Last February, I blogged how to use Inlets which allows you to expose your on-prem kubernetes cluster to the big bad internet using an exit node which is a public VPS. It works as it claims but this may not be for everyone as you need to pay extra $/mo for the public VPS. Like anything in IT- there’s many ways to skin a cat. Now, i’ll be detailing another way to achieve this using CloudFlare Argo Tunnel which unlike inlets, would not need a public VPS. Caveat Emptor: since we would be routing our traffic out to CloudFlare – you will lose control of security and data once it reaches cloudflare. If you prefer to have full control of data end-to-end, Inlets will be a better approach. Having said that, let’s get into it.
Disclaimer: I’m not affiliated with CloudFlare and Inlets. All information here are based on personal experience using the solutions.
Introduction to CloudFlare Argo Tunnel: https://blog.cloudflare.com/tunnel-for-everyone/
Last April 2021, CloudFlare announce Argo Tunnel will be free for everyone. This provided a low cost ramp-up to expose your on-premise kubernetes. There’s no guide in the internets to do this so i’ve decided to document it for everyone.
Overview of the Architecture
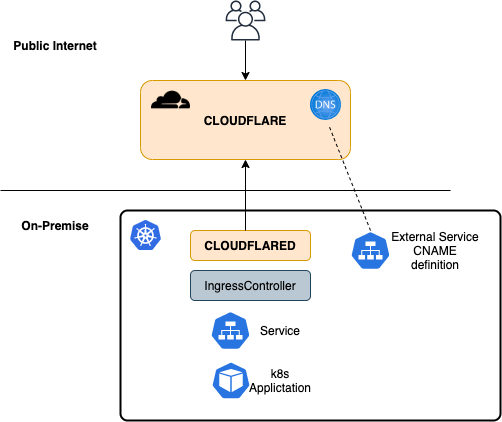
Requirement
- Domain Name that is controlled by CloudFlare
- Kubernetes Cluster in your On-Premise (i’m using Tanzu Kubernetes Grid :))
Argo Tunnel Creation
Follow the steps on this link: https://developers.cloudflare.com/cloudflare-one/connections/connect-apps. You only need to do:
- Setup.
- Use any linux/ mac machine by installing cloudflared installer
- Create Tunnel
- We need to manually create a tunnel cloudflared executable.
After creating tunnel, you’ll have the following files generated in .cloudflared directory:
- cert.pem
- tunnel-ID.json
- We will be needing the JSON file for the kubernetes setup
Setup your On-Premise Kubernetes Cluster
Full manifest here: https://github.com/dmnt3d/k8s-cloudflared/blob/main/cloudflared.yaml
Items to edit are the following:
- Copy the contents of the JSON file to credential-file configmap
apiVersion: v1
data:
  cred.json: |-
    {
      "AccountTag": # SUPPLY from *.json file in ~/.cloudflared/,
      "TunnelSecret": # SUPPLY from *.json file in ~/.cloudflared/,
      "TunnelID":# SUPPLY from *.json file in ~/.cloudflared/ ,
      "TunnelName": # SUPPLY from *.json file in ~/.cloudflared/
    }
kind: ConfigMap
metadata:
  name: credential-file
  namespace: cloudflared
- Edit the config-file depending on the Ingress-Controller that will handle all request
- Below, I use traefik to handle all the request. (Traefik service running in Traefik namespace) The config is setup to use a catch*all to allow us to route all traffic for all the CNAME records we will create later.
- You can also create specific Hostname/ Service in case you need to create specific service mapping.
apiVersion: v1
data:
  default.yaml: |-
    tunnel: <INSERT TUNNEL ID>
    credentials-file: /etc/cloudflared/cred.json
    ingress:
#    - hostname: # ADD specific hostname if needed
#      service: #
# use catch-all service
    - service: http://traefik.traefik
kind: ConfigMap
metadata:
  name: config-file
  namespace: cloudflared
- Prometheus port is exposed at port 9090
      annotations:
        prometheus.io/path: /metrics
        prometheus.io/port: "9090"
        prometheus.io/scrape: "true"
      labels:
        app: cloudflared
    spec:
      containers:
      - args:
        - tunnel
        - --config
        - /etc/cloudflared/default.yaml
        - --metrics
        - 0.0.0.0:9090
Dynamically Create CNAME for the Argo Tunnel
The following items details steps on how to create DNS records to our ArgoTunnel to create routing back to our on-prem resource.
Requirement:
- External-DNS configured for cloudflare
- Steps is documented on the following page: https://github.com/kubernetes-sigs/external-dns/blob/master/docs/tutorials/cloudflare.md
ArgoTunnel relies on CNAME record to your tunnel ID to be able to route the traffic. Once external DNS is setup in your kubernetes cluster, this can easily setup as a k8s resource using the following manifest:
kind: Service
apiVersion: v1
metadata:
  name: cname-test
  annotations:
    external-dns.alpha.kubernetes.io/hostname: # CLOUDFLARE PUBLIC DOMAIN
    external-dns.alpha.kubernetes.io/ttl: "120" # optional
spec:
  type: ExternalName
  externalName: #TUNNEL ID.cfargotunnel.com
Putting it all together
Now once we have everything setup, the way to expose a web application in the internet would require the following:
- Deploy your application to your kubernetes cluster.
- Make sure it has a service (duh). ClusterIP is enough
- Create an Ingress to expose it behind your IngressController
- In my example above, i’m using Traefik as an ingresscontroller with an IngressRoute CRD
- Make sure the IngressRoute/ FQDN/ Public Domain should be the same as the public record cloudflare will be hosting
- Create another Service to create a CNAME to create the public CNAME record for the service
After that -your service should now be accessible from outside 🙂
Hope that helps.