NOTE: This post is based on Tanzu Kubernetes Grid. If you are using other kubernetes release, installing/using AVI Kubernetes Operator manually should work.
With the release of Tanzu Kubernetes Grid ( tkg 1.3), Avi Kubernetes Operator can be pre-configured as part of kubernetes cluster creation. This helps streamline setting up Type:LoadBalancer especially for on-prem kubernetes install. This is HUGE as it removes the complexities normally attributed in exposing your kubernetes services from the outside. Normally, for on-prem install, the easiest option is to use metallb which works but is not recommended for production. Now, with AVI, we get to have production-grade load-balancer for on-premise which natively integrates with kubernetes!
With this post, i’ll try to list high-level steps on how to setup AVI with TKG 1.3.
For AVI, it will be utilizing Essentials license which has features enough to provide LoadBalancer for kubernetes. To compare AVI edition features, refer to this link: https://avinetworks.com/docs/20.1/nsx-license-editions/ | https://avi.ldc.int/src/assets/docs/license-tiers-comparison.pdf
Preparing AVI Manager
- Deploy OVA, go through the usual initial configuration. I won’t go over this step as its straightforward
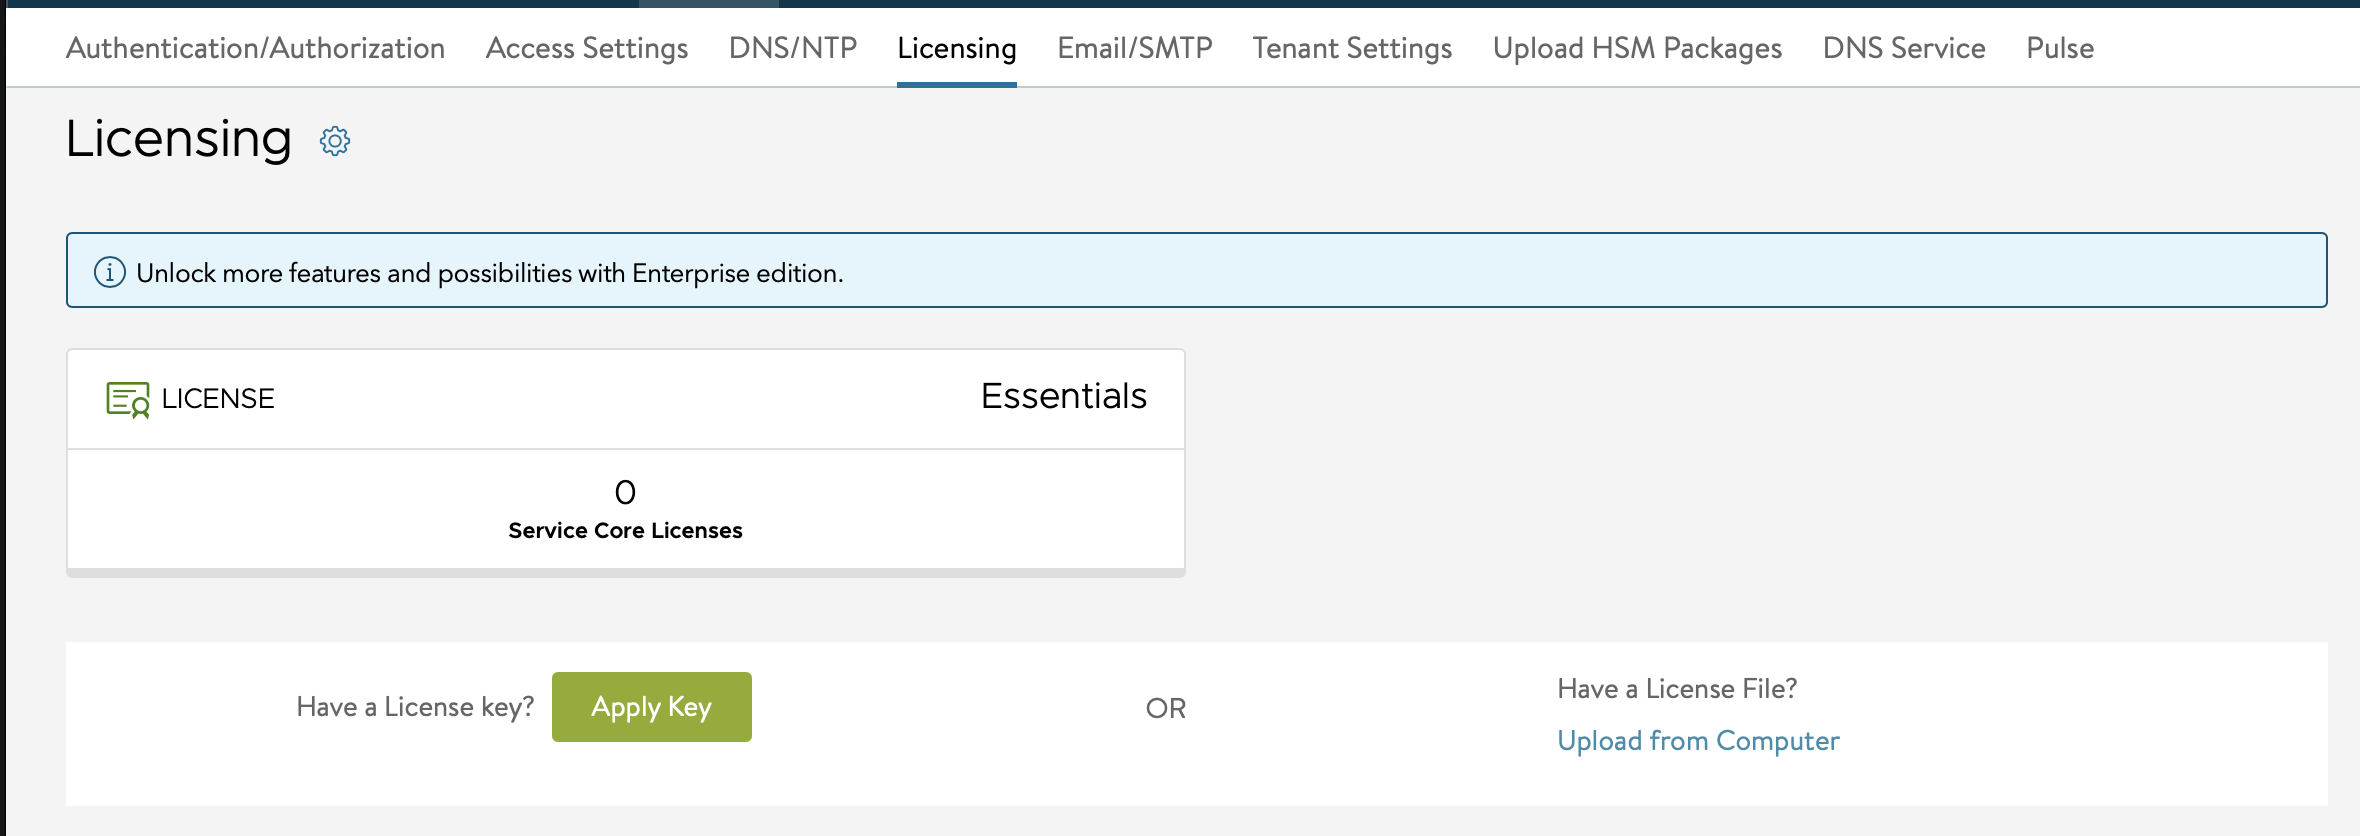
- Once Avi Manager is up, switch the license to Essentials. By default, it installs an enterprise trial license which we don’t need for this setup.
- Go to Administration -> Settings -> Licensing. Click the COG and change to Essentials
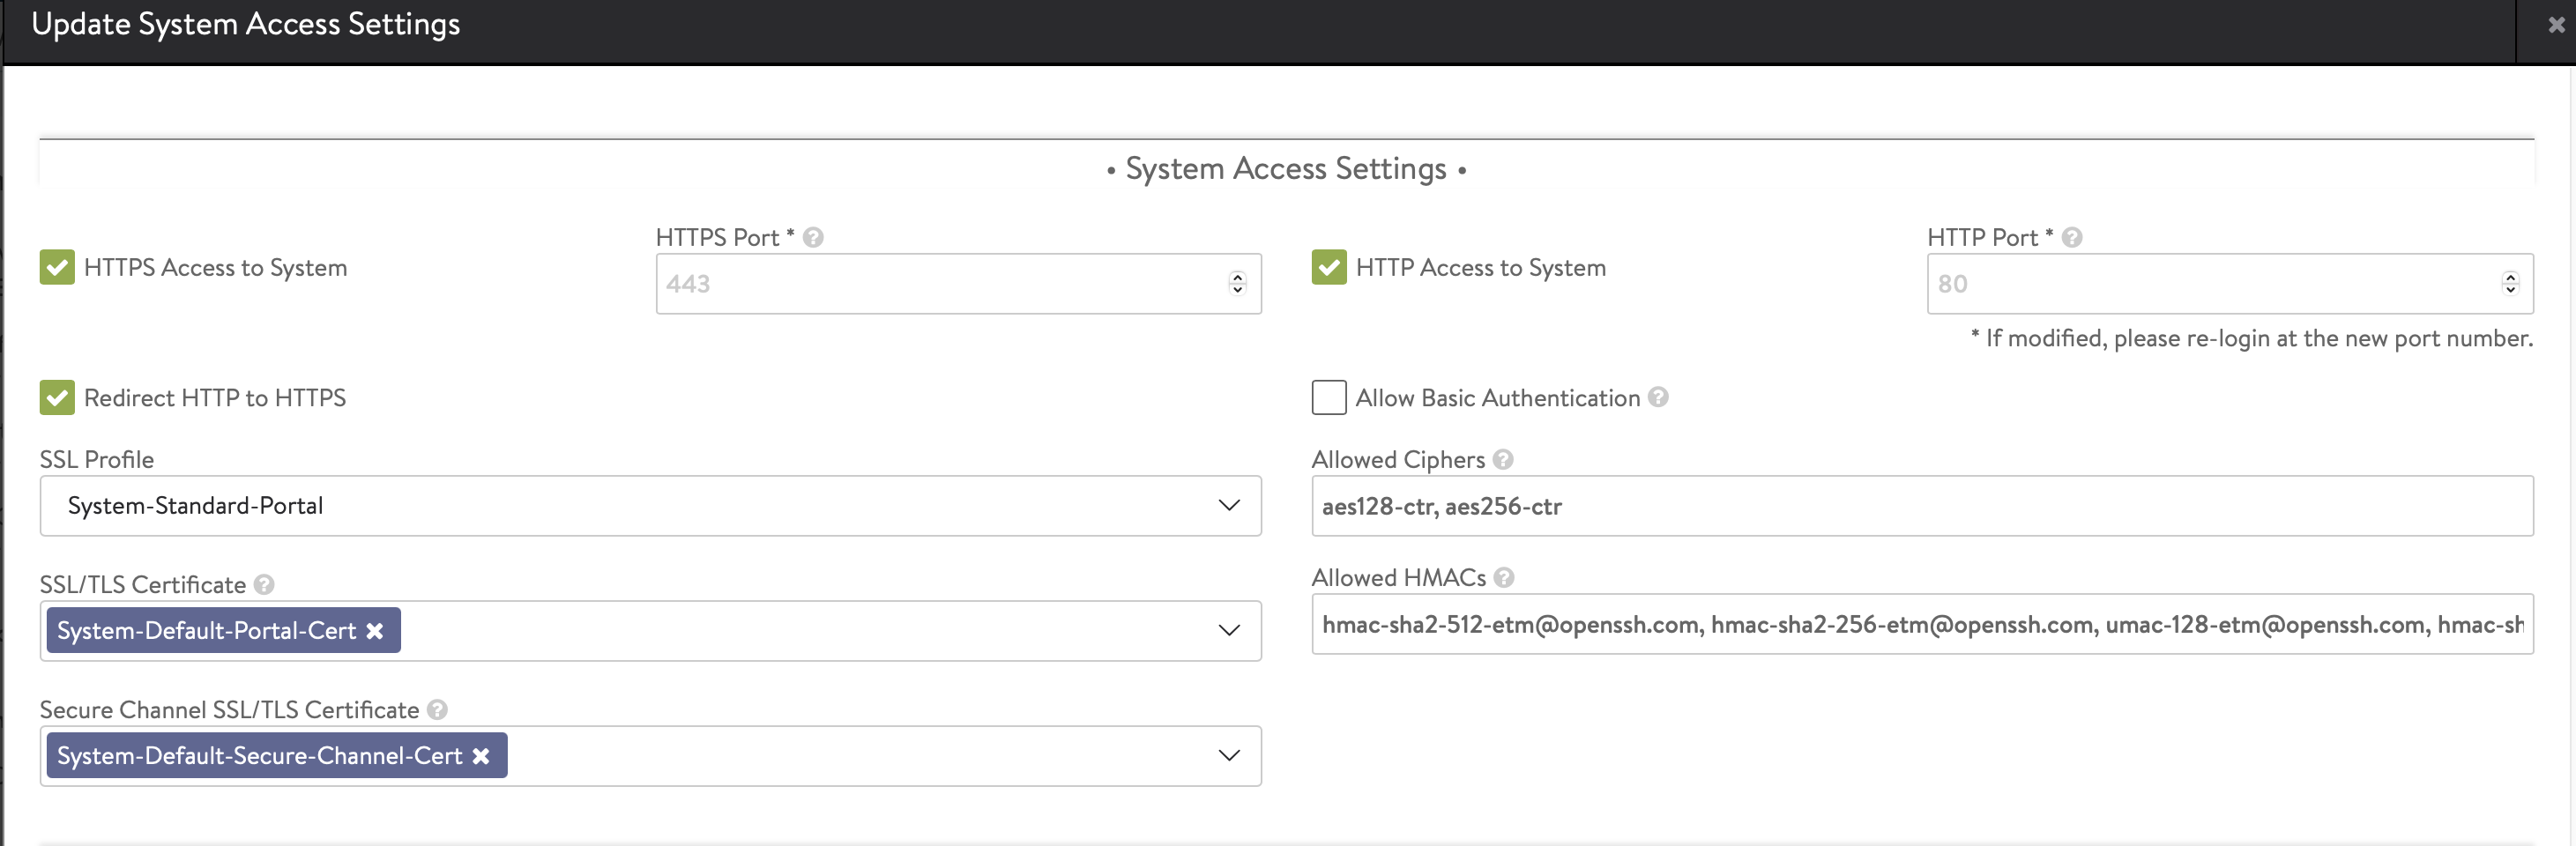
- Setup AVI portal certificate
- Go to Administration -> Settings -> Access Settings. Make sure theres only ONE certificate in SSL/TLS Certificate portion. This will be used by AKO to connect to AVI portal.
- Take note of the certificate
- Go to Templates -> Security -> SSL/TLS Certificate. Copy the certificate you specified in the previous step. (CLICK the DOWNLOAD/ arrow button in the table). This will be needed during the TKG setup.
- Keep this for later usage.

- Setup vSphere Cloud
- Go to Infrastructure -> Cloud -> Create. Select VMware vCenter/ ESX
- Next steps are straight forward.
- Just take note of the following:
- Keep everything by default
- Select the default IPAM in the drop down. IMPORTANT
- In the Step 4: Network, select the dvPortGroup where the Management will be placed. For my setup, I chose a normal VLAN and it’s running DHCP so I selected DHCP enabled network.

- Setup the Network where LoadBalancer VIP will be placed
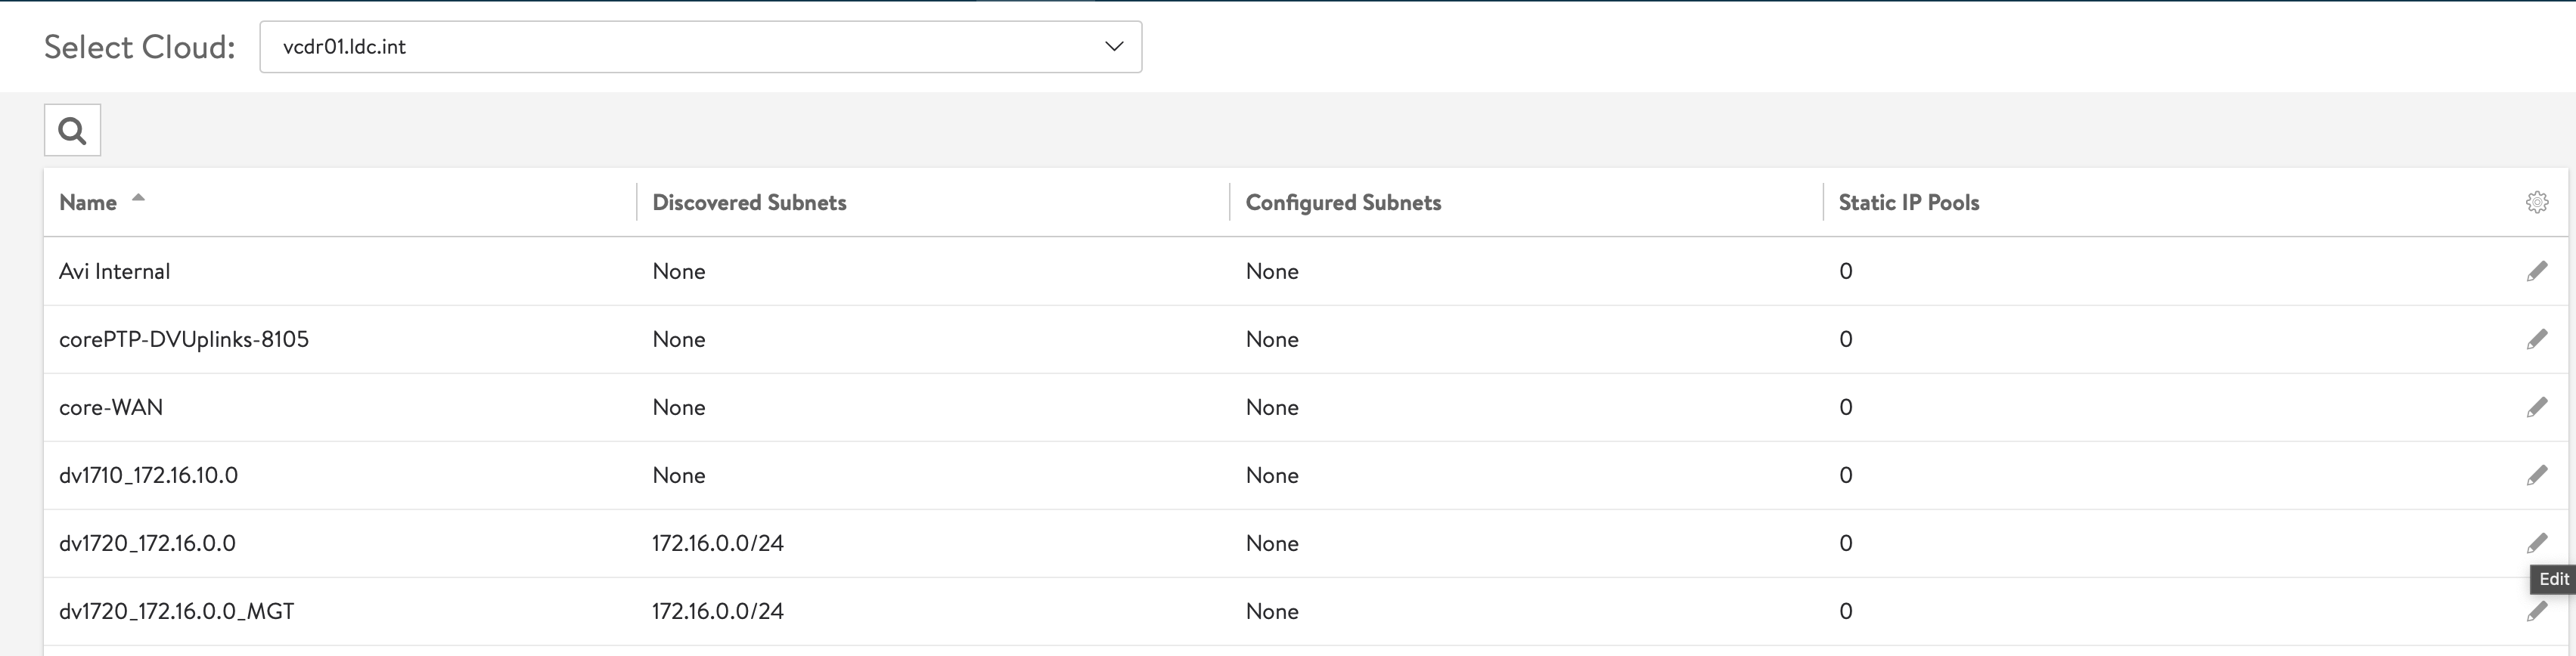
- Go to Infrastructure -> Networks. In the Drop-Down, select the vCenter cloud created previously.
- You’ll get a list of dvPortGroups. Select the one where you’ll place the VIP and Click Edit
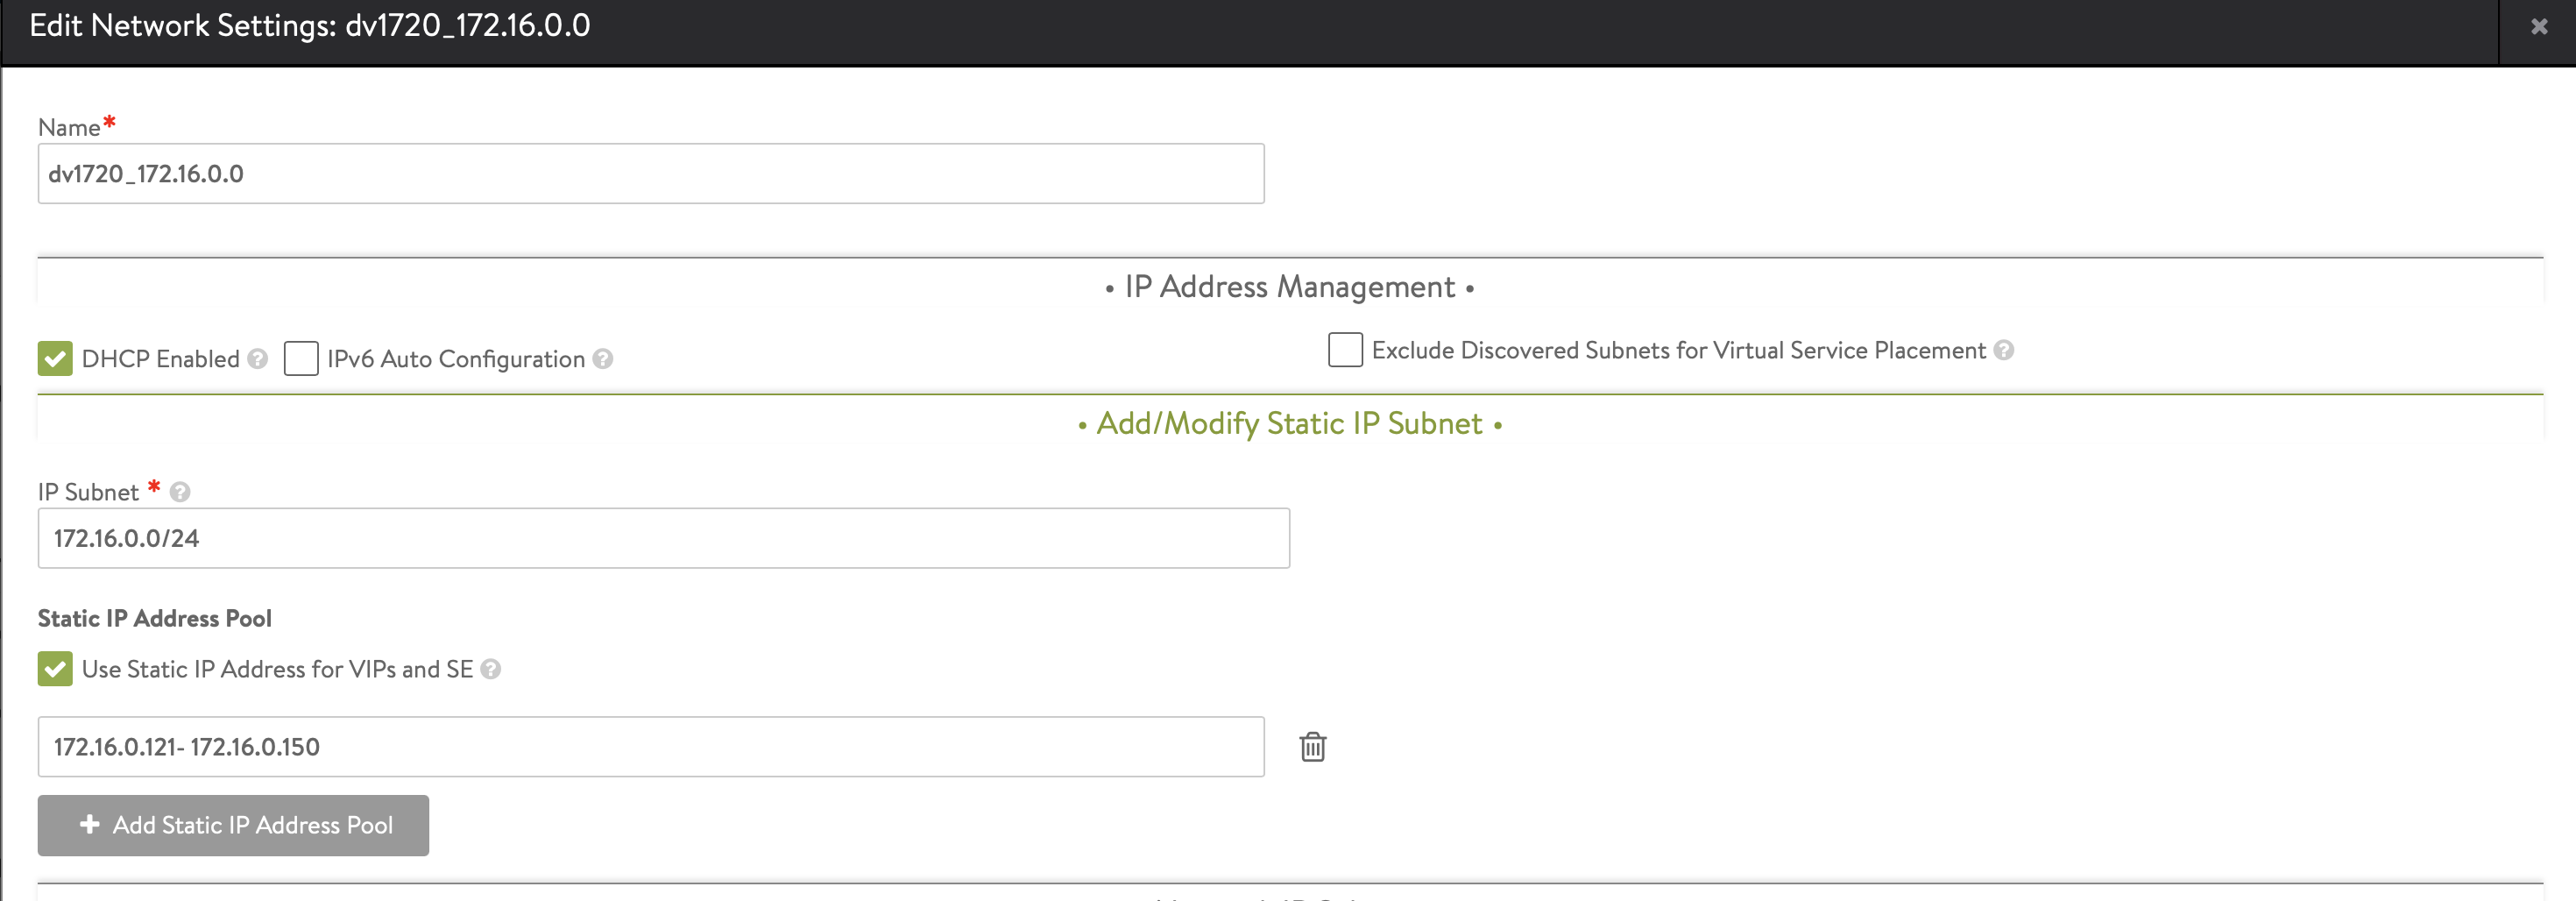
- In the Edit Page:
- Click Add Subnet
- Supply the IP/Subnet for the network in CIDR format
- Add Static IP Address Pool
- This where IP address for Type:LoaBalancer will be picked
- For my setup, I used the same Network for both Management and VIP setup.
- Management will be allocated using DHCP
- VIP address pool is explicitly specified outside of the DHCP range
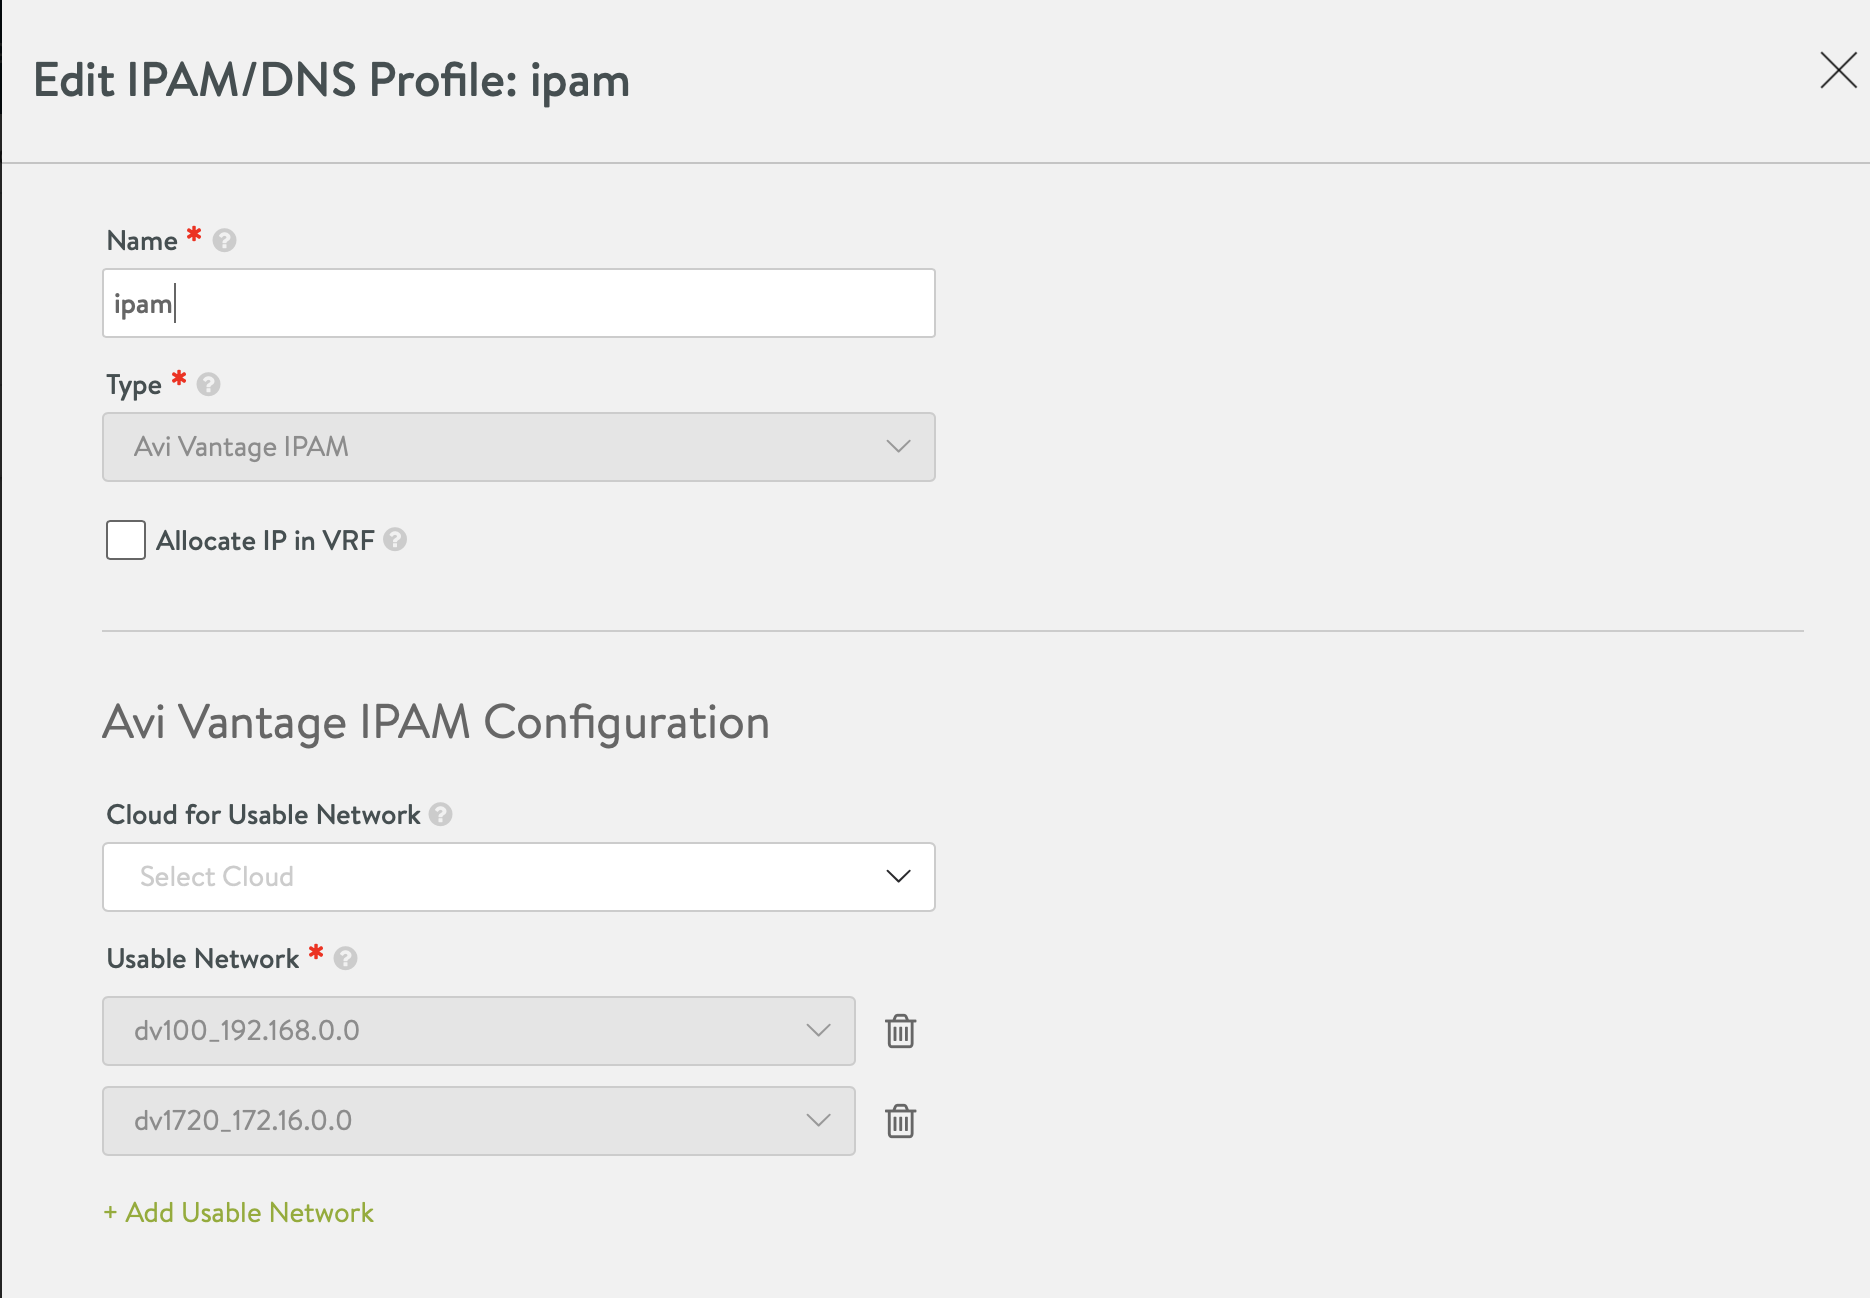
Setup IPAM
Once you have everything configured, you need to tell AVI to “keep track” of the IP addresses it will be issuing to the different type:LoadBalancer. To do this:
- In AVI Manager, go to Templates -> Profiles -> IPAM/DNS Profile
- Edit the default IPAM and add the same dvPortGroup you selected in the previous step.
- NOTE: Make sure the same IPAM Profile is configured on the cloud (the part where you connect the vCenter) you’ll be using.
Setting up routes from Service Engine to AKO
In my setup, I’ve deployed the VIP and k8s node network on two separate subnet. You need to explicitly define in AVI how to reach the k8s node network. This is done by doing the following:
- Go to Infrastructure -> Routing, add a new Static Route
- In my setup I had the following:
- VIP is at : 172.16.0.0/24
- K8s Node is at: 172.16.10.0/24
- Hence, the static route is: 172.16.10.0/24 via 172.16.0.1 which translates to “go to this IP if you want to reach that k8s network”
- In my setup I had the following:

Installing TKG 1.3
I’ve covered this part in detail before , the only change for TKG 1.3 installation are the following:
- tkg cli is no more. It’s replaced using tanzu command. To initiate UI install, issue the following command:
tanzu management-cluster create --ui
- In the wizard, theres a new NSX Advanced Load Balancer section, fill-out the following based on the previous steps:
- Controller Host: AVI controller manager
- Cloud Name : cloud name you previously setup
- Service Engine Group: Service Engine group where
- VIP Network Name: dvPortGroup Name with which you setup the static IP pool in the previous step
- VIP Network CIDR: specify the CIDR for this network
- Controller Certificate Authority: specify the certificate the portal is using. This was done in the previous step.
- NOTE: Keep cluster label empty unless you want to enable “Load Balancing” for specific workload cluster only. This is done by specifying this portion to have a key-value pair and having the same key-pair when you create the workload cluster.

- There’s a new portion to setup OIDC/ Authentication – we skip this for now on this post.
- After the configuration, make sure to create a COPY of the resulting configuration file. We will be using this as a basis to create workload cluster later.

Install TKG Workload Cluster
Once TKG Management cluster is created, it’s time to create the TKG workload cluster. This is done using the same configuration file that was used to create the management cluster with the following changes in the file:
# specify the cluster name for the new kubernetes cluster
CLUSTER_NAME: tkg-prod-pvt
# specify the FQDN/ IP that will be used by the control plane. This is also how kubectl will reach this cluster
VSPHERE_CONTROL_PLANE_ENDPOINT: tkg-prod-pvt.ldc.int

# customize the config depending on the need. For this case, i opted to increase the memory and number of worker nodes.
VSPHERE_WORKER_MEM_MIB: "8192"
WORKER_MACHINE_COUNT: 3
Initiate install using the following command
tanzu cluster create <CLUSTER NAME> --file FILENAME.yaml
After installation, you can get the kubeconfig to connect to the workload cluster by doing the following:
# if you have multiple tkg management cluster, issue the following:
# tanzu login
tanzu cluster kubeconfig get <CLUSTER NAME> --admin --export-file <FILENAME to export to>
Verify Avi Kubernetes Operator
Issue the following:
kubectl get po -n avi-system

This is expected as it’s looking for avi-secret to be able to login Avi Manager.
UPDATE 1: This is not expected. My environment was not properly configured (it cannot lookup the Avi Manager due to DNS issue) hence the error. Normally, avi-secret should be loaded automatically.
UPDATE 2: I got confirmation that it may be due to unsupported AVI i was using. TKG 1.3 is supported for AVI 20.1.3. I was using 20.1.4 on this post.
UPDATE 3-FINAL: This is because of invalid self-signed certificate in AVI. One way to have it correctly create the secret during Cluster creation is to make sure the Hostname is both in the CN and SAN of the AVI Manager certificate. Basically, after install of AVI, change the default certificate to include the HOSTNAME on both SAN and CN part. Instruction here: https://avinetworks.com/docs/latest/how-to-change-the-default-portal-certificate/#:~:text=Once%20the%20certificate%20is%20successfully,Click%20Save.
For my issue – to resolve it, create the appropriate secret object.
kubectl create secret generic avi-secret --from-literal=username=admin --from-literal=password=<AVI Manager password> -n avi-system
After which, the pod should now be running.

Testing the type:LoadBalancer
Here’s a sample application that uses type:LoadBalancer, submit it against the workload cluster.
apiVersion: v1
kind: Service
metadata:
  name: lb-svc
spec:
  selector:
    app: lb-svc
  ports:
    - protocol: TCP
      port: 80
      targetPort: 80
  type: LoadBalancer
---
apiVersion: apps/v1
kind: Deployment
metadata:
  name: lb-svc
spec:
  replicas: 2
  selector:
    matchLabels:
      app: lb-svc
  template:
    metadata:
      labels:
        app: lb-svc
    spec:
      serviceAccountName: default
      containers:
        - name: nginx
          image: gcr.io/kubernetes-development-244305/nginx:latest
After submitting, you’ll notice Service Engine appliances will automatically be deployed to the vCenter. The configuration is based on the SE Default Group configuration for that cloud which is by default – will deploy 2 x SE in Active/Standby mode.

After a couple of minutes, IP for the LoadBalancer should be visible.

The beauty of using AVI, is the full metrics and monitoring out-of-the box.

That’s it. Enjoy and hope that helps 🙂


Pingback: Use AVI LB with Tanzu Kubernetes Grid 1.3
This is a fantastic post. The part about the Avi secret, we had the exact same problem. How do you know this is a DNS resolving issue?
We worked around the issue in the exact way you prescribed.
I got confirmation on the issue on this one.
It’s because the self-signed certificate of the AVI Manager is not properly format.
The hostname/FQDN of the AVI Manager should be both in the CN and SAN portion of the certificate.
YES!! WE had this exact issue today.
Are we sure that this is DNS tho? I don’t see how re-creating the secret would solve a DNS resolution problem.
In my case, I suspected that it was just a misconfigured Avi password…. unless somehow re-creating the secret changes how AKO is trying to reach your Avi controller.
I got confirmation on the issue on this one.
It’s because the self-signed certificate of the AVI Manager is not properly format.
The hostname/FQDN of the AVI Manager should be both in the CN and SAN portion of the certificate.
Промокод при регистрации в Mostbet сегодня. Этой акцией может воспользоваться каждый новый клиент при регистрации на сайте букмекера. Это ваше преимущество со старта, и у Mostbet есть эксклюзивное предложение. промокод годовщины. В форме регистрации есть всего одно необязательное поле — как раз для ввода промокода. Как получить промокод на бесплатную ставку. Магазин находится во вкладке xBonus (в перечне вкладок верхнего блока). Вам предложат несколько вариантов для обмена баллов на промокоды Mostbet kz. Код можно получить для ставки ординар, для ставки экспресс, а также для лотерей от «Мостбет». На сегодня промокод Mostbet бесплатно найти можно без особых затрат энергии, при этом сделать это следующим образом: Путем поиска в сети интернет; На сайтах, специализирующихся на спортивных ставках (Не ресурсы БК); В официальных сообществах Мостбет (соцсети). Представители БК часто выкладывают в группах или же просто в сети промокоды на Mostbet бесплатно в честь какого-то праздника либо же грядущего крупного спортивного турнира. Все промокоды Mostbet 2025. На официальном сайте букмекера в соответствующей рубрике находится полный перечень промокодов Mostbet 2025, бесплатно получить которые можно обменяв на них бонусные баллы.
https://shorturl.fm/1MBse
Thank you for this interesting article! Very useful information.
Verification: VRF964FA2DF
https://shorturl.fm/vq10M
https://shorturl.fm/Pmcod
Официальный сайт букмекерской компании > http://www.autotat.ru/
https://shorturl.fm/l3mJb
https://shorturl.fm/b1nHt
Find the new look here > https://www.apelsin.su/
https://shorturl.fm/3XONh
https://shorturl.fm/mOV3X
https://shorturl.fm/Asdt3
https://shorturl.fm/5mSA1
rh19xy
Hello friends!
I came across a 146 valuable page that I think you should visit.
This resource is packed with a lot of useful information that you might find insightful.
It has everything you could possibly need, so be sure to give it a visit!
https://mynewsweb.net/basics-to-consider-for-a-perfect-cv/
Furthermore don’t overlook, everyone, that a person always are able to in the publication locate solutions to address the most the absolute confusing questions. Our team attempted — lay out all data via an most understandable manner.
https://shorturl.fm/nf4Z0
https://shorturl.fm/t7Sbk
https://shorturl.fm/6SklY
https://shorturl.fm/n8IFK
https://shorturl.fm/N8e8W
Nhờ giao diện hiện đại, bảo mật cao, cùng chiến lược toàn cầu hóa thông minh, 66b online không chỉ nổi bật mà còn trở thành biểu tượng mới của sự đẳng cấp và an toàn trong ngành cá cược trực tuyến.
https://shorturl.fm/O54i5
Hello !!
I came across a 147 great website that I think you should visit.
This platform is packed with a lot of useful information that you might find valuable.
It has everything you could possibly need, so be sure to give it a visit!
https://ieltsbands.com/big-data-science-changes-education/
And don’t neglect, guys, which a person at all times can within the article locate solutions to address the most the absolute complicated questions. We tried to explain all of the information using the very understandable method.
https://shorturl.fm/cVF5h
https://shorturl.fm/Y9SSH
Thank you for this interesting article! Very useful information.
Verification: VRF23635CBD
https://shorturl.fm/k7fpF
dbcwoe
https://shorturl.fm/d22XS
https://shorturl.fm/JzgIz
https://shorturl.fm/IC8KC
Activate the promo code today and receive free spins. Any client can activate the code with minimal deposit and immediately enjoy. You can find daily bonuses available today. Claim your bonus today to get special perks with mostbet promocode. mostbet promo code today mostbet bonus code
Great article! Thanks for sharing.
Ref: TEST-8274AA65
Great article! Thanks for sharing.
Ref: TEST-9AB20068
https://shorturl.fm/0t9Nk
Код на бонусы Мостбет позволяет забирать дополнительные привилегии. https://loginnet.ru/pages/promokod_mostbet_pri_registracii_na_segodnya.html Мостбет Промокод Без Депозита
Промокод 1xbet для TJ ориентирован на игроков из Таджикистана и часто дает особые предложения для региона. Для активации, смотрите локальную версию сайта и вводите код при регистрации или в личном кабинете. Этот комментарий при продвижении и локальной рекламе. http://vavto.su/img/pages/?promokod_567.html
Рабочий промокод Melbet активирует свежие бонусы включая депозитные бонусы, бесплатные ставки, фриспины и участие в специальных акциях. Игроки используют такие коды регулярно, поскольку платформа часто обновляет условия. Важно вводить код правильно, чтобы система его приняла. https://grktmn.ru/includes/pages/melbet_promokod_pri_registracii_na_segodnya_2.html
Введите свежий 1xslots промокод, чтобы получить дополнительные возможности в игре 1xslots промокод 1xslots промокод
Im Lesetext erfahre ich, dass Tape Art nicht nur Aufmerksamkeit erzeugt, sondern auch die Conversion‑Rate um bis zu zehn Prozent steigern kann, wenn das Design gezielt auf die Markenfarben abgestimmt wird. Die vorgestellten Fallstudien aus verschiedenen Branchen sind sehr inspirierend. Schau dir das mal an: https://pphr9sc56f4j4s.notepin.co/tape-art-im-unternehmensmarketing–berblicktape-art-im-unternehmensmarketing-steigern-sie-markenrecall-um-30–lftmzwwb E936CB
Hey Leute, ich bin gerade über den Beitrag bei Selfmade Crew gestolpert und muss sagen, er liefert klare Tipps, wie man seine Produktivität im Home‑Office steigert. Besonders die Praxisbeispiele haben mir geholfen, sofort etwas umzusetzen. Schaut euch das unbedingt an: https://shrib.com/?v=md#promo-u5sugbfy 999242
Hey, ich bin gerade auf einen interessanten Beitrag gestoßen, der erklärt, wie man seine Produktivität im Home‑Office steigert. Besonders die Methode mit kurzen Fokus‑Intervallen hat mir geholfen, Ablenkungen zu reduzieren. Wer mehr darüber wissen will, sollte unbedingt den Artikel lesen (https://ideone.com/sO8b8N). 51191D
https://shorturl.fm/7irjb
Im PDF werden mehrere Gründerinterviews präsentiert, die zeigen, wie man Hindernisse überwindet. Besonders die Geschichte von Anna K. inspirierte mich, meine Angst vor dem ersten Kundenkontakt zu verlieren. Diese Praxisbeispiele geben echten Mut – hier geht’s zum Dokument: https://files.catbox.moe/nwmziq.pdf und zeigen klare Handlungsoptionen.
Если вы устали от постоянных просадок, статья на proFXportal.com раскрывает простую систему управления капиталом, позволяющую сохранять спокойствие даже в волатильные периоды. Автор показывает, как рассчитывать размер позиции в зависимости от риска. Смотрите здесь https://controlc.com/3c1c8ae9 – советов достаточно, чтобы сразу увидеть результат. 53CD3F
Im Text wird gezeigt, wie man mit wenigen Metern Tape ein komplettes Corporate‑Design auf einer Messefläche realisieren kann. Die Schritt‑für‑Schritt‑Anleitung spart nicht nur Zeit, sondern reduziert auch die Kosten für teure Messestände um bis zu 30 %. Besonders hilfreich ist die Materialliste, die sofort umsetzbar ist. Für alle, die schnell und günstig Eindruck machen wollen, ein klarer Gewinn (https://telegra.ph/Tape-Art-Auftragsk%C3%BCnstler-f%C3%BCr-innovative-Unternehmensdesigns-und-Events–obzor-12-10). 2BCC35
Im aktuellen SelfmadeCrew‑Artikel wird ein einfacher SEO‑Check vorgestellt, der bereits kleine Webseiten nach vorne bringt. Die Anleitung erklärt, wie du Meta‑Tags, Überschriften und interne Verlinkungen optimierst, ohne ein Experte zu sein. Meine Besucherzahlen stiegen nach der Umsetzung um 20 %. Probier es aus: https://termbin.com/x5mo A1533B
Статья на proFXportal.com раскрывает ключевые ошибки новичков, такие как отсутствие стоп‑лосса и переоценка риска. После прочтения понял, как правильно ставить защитные ордера, что сразу сократило количество убыточных сделок. Ссылка https://shrib.com/?v=md#promo-v3dbnkgh ведёт прямо к материалу, где всё объяснено доступно. Теперь я увереннее подхожу к каждой сделке, учитывая реальные уровни риска. 50615A
Статья proFXportal.com раскрывает, как подобрать оптимальный таймфрейм в зависимости от стиля торговли, будь то скальпинг или позиционная. Один из ключевых выводов – использовать 4‑часовой график для подтверждения тренда перед входом на 15‑минутный. Это значительно повышает точность сигналов. https://write.as/msr06tdak817g.md Автор также приводит примеры реальных сделок, где такой подход сократил количество ложных входов вдвое. 0F57C9
Der Selfmadecrew‑Artikel liefert ein klares Bild, wie man einen einfachen Verkaufstrichter aufbaut, beginnend mit einem kostenlosen Lead‑Magneten bis hin zum Upsell. Das Schema ist praktisch und lässt sich in jeder Nische anwenden, wodurch man mehr Leads in Kunden verwandeln kann. Sieh dir das hier an: https://shrib.com/?v=md#promo-ofohea23 D2E829
Статья на proFXportal.com помогает избежать типичных ошибок новичков, например, неверного расчёта лота. Автор привёл пример, как правильно использовать калькулятор риска, что спасло меня от потери 5 % капитала за одну сделку. Такое руководство стоит прочитать каждому, кто хочет торговать безопасно. (https://ideone.com/rWx1eR) 999FB4
Der Artikel gibt einen ungewöhnlichen Trick: jeden Tag drei zufällige Wörter notieren und daraus eine Mini‑Story bauen. Das hat meine Kreativität angekurbelt und half bei Brainstormings. Probier es aus, indem du https://termbin.com/pf55 liest – du wirst überrascht sein und neue Ideen finden. DA886A
Der Beitrag gibt einen klaren Fahrplan, wie man potenzielle Kunden gezielt anspricht, ohne aufdringlich zu sein. Besonders die Technik, personalisierte Nachrichten mit einem kurzen Nutzenversprechen zu senden, hat meine Rücklaufquote verdoppelt. Alle Details dazu gibt es hier: https://controlc.com/4895c80e. 5CB30F
В статье подробно описаны две новые стратегии, основанные на индикаторе MACD и уровней Фибоначчи. Автор показывает, как комбинировать их для получения более надёжных сигналов, а также приводит примеры реальных сделок с результатами. Это отличный способ расширить арсенал инструментов. Обязательно ознакомьтесь, если хотите разнообразить свои методы. (https://pad.riseup.net/p/promo-s984izlt) 2642F8
Der Beitrag zeigt, warum ein Wachstums‑Mindset entscheidend ist und gibt praktische Übungen, um negative Glaubenssätze zu überwinden. Nachdem ich die täglichen Reflexionsfragen angewendet habe, fühle ich mich motivierter und sehe klarere Fortschritte in meinen Projekten. Das solltest du dir nicht entgehen lassen: https://paste2.org/0kMmOAvZ
Если ищете простой план действий, статья на proFXportal.com будет кстати. В ней собраны шаги от открытия счёта до первой сделки, а также список проверенных брокеров. Особенно ценным оказался раздел о выборе подходящего таймфрейма, который помогает сократить количество ложных сигналов. https://rentry.co/shf6pby8 8C620F
Im Beitrag wird gezeigt, wie Tape‑Art als visuelles Storytelling‑Tool eingesetzt werden kann. Ein Beispiel erklärt, wie man Unternehmenswerte in farbige Muster übersetzt, die dann bei Events als Wandgestaltung dienen. Das Ergebnis ist ein einprägsames, wiedererkennbares Bild, das Besucher begeistert. https://telegra.ph/Tape-Art-Auftragsk%C3%BCnstler-f%C3%BCr-innovative-Unternehmensdesigns-und-Events–obzor-12-10-3
В статье собран список бесплатных сервисов для анализа рынка, от экономических календарей до скринеров сигналов. Их интеграция в рабочий процесс позволяет быстро находить выгодные возможности и экономить время на ручной проверке данных. Попробуйте, и вы заметите улучшение эффективности. Каждый ресурс снабжен инструкциями по настройке, что упрощает старт даже без технического опыта. https://privatebin.net/?57c88f343be1287c#DpUkAQLXBkUHTSRcSG8DGbYkYRmLXZ4PoyKhXHKyYtMY 328601
Im Artikel werden drei konkrete Strategien für einen starken LinkedIn‑Auftritt erklärt, darunter das Optimieren des Profils, das gezielte Teilen von Fachartikeln und das aktive Kommentieren in relevanten Gruppen. Diese Maßnahmen haben meine Sichtbarkeit innerhalb eines Monats um 40 % erhöht. Sehr empfehlenswert für alle, die ihr Netzwerk ausbauen wollen. https://paste.rs/Acms6 7E7B08
Прочитал материал на proFXportal.com и понял, как важно вести журнал сделок. В статье подробно описаны шаги по систематическому анализу результатов, что помогает выявлять слабые места и повышать эффективность. Если хотите повысить точность прогнозов, стоит обратить внимание. Также автор делится рекомендациями по выбору таймфрейма, что упрощает процесс принятия решений. https://rentry.co/c9gpdmna
Der Text zeigt, wie man systematisch Kundenfeedback sammelt und in Produktverbesserungen umsetzt. Besonders das vorgestellte 3‑Stufen‑Modell (Sammeln, Analysieren, Handeln) hat mir geholfen, meine Servicequalität zu steigern. Wer seine Angebote kontinuierlich verbessern will, sollte das lesen: https://controlc.com/e1e7f48e. Damit bleibt die Kundenzufriedenheit langfristig hoch. E8EB14
Статья proFXportal.com раскрывает, как правильно сравнивать спреды разных брокеров и выбирать оптимальный вариант для конкретной стратегии. Благодаря этим рекомендациям я смог снизить издержки на 15 %, что сразу отразилось на чистой прибыли. Полный разбор доступен по ссылке https://pad.riseup.net/p/promo-nw1ydd3e – советую каждому. AE76F1
Das Dokument auf Selfmadecrew liefert ein überraschend simples System, um Meetings effizienter zu planen – die 15‑Minuten‑Regel und für jedes Team. Seit ich das anwende, sind meine Besprechungen kürzer und produktiver. Wer seine Zeit besser nutzen will, sollte das prüfen: https://files.catbox.moe/rla2wa.pdf A61698
Selfmadecrew hat einen spannenden Beitrag veröffentlicht, der die Brainstorm‑Methode „6‑3‑5“ erklärt. Mit dieser Technik entstehen in kurzer Zeit 108 Ideen, die sofort weiterentwickelt werden können. Ich habe sie im Team ausprobiert und wir haben ein neues Produktkonzept gefunden. Mehr dazu hier: https://justpaste.it/fwy28 6E20E9
Рекомендую к прочтению статью на proFXportal.com – в ней подробно разбираются стратегии управления рисками в форекс. Вы получите практический чек‑лист, который поможет снизить потери и повысить эффективность сделок. Автор также делится примерами реальных торговых ситуаций, показывая, как применять инструменты защиты капитала в реальном времени. Подробнее по ссылке (https://pphr9sc56f4j4s.notepin.co/hello————uwwyamnd).
PowerInsights reveals a handful of shortcut keys and browser settings that cut the CRS login time in half. The tip about saving your credentials securely was a game‑changer for me, letting me jump straight to the dashboard. No more endless password resets. (https://telegra.ph/JoinCRS-Online-Services-Guide-Simple-Steps-for-Easy-Access-12-11)
В статье proFXportal.com нашёл полезный раздел о психологических ловушках, в которые часто попадают трейдеры. Описаны способы контроля эмоций и построения дисциплины, что помогает избежать импульсивных сделок. Особенно ценно обсуждение «страха упустить прибыль». Если хотите улучшить менталитет – читайте. (https://privatebin.net/?a77de2bb4b0be0e9#9QwuizV5GL1b6Cvg9B69egCy5QGNWSMUHS2TLHWcFWHv) Это стоит вашего времени. AA9350
В статье подробно разбирается, как эффективно использовать экономический календарь для планирования сделок. Показаны типы событий, которые действительно влияют на рынок, и способы фильтрации шума. Есть чек‑лист, который можно сразу внедрить в свою рутину. Ссылка на материал: (https://ideone.com/R4nVJC). После прочтения вы будете лучше подготавливать позиции к важным новостям. A01650
If you’re looking for a quick way to improve decision‑making, PowerInsights delivers exactly that. It breaks down complex metrics into three simple steps, and I applied the “priority matrix” tip to cut down my weekly meeting time by 20%. Give it a read: https://rentry.co/d6nki82k – you’ll see the difference. 6B97ED
Статья от Романа Зиф – отличный стартовый набор для новичков. В ней подробно описаны бесплатные индикаторы, которые позволяют быстро оценить рыночную динамику без сложных настроек. Особенно ценен совет по использованию скользящих средних для определения тренда. Попробуйте, будет легче понять графики. https://telegra.ph/Trejding-dlya-nachinayushchih-besplatnye-sovetniki-i-indikatory-ot-Romana-Zif–obzor-12-10 F664CC
After skimming through PowerInsights I discovered a shortcut for automating weekly reports using built‑in templates. The author shows exactly how to set up dynamic dashboards that refresh with one click, cutting my reporting time in half. It’s a game‑changer for busy analysts (https://paste.ofcode.org/rbX855wwvWQjYvC3R6dxuc).
В обзоре подробно описаны основные индикаторы, их настройки и когда их лучше применять. Я нашёл раздел о сочетании нескольких индикаторов особенно полезным – теперь мои сигналы стали более надёжными. Если хотите повысить точность входов, стоит прочитать эту статью. https://telegra.ph/Trejding-dlya-nachinayushchih-besplatnye-sovetniki-i-indikatory-ot-Romana-Zif–obzor-12-10-2
Just came across PowerInsights and was impressed by the practical checklist for improving workflow efficiency. It highlighted three small habits that boost productivity, like batching similar tasks and setting micro‑deadlines. Implementing them cut my turnaround time by 15% in a week. See the details here: https://write.as/h0gae3z10tkib.md.
Код на бесплатные бонусы без пополнения даёт возможность получить бонусы бесплатно. Играть можно сразу после активации. https://sportape.ru/art/mostbet_promokod_pri_registracii_1.html Промокод Mostbet И За Регистрацию
What I loved about PowerInsights is the visual roadmap section. It shows how to map milestones on a timeline, which helped my team align on deliverables and cut meeting time by 30%. The practical examples make it easy to adapt to any project size. Check the full guide here: https://shrib.com/?v=md#promo-2blmdjss. It’s a game‑changer for planning.
Статья о Seobomba.ru МАГАЗИН открыла мне глаза на новые возможности в контент‑маркетинге. Особенно запомнилась часть про автоматическое распределение статей по релевантным площадкам, что повышает охват без дополнительных усилий. Прочтите, если хотите увеличить трафик без лишних затрат. Это экономит время на ручную публикацию и улучшает SEO‑показатели сайта. https://rentry.co/dczwxykv 0D8FDB
What struck me about PowerInsights is the clear example of converting raw survey results into a concise executive summary. That approach helped my team present findings to senior leadership without overwhelming them. The guide walks you through each step, and you can see the method in action at https://files.catbox.moe/ma3emj.pdf.
Специальный 1xbet промокод Tj доступен для регион TJ и часто дает особые предложения для региона. Чтобы его получить, проверяйте локальные страницы и вписывайте в поле промокода. Текст можно использовать при продвижении и локальной рекламе. https://happy-gift.ru/includes/pages/?1hbet_promokod_pri_registracii_bonus_do_32500_rubley.html
Читая proFXportal.com, я нашёл простой метод расчёта размера позиции в зависимости от риска. Особенно полезным оказался пример с 2% от депозита, который легко адаптировать под любой счёт. Применив эту схему, я уменьшил просадку. Подробнее – https://ideone.com/ и стал увереннее в планировании. CE168B
I was impressed by how the guide breaks down the process into bite‑size actions, which let me finish the whole setup without pausing. One tip that stood out was clearing cache before starting, which prevented a login loop on my browser. Give it a look: https://pphr9sc56f4j4s.notepin.co/joincrs-user-guide-easy-steps-for-seamless-online-accessjoincrs-user-guide-easy-steps-for-seamless-online-access-fclrcloz. You’ll get online faster. 2A55D3
Рабочий код на Melbet открывает расширенные возможности для ставок и казино. Комбинация активирует фриспины и позволяет игроку начать или продолжить игру более выгодно. Melbet часто меняет условия акций, поэтому важно использовать актуальную версию. https://badgerboats.ru/themes/middle/?promokod_pri_registracii_melbet_pouchi_bonus_130.html
What I liked most about PowerInsights is the simple 15‑minute planning routine. It teaches you to map out your top three priorities each morning, which has slashed my email overload by nearly 30%. The article walks you through setting realistic buffers, too. Check it out here: https://termbin.com/oqx8
Автор делится тем, как правильно совмещать фундаментальный и технический анализ, чтобы повысить вероятность прибыльных сделок. Приведены реальные примеры и пошаговые инструкции. Ознакомьтесь здесь: https://pad.riseup.net/p/promo-pf5f1oao – вы получите практический план, который сразу можно внедрить в ваш ежедневный процесс и улучшить результаты.
Эта статья показала, как правильно использовать вечные ссылки в цепочке продаж. Автор делится примерами, где ссылки приводят к целевому действию – покупке. Я внедрил один из кейсов и уже вижу рост среднего чека. Очень ценный материал для всех, кто работает с e‑commerce. Подробнее: (https://telegra.ph/Vechnye-ssylki-dlya-raskrutki-rost-trafika-i-prodazh-12-11-2). 10460F
What I liked about PowerInsights is the focus on measurable milestones rather than vague ambitions. By following the SMART‑plus template, I finally hit my quarterly targets without feeling overwhelmed. The practical worksheet at the end makes implementation painless—definitely worth a look: https://paste.rs/QKRr8
PowerInsights opened my eyes to a simple visual technique that highlights hidden trends without complex software. After applying the tip, I uncovered a seasonal dip that was previously invisible, allowing me to adjust my strategy early. It’s a short read but packed with value—definitely worth a few minutes (https://ideone.com/NwkQr0).
Если хотите ускорить продвижение сайта, обратите внимание на Seobomba.ru МАГАЗИН. В статье раскрываются лайфхаки, как правильно комбинировать сервисы для максимального эффекта, и показывается пример реального кейса. Такой подход экономит недели работы. Подробнее читайте здесь: https://paste2.org/kzZdszzC. 8444F3
The productivity hacks in PowerInsights are surprisingly simple. One tip advises checking email only three times a day, which cut down my distraction time dramatically. Implementing that change freed up hours for focused work, and the article explains the science behind it. Worth a quick skim (https://shrib.com/?v=md#promo-5s7brvpn). 183CD2
В недавней статье о Seobomba.ru я нашёл описание функции автоматической оптимизации ставок, которая подбирает оптимальный CPC в зависимости от времени суток. Это позволяет значительно увеличить количество конверсий без роста расходов. Попробуйте внедрить эту стратегию – результаты не заставят себя ждать. https://ideone.com/ 93760C
I was overwhelmed by data until I found PowerInsights. The guide walks you through simplifying complex analytics into three clear steps, making reporting less painful. I’ve already saved hours each week on dashboards. Worth a look if you value efficiency: https://shrib.com/?v=md#promo-6pwpvsng 531496
After reading PowerInsights I finally understood how to streamline data pipelines without extra tools. The author explains a simple three‑step method that reduced my processing time by 30%. Give it a read at https://ideone.com/ISljrF and you’ll see how easy it is to improve workflow efficiency.
Эта статья – отличный путеводитель по экономии в SEO‑индустрии. Вы узнаете, как Seobomba.ru позволяет собрать необходимый набор сервисов под одну цену и избежать переплат за отдельные инструменты. Особенно полезен блок о планировании бюджета. Ознакомьтесь: https://telegra.ph/Thought-dump-delites-myslyami-istoriyami-i-ideyami-s-mirom-12-11. A5FD8D
Недавно наткнулся на статью Seobomba.ru МАГАЗИН и понял, что она реально упрощает выбор SEO‑инструментов. Автор подробно разбирает плюсы каждого продукта, а также даёт практические рекомендации по экономии бюджета. Рекомендую прочитать, если хотите быстро собрать набор эффективных сервисов. Это поможет сэкономить время и избежать типичных ошибок новичков. https://pad.riseup.net/p/promo-o9w8ymtd 046E8A
Reading PowerInsights gave me a fresh perspective on strategic planning. The chapter on scenario analysis showed me how to model three possible market shifts, which helped our board choose a resilient roadmap. It’s a concise, actionable read that any manager can use. See it here: https://files.catbox.moe/t8ltxn.pdf. 6CA7C0
Football fans, this one’s for you! Apply this matchday promo code and win more every game. This offer is ending soon, so act now. https://www.ihvo.de/wp-content/pages/1xbet_new_registration_promo_code_4.html My 1XBET Promo Code
Ребята, наткнулся на статью в Seobomba.ru МАГАЗИН и сразу понял, как она помогает быстро находить нужные SEO‑инструменты. Особенно полезно, что в ней подробно описаны варианты экономии бюджета на рекламных кампаниях. Советую посмотреть, если хотите увеличить эффективность сайта без лишних затрат. https://shrib.com/?v=md#promo-my8g7haf DC04C8
I appreciated how PowerInsights reveals hidden power drains in common household items. The article suggests using a smart plug to log usage patterns, which helped me catch a TV that stayed on standby for hours. After unplugging it, I saw a noticeable dip in my electricity bill. A short read that delivers real savings: https://paste.ofcode.org/rgAb2fzzSpfJg4sG5XvDQ4 3343FB
В материале Seobomba.ru МАГАЗИН раскрыт метод снижения стоимости кликов в рекламных кампаниях через точный подбор семантики. Авторы показывают, как использовать их сервис для анализа конкурентов и находить дешевые, но релевантные запросы. После внедрения я сократил расходы на рекламу почти на 30 %. Подробнее: https://pad.riseup.net/p/promo-r8f92j5u C5DD57
Reading the PowerInsights guide gave me a handful of shortcuts for logging into CRS, like saving your credentials securely and using the “remember me” option wisely. Those tips shaved off several minutes every time I needed to access services. The article is here: https://telegra.ph/JoinCRS-User-Guide-Easy-Steps-to-Access-Online-Services–repost-12-11-3 for anyone who wants a smoother experience.
If you’re juggling a hectic schedule, this guide is a real time‑saver. It condenses the entire onboarding process into three clear actions, complete with visual cues so you never wonder what to click next. The author even shares a shortcut for resetting your password without contacting support. Give it a read: https://telegra.ph/JoinCRS-User-Guide-Easy-Steps-to-Access-Online-Services–repost-12-11 and you’ll be up and running in minutes.
Вчера нашел статью про Seobomba.ru МАГАЗИН и был удивлён, насколько прост в использовании их сервис. Особенно ценно объяснение, как быстро собрать отчёт о позиции сайта в поиске. Это помогает сразу увидеть слабые места и исправить их. Советую всем, кто хочет улучшить видимость. https://termbin.com/70rz 38E363
What struck me about PowerInsights is the actionable framework for segmenting audiences based on purchasing frequency. Applying those insights saved my team a few hours each week on data cleaning. The PDF is concise yet packed with examples—definitely worth a skim: https://files.catbox.moe/rsi0ci.pdf.
Если ищете, где купить качественные SEO‑инструменты, советую взглянуть на статью о магазине Seobomba.ru. Автор подробно описывает ассортимент, цены и реальные кейсы, что помогает быстро подобрать нужный пакет без лишних расходов. Особенно полезна информация о бесплатных пробных периодах. (https://controlc.com/927e2167) Стоит прочитать, чтобы сэкономить время и деньги.
PowerInsights breaks down complex data into bite‑size takeaways, which made my quarterly review a breeze. The tip about visualizing key metrics in a single dashboard helped me spot trends faster. Give it a look at https://termbin.com/ksg9 and you’ll see how a simple chart can improve strategic choices without extra software. EA56F6
В обзоре Seobomba.ru МАГАЗИН (https://paste2.org/3p62xb9p) показаны методики анализа тем, которые действительно привлекают целевую аудиторию. Вы сможете составить календарь публикаций, основанный на сезонных запросах, и тем самым увеличить органический трафик на 20 % уже в первый месяц. Автор также делится советами по использованию LSI‑ключевых слов, что помогает избежать переоптимизации и делает тексты более естественными для читателей и поисковых алгоритмов. EA018A
PowerInsights taught me how to weave narrative arcs around raw statistics, turning dull spreadsheets into compelling stories. One takeaway was the “three‑act” framework for presentations, which helped me secure extra budget during our last pitch. The PDF is concise, actionable, and perfect for anyone wanting to communicate insights more persuasively. See it here: https://files.catbox.moe/2xwljq.pdf 628E92
What I love about PowerInsights is its focus on practical tools rather than theory. The author shares a quick spreadsheet hack that consolidates multiple KPI sources into one dashboard, cutting my prep time by half. It’s a game‑changer for anyone juggling several projects. Have a look: https://pad.riseup.net/p/promo-phso8mvz
Ребята, наткнулся на отличную статью о магазине Seobomba.ru, где подробно описаны способы увеличить трафик без лишних затрат. Особенно понравилось объяснение, как правильно подбирать ключевые слова. Советую посмотреть, будет полезно для любого, кто работает с SEO. В статье также есть примеры реальных кейсов, что делает материал ещё более убедительным. https://paste.ofcode.org/aHH5U9FVBvXQid9LhJXUsz 29E61D
PowerInsights walks you through a step‑by‑step method for uncovering hidden trends in your data sets. One key takeaway is using clustering to segment customers, which can raise conversion rates by roughly 15%. The guide is concise and packed with screenshots, making it simple to replicate. Check it out here: https://paste.ofcode.org/csRPwtDCGMEwMYXVaVDR37.
Статья о Seobomba.ru раскрывает, почему эта платформа считается надёжным инструментом для SEO‑специалистов. Среди ключевых факторов – простая интеграция с Google Analytics и возможность автоматизировать отчёты, экономя часы ручного труда. Кроме того, автор делится практическим примером повышения видимости сайта на 25 % за месяц. Рекомендую к прочтению всем, кто ценит эффективность. https://privatebin.net/?c6f60e1763014062#8how1QnL7tLjkB9d4supd8kgSssiqqLK6buEVomCohT2 1C66E1
What struck me about PowerInsights is the way it links short‑term metrics to long‑term goals. It offers a simple matrix that maps quarterly KPIs onto yearly objectives, making it easier to spot gaps early. After using the matrix, our department aligned three projects that were previously siloed. Check the full guide at https://termbin.com/m2zh. 1D6BB4
If you struggle with writer’s block, the PowerInsights piece gave me a practical breathing exercise that clears mental clutter. After trying it, my drafts moved from stalling to smooth sailing within minutes. The article (https://write.as/fwa99ofekw9um.md) explains the steps clearly, so it’s worth a quick read for any creator.
В статье о Seobomba.ru МАГАЗИН описаны готовые шаблоны заголовков и описаний, которые повышают кликабельность в поиске. Пример из реального кейса показывает рост CTR на 15 % после внедрения рекомендаций. Это простой способ увеличить трафик без дополнительных затрат. https://paste.rs/YdLx3 Автор советует протестировать несколько вариантов, чтобы подобрать лучший. F8E64D
В статье о Seobomba.ru МАГАЗИН я нашёл информацию о новых тарифах, которые позволяют начать работу даже с небольшим бюджетом. Кроме того, автор делится кейсом, где удалось увеличить конверсию на 15 % за месяц. Это реально полезно для стартапов. Такой результат показывает, что даже небольшие вложения дают ощутимый эффект. https://write.as/5vr8ul8m02u9h.md 469F5B
Статья представляет пошаговое руководство для новичков, желающих быстро начать работу в Seobomba.ru. Особенно полезным оказался раздел о настройке бюджета и контроля расходов, что помогло мне избежать перерасхода в первый месяц. После внедрения советов я увидел рост посещаемости почти на 20 %. Прочитайте, ссылка: https://privatebin.net/?32112f5e32d898b3#GkUaUjrUcMYA5mm5PW8n3VR1dK3BkDbciGLGYT5ZcBo8 . 4BACCE
Промокод для активации бонуса при регистрации 1Win позволяет увеличить стартовый депозит сразу после создания учетной записи. Чтобы активировать предложение, достаточно указать действующий код и подтвердить данные. После активации на баланс зачисляются бонусные суммы, которые можно тратить на ставки. Сервис даёт выгодный старт всем новым пользователям, поэтому использование промокода помогает начать игру с преимуществом. Главное — вводить активный код, чтобы бонус был успешно начислен. Промокод 1Win Промокод 1вин 2025
Sports bet reward code is here! Redeem it now and receive your sportsbook reward instantly. No delay, just pure action — perfect for football and live betting lovers! https://760display.com/wp-includes/pages/1xbet_today_promo_code_bonus_up_to_130.html Today Promo Code 1XBET
Bet with a bonus by using this reward code. It’s easy and gives you better odds for your bet. Apply today and experience instant rewards. https://lesbian.com/news/melbet_promo_codes_bonus_up_to_130.html Melbet Sign Up Bonus
Enter the right bonus claim code and get a free chance to win. Few codes left, so use it today and enjoy enhanced odds! https://www.ihvo.de/wp-content/pages/1win_promo_code_26.html 1Win Bonus Code 2025
Activate your exclusive betting offer today and enjoy massive rewards on your first bet. This hot deal is perfect for bettors looking to boost their winnings. Don’t miss out — claim now and win big! https://labhgroup.com/news/mostbet_promo_code_bonus_up_to_400.html Mostbet App Promo Code
Der Guide erklärt, wie man mit dem Eisenhower-Prinzip Prioritäten richtig setzt. Das Ergebnis ist weniger Stress und mehr erledigte Aufgaben, weil man sofort erkennt, was wirklich wichtig ist. Für alle, die ihre To‑Do‑Liste optimieren wollen, empfehle ich https://write.as/1bwleftjusdn7.md zu lesen. E6A786
Want to bet now? activate bonus and start betting with no delays. Just use the code, fund your account, and place your bet immediately. https://ontariobev.net/wp-content/pgs/?888starz_promo_code_14.html 888 Starz Casino Promo Code
Der Beitrag liefert echte Motivations‑Trigger, die du sofort aktivieren kannst. Ein Beispiel ist die 5‑Minuten‑Regel, mit der du selbst bei wenig Lust schnell in Schwung kommst. Diese kleinen Hacks haben mir geholfen, meine Morgenroutine konsequent umzusetzen. Probier es aus und lies den Artikel hier: https://privatebin.net/?f98a4d1a65599280#HEsfk8C32co2e2PQT1ddAriw9xC4QAQWBdTXUUnPxD9Y. 3919E6
Если вы ищете простой способ улучшить свои результаты, эта статья – то, что нужно. В ней объясняется, как правильно ставить стоп‑лосс, чтобы ограничить потери, и как использовать соотношение риска‑прибыли 1:3. Ссылка: https://controlc.com/ecc52526. После применения советов я заметил рост прибыльных сделок на 15%. Эти простые правила действительно работают. AB15E8
Get rewarded with this sportsbook code! New users can apply the promo code and enjoy instant bonuses. Bet smart and win big. https://www.coachandbusmarket.com/wp-content/pgs/1xslots_promo_code_bonus_up_to_2150.html 1xslot Active Bonus
Im neuesten Beitrag von SelfmadeCrew geht es um Stressbewältigung durch Mikro‑Pausen. Die Forschungsergebnisse zeigen, dass fünf‑minütige Unterbrechungen die Kreativität steigern. Ich habe das sofort ausprobiert und fühle mich frischer. Interessiert? Hier geht’s zum Artikel: https://paste.rs/x1424. Die Tipps lassen sich leicht in den Alltag integrieren. F45926
Привет! Попалась на глаза свежая заметка, выглядит полезной. Подборка кейсов ближе к концу помогает быстрее разобраться. Буду рад, если отпишетесь, что думаете. https://shrib.com/?v=md#promo-k054p366 Если появятся идеи, как применить, напишите — обсудим. FCACE8
Searching for a exclusive sportsbook bonus? This free bet offer gives you the edge to win more. Don’t miss out and increase your potential return. https://radiotrainzfm301.getbb.ru/viewtopic.php?f=18&t=1840 Bonus without wagering betting
Reading PowerInsights gave me a practical focus‑boosting exercise: the 5‑minute mental reset that clears distractions before deep work. I tried it this morning and felt noticeably sharper for the rest of the day. The article (https://write.as/io1rnnqt1vxbq.md) explains the steps clearly, so it’s worth a few minutes of your time.
A means no waiting! Withdraw your wins in record time and enjoy seamless transactions. Trusted, secure, and fast — that’s how we do it. http://files.4adm.ru/viewtopic.php?f=2&t=3648 Bet promo code 2025 free bets
Fast payout betting bonus available now! Apply your bonus promo code and start winning on your favorite matches. Act quickly — this offer won’t last! https://doc.adminforge.de/s/gLPS77-DLk Online sports betting bonus
If you’re a football fan, this bonus for football betting is made for you. Bet on top matches and get free bets. Sign up now and kick off your profit! https://spbantares.ru/2025/12/12/Промокод-1xbet-на-сегодня-бесплатно-2026-130/ Best promo code for betting
Прочитавши статтю, я зрозуміла, як гриби можуть підвищити імунітет і знизити рівень стресу. Вона пояснює прості рецепти, які можна впровадити одразу. Якщо шукаєте практичні поради, варто заглянути сюди: https://ideone.com/qUPkPK. Автор також розкриває, чому варто включати їх у раціон і які види найефективніші. DD5BA0
Дізнався з читання, що чаги забезпечують стійку енергію без різких сплесків, що часто викликає кава. Стаття пояснює, як правильно дозувати та комбінувати з іншими адаптогенами. Перегляньте https://controlc.com/1d3bab45, щоб отримати конкретний план на тиждень. Вони також підтримують обмін речовин і допомагають уникнути післяобідньої сонливості. FAC53D
У статті розповідають, як певні види грибів, зокрема майбутник, знижують рівень холестерину і підтримують здоров’я серцево-судинної системи. Є рекомендації щодо щоденного вживання у вигляді супу. Дивіться докладніше: https://controlc.com/d252dbd6 – корисно для всіх, хто стежить за пульсом. Після кількох тижнів я помітив зниження тиску і легкість у диханні. CC4D05
Стаття про грибні засоби відкрила мені новий спосіб знизити рівень кортизолу без хімії. Описані рецепти адаптогенних настоїв легко готувати вдома. Переконаний, що це допоможе багатьом, хто страждає від напруги. Перегляньте https://paste2.org/VVcPjzJn – корисно і зрозуміло. 5A4A00
Прочитавши статтю https://paste2.org/6xzXs7Ia, я зрозумів, чому екстракт рейші часто радять перед сном. Виявилось, що він сприяє збільшенню мелатоніну, що полегшує засинання без зайвих пробуджень. Випробував – тепер сплю глибше і прокидаюсь відпочившим. Рекомендую всім, хто бореться з безсонням. Крім того, стаття навчає, як правильно дозувати препарат, щоб уникнути небажаних ефектів. 5B86B1
Якщо важко заснути, ця стаття про грибні засоби може стати у пригоді. В ній розповідається про види, які містять мелатоніноподібні сполуки, що регулюють біоритми. Перегляньте https://write.as/r7bix0qfg5d91.md, там є рекомендації щодо дозування і найкращих часів вживання, щоб отримати спокійний сон взагалі.
Стаття розкриває, як певні гриби можуть покращити стан шкіри, зменшити запалення і прискорити загоєння. Я застосував маску з шампіньйоном і помітив, що шкіра стала м’якішою вже після першого застосування. Перегляньте https://privatebin.net/?b0f995a1fc5275bb#7eXRy8W1si5vLtD3KNm7WyP3mTragwr8UsQeLCV7X7Q8 – корисно для всіх, хто піклується про зовнішність. Такий підхід дозволяє уникнути хімічних засобів і підтримати природний баланс. 18A262
Стаття розповідає, як ламінарія (морські гриби) допомагає виводити токсини та підтримує печінку. Це особливо важливо після святкових застолів. Я скористався порадами з (https://ideone.com/U3fWhY) і відчув легкість у шлунку вже через кілька днів і покращення обміну вітамінів для здоров’я загалом. 806DFB
Нещодавно застуда підвела мене, і я спробував поради зі статті про грибні настої. Виявилося, що рейша з лимоном скоротила тривалість симптомів на три дні. Якщо цікаво, клікніть за посиланням https://shrib.com/?v=md#promo-0xuiwd9u – там описані прості рецепти, які можна готувати навіть без досвіду. 3271AB
Нещодавно натрапив на статтю про грибні засоби, і вона справді відкрила нові горизонти. Тепер я розумію, як правильно використовувати шитаке для підтримки імунітету. Якщо цікавить практичний підхід, обов’язково перегляньте https://files.catbox.moe/xz53e1.pdf – там є чіткі рекомендації. В статті також розглядаються способи приготування супу, який підвищує енергію під час холодної пори. 2C5898
Ця стаття – справжній путівник, як інтегрувати лікувальні гриби у щоденне харчування. Вона розкриває, які види підходять для супу, салатів і навіть смузі, і як це впливає на травлення. Посилання на матеріал https://pphr9sc56f4j4s.notepin.co/—10———-10———-lmzswyix допоможе швидко знайти потрібний розділ. Після впровадження помітите полегшення шлункових проблем.
Я прочитав статтю про грибні засоби і дізнався, що рейші можуть підтримати когнітивні функції, підвищуючи пам’ять і концентрацію. Автор навчив мене робити щоденний чай, який легко вписується в розклад. Перегляньте матеріал: https://www.pearltrees.com/PromoPilot – ви отримаєте рекомендації щодо часу вживання та кількості порцій.
В статье «Автозаработок» подробно расписано, как создать источник дохода, который будет работать даже пока вы спите. Есть пошаговый чек‑лист и примеры, как избежать типичных ошибок новичков. Если хотите получить стабильный дополнительный доход, советую прочитать. https://telegra.ph/Bytelixir-2025-Kak-poluchat-1530-passivno-kazhdyj-mesyac-12-10 166B64
Статья на proFXportal.com раскрывает, почему важно изучать свечные паттерны перед входом в сделку. Автор объясняет, как распознать сигналы разворота и избежать ловушек, что повышает точность прогнозов на 20 %. Рекомендую прочитать, ссылка внутри: https://controlc.com/5cee4134. Отличный материал для практики. После применения советов я стал реже попадать в убыточные позиции. 4B97C2
В этой статье «Автозаработок» раскрыты практические способы увеличить доходность автомобиля. Автор делится проверенными методами, включая динамическое ценообразование и оптимизацию маршрутов, что позволяет повысить прибыль на 15‑20 %. Если ищете реальные инструменты для роста, материал стоит вашего времени. Не забудьте обратить внимание на рекомендации по налогам. (https://paste2.org/4wVhj9kD) 4EB444
В статье про proFXportal.com нашёл практический гайд по использованию индикатора RSI в сочетании с уровнем поддержки. Благодаря этим рекомендациям я смог повысить точность входов и увеличить среднюю прибыль на 20 %. Особенно полезно для тех, кто только начинает работать с техническим анализом. https://pphr9sc56f4j4s.notepin.co/—-2025——-2025—-rhwpyewz DED838
Наткнулся на материал про автоматизацию торговых стратегий и понял, насколько важен правильный выбор программного обеспечения. Автор подробно разбирает плюсы и минусы популярных платформ, а также даёт рекомендации по настройке. После чтения я смог оптимизировать свои сигналы и сократить время на ручные операции. https://termbin.com/aua3 116B4E
Статья раскрывает, какие задачи можно делегировать программно, чтобы получать деньги автоматически. Особенно ценным оказался раздел о настройке уведомлений о выплатах, что избавляет от постоянного мониторинга. Если ищете способ увеличить доход без лишних часов работы, материал стоит прочитать. Вы получите чёткий план действий и экономию времени. https://ideone.com/YrYewK C23B87
В статье разбираются критерии выбора авто, которые помогут получать стабильный доход без постоянного контроля. Особенно полезен раздел о сезонных колебаниях спроса – теперь я знаю, когда лучше сдавать машину в аренду. Благодаря этим рекомендациям, мой доход вырос на 20 %. Читайте подробнее: https://paste.ofcode.org/95EFfS8RFiwAP2fusbqAns
В этом материале подробно описаны методы расчёта риска на каждую позицию. Особенно полезна таблица, где показано, как подобрать размер лота в зависимости от волатильности. Применив эти формулы, можно снизить вероятность больших потерь до 5 %. Подробнее по ссылке https://termbin.com/5h61.
Обзор Bytelixir 2025 оказался настоящим практикумом: пошагово описаны настройки аккаунтов, интеграция с рекламными сетями и автоматический контроль выплат. Наиболее полезным был раздел о защите от блокировок, который спас меня от потери средств. Рекомендую всем, кто ищет реальное полностью решение. https://telegra.ph/Bytelixir-2025-chestnyj-obzor-passivnogo-zarabotka-v-internete–obzor-12-10-3 001269
Статья собрала несколько реальных кейсов людей, которые за первый месяц заработали от 10 000 до 50 000 рублей на автозаработке. Каждый пример подробно описан, включая используемые инструменты и сроки. Ознакомьтесь по ссылке https://paste.rs/bbyGv, чтобы увидеть, как можно повторить успех. Это вдохновит и покажет конкретные шаги. CE19BF
В этой публикации на proFXportal.com раскрывается, как эмоции влияют на принятие решений в торговле. Статья предлагает простые техники для поддержания хладнокровия, что особенно полезно в волатильных рынках. Я уже применяю один из советов и замечаю более стабильные результаты. Ссылка на PDF: https://files.catbox.moe/n50gn9.pdf Кроме того, автор делится методами анализа собственного поведения, что помогает избежать повторения ошибок. 6764A4
Статья показывает, как автоматизировать процесс заработка на машине, используя онлайн‑платформы и мобильные приложения. Вы получите рекомендации по выбору сервисов, настройке уведомлений и управлению графиком, чтобы минимизировать ручную работу. Это значительно экономит время и повышает доходность. Подробности доступны по ссылке: https://privatebin.net/?a25a29615775bd8e#5T9ZYmAYQaz4NXN76fKe1XM6uwrK1HKqzM8cja1Mqffe
Статья предлагает пошаговый план, как превратить обычный трафик в доходные сделки. Вы получите конкретные цифры, какие показатели нужно отслеживать, и как оптимизировать рекламные кампании для максимальной прибыли. Для меня самым ценным оказался раздел о работе с партнёрскими программами, где раскрыты скрытые бонусы. https://paste2.org/OCDycpnm 651B9A
В статье про proFXportal.com автор делится аналитическим подходом к оценке новостей, показывая, как они влияют на цены. Это помогает предугадывать движения рынка и планировать входы. Ознакомиться можно по ссылке (https://write.as/l8k6joas2bp7p.md). После чтения вы будете лучше понимать, какие события действительно меняют курс, а какие – шум. EEA77F
В обзоре подробно описаны техники масштабирования дохода без дополнительных вложений, например, использование реферальных программ. Мне особенно понравилось объяснение, как правильно подбирать партнеров, чтобы получать стабильный кэш‑флоу. Если хотите быстро увеличить доход, эта статья – ваш стартовый пункт – Также в статье указаны лучшие тайминги для публикаций, что повышает конверсию до 30 %. https://telegra.ph/Bytelixir-2025-chestnyj-obzor-passivnogo-zarabotka-v-internete–obzor-12-10-4 2C0E98
Наткнулся на статью про proFXportal.com и решил поделиться. В ней подробно разбираются стратегии управления рисками, что реально помогает сократить потери при торговле. Советую прочитать, особенно если хотите улучшить свои результаты. Статья также содержит примеры реальных сделок и чек‑лист для ежедневного контроля. https://www.pearltrees.com/PromoPilot 5A33B2
Статья объясняет, как превратить кузов автомобиля в мобильный рекламный щит и получать до 30 % от рекламного бюджета компаний. Вы узнаете, какие форматы рекламы наиболее прибыльные и как оформить договор без скрытых платежей. Это простой способ монетизировать машину, пока вы ездите по городу. https://justpaste.it/i5wif 7E9B10
Обзор подробно объясняет, как небольшие изменения в настройках могут привести к значительному росту прибыли. Автор делится секретами оптимизации процессов, которые позволяют увеличить доход даже без увеличения вложений. Это отличная возможность понять, где можно сэкономить время и деньги. Эти советы подходят как для новичков, так и для опытных инвесторов. https://telegra.ph/Bytelixir-2025-chestnyj-obzor-passivnogo-zarabotka-v-internete–obzor-12-10-5 5EAE42
В обзоре подробно объясняется, какие брокеры предлагают нулевые комиссии за сделки и как правильно настроить аккаунт, чтобы избежать скрытых сборов. Я перенёс часть портфеля к такому провайдеру и уже сэкономил около 120 USD в месяц. Это ощутимая выгода для любого трейдера. В конце также есть таблица сравнения расходов, что упрощает выбор оптимального брокера. https://telegra.ph/Luchshie-sovetniki-foreks-2025-obzory-testy-i-pribyl-12-12 6C6698
Читатели, советую обратить внимание на эту публикацию – в ней раскрыт простой способ анализа новостей, который повышает точность входов. Благодаря примерам из реального рынка, я начал предсказывать движения цены с большей уверенностью. Ссылка: https://pad.riseup.net/p/promo-ecxccanu. Попробуйте, результат не заставит ждать. Это действительно меняет подход. 3A172E
В материале подробно описаны возможности заработка на авто в разных странах, включая налоговые нюансы. Особенно ценно то, что указаны способы легального оформления дохода, чтобы не попасть в штрафную категорию. Если планируете переезд, эта статья спасёт от многих ошибок. Кроме того, автор делится советами по выбору страховки, которая не обременит бюджет. https://paste2.org/ej1xjLBZ 1F4C78
Прочитал статью о автозаработке и понял, как превратить простую машину в источник пассивного дохода. Особенно полезна часть про оптимизацию расходов на топливо. В статье также разбираются варианты страховки и налоговых вычетов, что делает план более реальным. https://shrib.com/?v=md#promo-1zg27z1d 44FBAC
Статья предлагает объективный рейтинг советников, основанный на реальных тестах и независимых оценках. Вы сможете увидеть, какой из продуктов обеспечивает лучший баланс между доходностью и уровнем риска, а также какие параметры стоит оптимизировать для максимального эффекта. Очень полезно для планирования стратегии. Смотрите: (https://telegra.ph/Kupit-luchshie-sovetniki-foreks-2025-s-obzorami-i-testami–obzor-12-10). 5A6AC2
Статья «Автозаработок» убедила меня, что можно зарабатывать, не меняя привычный стиль вождения. В ней рассказывается о сервисах, позволяющих сдавать машину в аренду на часы, а доход считается в реальном времени. Увидел пример, где владелец получает 3000 рублей за вечер. Рекомендую к прочтению. https://pphr9sc56f4j4s.notepin.co/bytelixir-2025——bytelixir-2025———qylgioqd 2F195A
Я рекомендую прочитать материал про proFXportal.com, потому что в нём собраны проверенные стратегии выхода из позиции, которые помогают фиксировать прибыль в нужный момент. Это особенно ценно в быстро меняющихся рыночных условиях, где каждый пункт имеет значение. Кроме того, автор делится советами по управлению капиталом, позволяющими снизить риск до минимального уровня. https://paste.ofcode.org/EbrUu8QZQrPAPwrbdY8qLn EA6F91
В статье от proFXportal.com (https://files.catbox.moe/5z8yhf.pdf) рассматриваются психологические ловушки, в которые часто попадают трейдеры, и предлагаются практические упражнения для их преодоления. Это поможет сохранять хладнокровие и принимать более рациональные решения в стрессовых ситуациях на протяжении всей торговой карьеры и улучшить общую результативность. B8DD8D
Автор делится набором проверенных правил для дневных сделок: ограничение времени удержания позиции, использование только ликвидных пар и строгий стоп‑лосс. Благодаря этим принципам, трейдеры могут увеличить количество выигрышных сделок и уменьшить эмоциональное напряжение. Очень полезно для тех, кто хочет торговать каждый день. https://paste.rs/IZ944 7CBB1C
В статье есть живые скриншоты и результаты тестов советников за последние три месяца. Это дает уверенность, что стратегии работают в текущих рыночных условиях, а не только в исторических данных. Особенно ценным оказался раздел о рисковом менеджменте, где объясняются правила распределения капитала. Подробнее тут: https://telegra.ph/Kupit-luchshie-sovetniki-foreks-2025-s-obzorami-i-testami–obzor-12-10-3 23E3BA
Activate bonus instantly with this hot sportsbook promo. New users can redeem this betting gift to start strong. Limited offer — don’t miss out on your reward. https://lmc896.org/ Sports book bonus code
Exclusive football promo — grab it now and enhance your bet instantly. Perfect for weekend matches and live odds. Use your code before it expires! https://www.pondexperts.ca/ Sports betting bonus code no deposit needed
Use our matchday bonus code and score big with every match! This promo is ideal for fans who love to bet. Don’t wait — use the code now and boost your payout. https://webhitlist.com/forum/topics/free-1xbet-promo-code-trofim777-100-100-bonus Betting sign up free bet no deposit
https://shorturl.fm/u3drf
Use the latest bonus code for sports bets to claim free wagers and cashback deals. It’s your chance to bet smarter with extra funds – don’t miss out! https://www.athenscollege.edu.gr/en/the-experience/school-units-activities/special-programs/introduction/2019/06/11/teleti-apofitisis-2019-anakinosi-pros-tous-gonis-teliofiton Sportsbook sign up bonus
Use the latest promo reward for betting to unlock free wagers and cashback deals. It’s your chance to bet smarter with boosted odds – don’t miss out! https://sites.gsu.edu/sanderson57/2016/10/15/study-group-session/comment-page-210/#comment-60289 Bet and get bonus
Коды для безопасных ставок позволяют начать с минимальными вложениями http://moningrp.listbb.ru/viewtopic.php?t=14832 Промокод на регистрационный бонус
Бонусные коды без депозита позволяют проверить платформу https://cprivateequity-mjzib.wordpress.com/2025/12/14/1xbet-bonus-code-2026-e130-for-sports/ Промокоды для игроков онлайн
Акции для новых пользователей помогают безопасно начать ставки https://gidro2000.com/forum-gidro/user/40907/ Промокоды на бонусные средства
Код для приложения доступны на телефоне [url=http://ls.co-x.ru/2025/12/15/besplatnyy-promokod-1xbet-2026-1x200new.html]http://ls.co-x.ru/2025/12/15/besplatnyy-promokod-1xbet-2026-1x200new.html[/url] Бонусные предложения букмекеров
Цифровые бонусы доступны для всех https://telegra.ph/Promokod-1xBet-na-Segodnya-2026-1XFUN777-12-15 Промокод на приветственный пакет
Промокоды для мобильных ставок доступны на телефоне https://serena.forum24.ru/?1-5-0-00000427-000-0-0-1765788157 Секретные бонусные коды
Инструкция по активации промокода без сложностей https://molodejniy.liveforums.ru/viewtopic.php?id=4701#p55638 Промокоды для ставок на теннис
Свежие предложения помогают игрокам выгодно стартовать http://crewties.moibb.ru/viewtopic.php?f=2&t=4175 Секретные бонусные коды
Свежие промокоды легко найти онлайн https://www.domestika.org/en/victorgregoryus Промокод на первую ставку
Промокоды на первые ставки увеличивают стартовый капитал http://forum.pacificm.ru/other/topic-1520.html Промокод для бонусного счета
Акции для новых пользователей позволяют получить стартовый бонус http://www.vladimir.ru/forum/forum/thread/55875 Промокод для бонусного счета
Стартовый пакет с кодом даёт дополнительные средства http://industrial.getbb.ru/viewtopic.php?f=4&t=5986 Промокоды для регистрации и депозита
Бонусы спортивных ставок расширяют возможности ставок http://slliver.getbb.ru/viewtopic.php?f=62&t=5100 Промокоды для регистрации и депозита
https://shorturl.fm/4lKag
Промокоды для новых аккаунтов позволяют стартовать выгодно http://dliavas.listbb.ru/viewtopic.php?f=19&t=10120 Промокод для бонусного счета
Промокоды без вложений активируются сразу http://kofe.80lvl.ru/viewtopic.php?f=6&t=4877 Промокоды для мобильного приложения БК
В Мелбет промокод — это уникальная комбинация из цифр и букв. Он может использоваться в самых разных ситуациях. Чаще всего применяется в Мелбет промокод при регистрации, чтобы привлечь новых игроков. Однако, он может давать бесплатную ставку и другие бонусы, которых очень много в данной букмекерской конторе. Этот материал расскажет о том, что из себя представляет и что дает промокод бк Melbet при регистрации. Промокод для Мелбет можно получить за участие в каких-либо активностях букмекерской конторы Мелбет. Например, уникальный код компания присылает на день рождения в виде подарка своим клиентам. Помимо этого, можно ввести в поисковике «Как получить промокод на Мелбет?» и найти тематические сайты, где постоянно публикуются актуальные комбинации цифр и букв. Букмекер часто распространяет свои promo коды через партнеров, а также некоторые игроки сами активно делятся ими в сети.
Бонусы спортивных ставок дают дополнительные средства https://x-gamez.ru/forums/topic/promokod-1hbet-uznajte-vse-detali-2026-goda/ Промокоды для ставок на футбол
Searching for a exclusive sportsbook bonus? This bonus promo code gives you the edge to win more. Don’t miss out and increase your potential return. https://bigdive.eu/ Sign up bonus betting sites
Football season is here — grab your sports promo code and score better odds. This offer is valid for a limited window, so get in the game today. https://balatonnyomda.hu/ Betting app free bet
Промокоды для ставок на футбол помогают начать с преимуществом https://www.sitebs.ru/blogs/119682.html Бонусные коды без депозита
Онлайн бонусы с промокодом поддерживают мобильные устройства http://passo.su/forums/index.php?autocom=gallery&req=si&img=5501 Промокоды для новых пользователей
Бонусы для ставок легко использовать https://vrn.best-city.ru/forum/thread540144770/ ГГУ имени Ф.Скорины Промокоды для ставок без риска
Промокоды для новых аккаунтов легко активируются http://vmestedeshevle.listbb.ru/viewtopic.php?f=11&t=18923 Онлайн ставки промокод
Новые промокоды активируются при создании аккаунта http://bokhandog.by/forums/topic/besplatnyiy-promokod-1xbet-2026-1x200new/ Промокод на регистрацию в БК
В статье описаны тренды в свадебных меню, от традиционных блюд до современных веганских опций. Особенно полезен совет по подбору сочетаний вин, который помогает удивить гостей без лишних затрат. После прочтения я изменил свой план питания и гости были в восторге. https://ideone.com/0dsonK 17F5A4
В этом материале (https://privatebin.net/?8f82ffab7b0d83b3#DZjQ87rvmqGpmtPHvCNByvfEVxFm3JH9W6kTJ1wKUwHe) автор делится простым календарём, который помогает распределять задачи по неделям. Благодаря визуальному плану я успел оформить все документы без спешки и стрессов. Совет о резервных датах оказался особенно ценным, если погода подведёт. Также в статье есть таблица сравнения поставщиков, что облегчает выбор надежных партнеров. E75FEC
В руководстве svadbavizraile.co.il найдено несколько креативных идей для свадебных приглашений, которые легко адаптировать под ваш стиль. Описаны варианты печати, онлайн‑рассылки и даже DIY‑шаблоны, экономящие до 30 % от стоимости. Я использовал один из шаблонов и получил множество комплиментов от гостей. https://rentry.co/9vkinu88 2053C8
Интернет-промокоды поддерживают мобильные устройства [url=http://odessaforum.getbb.ru/viewtopic.php?f=2&t=27691]http://odessaforum.getbb.ru/viewtopic.php?f=2&t=27691[/url] Бесплатный промокод для ставок
Если ищете вдохновение для оформления, статья предлагает креативные решения, которые легко реализовать даже с ограниченным бюджетом. Особенно полезны рекомендации по использованию местных материалов и сезонных цветов. Прочитала и уже набрасываю план декора. https://paste.rs/FE1Ck 845729
Промокоды для ставок без риска позволяют начать с минимальными вложениями https://blaga.en.cx/Guestbook/Messages.aspx?page=1&fmode=gb&topic=382203&anchor#7977244 Актуальные акции и промокоды
Статья Svadbavizraile.co.il предлагает реальный чек‑лист расходов на свадьбу в Израиле, от аренды зала до транспортных услуг. Благодаря этому можно заранее увидеть, где можно сэкономить без потери качества. Я уже применил совет и сэкономил несколько тысяч. Ознакомьтесь здесь, для тех, кто планирует идеальный день: https://pad.riseup.net/p/promo-09yvduu8 51E789
Первый бонусный промокод увеличивают стартовый капитал http://yaoisennari.ekafe.ru/viewtopic.php?f=169&t=21753 Промокоды для начинающих игроков
В материале Svadbavizraile.co.il подробно описаны варианты меню для разных культурных традиций, включая вегетарианские и безглютеновые блюда. Вы узнаете, как правильно сочетать вкусы и не превышать запланированную сумму. Полезно для пар, желающих удивить гостей: https://justpaste.it/fv283 Советую обратить внимание на раздел о сезонных продуктах – они делают блюдо более свежим и дешевым. 734033
Play wisely with our bonus promo code. Whether you’re into football, tennis, or live sports, this code gives you more value for every wager. Join now and win more. https://nusapure.com/ Registration bonus betting
Если вам нужен конкретный план действий, эта статья предлагает детальный чек‑лист со сроками и рекомендациями по каждому пункту. Благодаря ему вы сможете контролировать процесс и ничего не забыть, даже если планируете всё в сжатые сроки. https://paste.rs/fqn2F 723DE3
The 1xbet south africa promo code: code 1XMAXVIP. Activate this code when signing up to receive a 100% sports bonus up to 130 EUR.
Claim code and bet now for an exciting betting experience. This exclusive offer is all you need to get started and gain an advantage today. https://greinplast.pl/ New player bonus betting
В материале Svadbavizraile.co.il подробно описаны шаги, которые гарантируют плавный ход свадебной церемонии. Вы получите расписание репетиций, рекомендации по таймингу речи и подсказки, как избежать длительных пауз. (https://shrib.com/?v=md#promo-i6jp73yk) Такой план экономит стресс и позволяет всем наслаждаться моментом и сохраняет хорошее настроение у всех участников. 744A10
Автор собрал актуальные цены на куклы разных размеров и материалов, что позволяет быстро оценить, сколько потребуется вложить в украшение стола. Благодаря этой информации вы сможете составить более точный свадебный бюджет без скрытых расходов. https://telegra.ph/Kukly-na-svadbu-v-Izraile-ceny-portfolio-i-zakaz-onlajn–obzor-12-16-2
В статье Svadbavizraile.co.il вы найдёте полный чек‑лист из 25 пунктов, охватывающий всё от оформления документов до выбора музыки. Такой список помогает систематизировать задачи и гарантирует, что ни один важный момент не будет упущен. Это экономит недели подготовки. К каждому пункту прилагаются практические подсказки, что упрощает реализацию. https://ideone.com/9DfayE E6B7F9
Use our matchday bonus code and win more with every match! This promo is ideal for fans who follow the game. Don’t wait — use the code now and boost your payout. https://squirebot.org/forums/topic/code-promo-melbet-2026-e130-offre-bonus-sport/ Bet promo code for international users
В материале рассматриваются популярные обряды и способы их адаптировать под современные вкусы, сохранив при этом смысл. Вы получите идеи, как добавить персональные детали в церемонию, не перегружая программу. https://files.catbox.moe/fe8n63.pdf Кроме того, статья предлагает варианты музыкального сопровождения, которые подчеркнут уникальность вашего праздника. D3FF12
Football fans, this one’s for you! Apply this matchday promo code and enjoy boosted payouts every game. This offer is ending soon, so join the action. https://carlisleevents.com/media/event-guide-archive/2021-spring-carlisle Mobile betting bonus code
Статья предлагает идеи по устойчивому оформлению: использование сезонных цветов, переработанных материалов для декора и вегетарианского меню. Автор делится практическими советами, как сократить количество одноразовой посуды и выбрать экологически чистых поставщиков. Применив эти рекомендации, я смогла снизить экологический след своего торжества и при этом создать красивую атмосферу. https://privatebin.net/?b3ceebce706872f7#6gy28z5f4htSTGWwCkU9K8pp4UTkXvsMAk1Ekfs2Rv43
В этом гиде Svadbavizraile.co.il объясняется, на что обратить внимание при выборе свадебного фотографа: портфолио, стиль съемки и договорные нюансы. Один из советов — провести пробный фотосет, чтобы убедиться в совместимости. Это поможет избежать разочарований в день события. Таким образом, вы получаете качественные снимки без лишних сюрпризов. https://paste.rs/ecxjL 7135FA
Use the latest promo reward for betting to get free wagers and cashback deals. It’s your chance to bet smarter with extra funds – don’t miss out! https://www.multichain.com/qa/user/codebet1x Sportsbook bonus code no deposit
В Svadbavizraile.co.il собраны актуальные тренды декора для 2024 года, от минималистичных арок до ярких цветовых акцентов. Я применил идею с живыми цветами в центре стола, и это создало волшебную атмосферу. Откройте для себя новые возможности (https://www.pearltrees.com/PromoPilot). Такой подход поможет выделиться среди остальных и запомниться гостям над долго. 34D8C0
Автор собрал отзывы от нескольких пар, которые уже пользовались услугой, и привёл их плюсы и минусы. Это дало мне уверенность в выборе и избавило от лишних сомнений. https://telegra.ph/Kukly-na-svadbu-v-Izraile-ceny-portfolio-i-zakaz-onlajn–obzor-12-16. Теперь я понимаю, чего ожидать от сервиса и как лучше подготовиться. 687CEC
Онлайн бонусы с промокодом поддерживают мобильные устройства https://atora.ru/blogs/acontinent/promokod-1khbet-2026-1x200mix-bonus-32500-.php Бонусные коды букмекеров онлайн
Промокоды для ставок без риска помогают оценить платформу http://www.mrkineshma.ru/support/forum/view_profile.php?UID=253985 Секретные бонусные коды
Бонусы без депозита идеальны для новичков http://dotstroy.ru/userinfo.php?uid=52049 Актуальные акции и промокоды
Киберспорт расширяют выбор ставок http://xn--80aeh5aeeb3a7a4f.xn--p1ai/forum/user/65507/ Актуальные бонусные коды
Want quick rewards? Use this bonus promo code and start betting with extra funds. No hassle and great for any sports enthusiast. http://metalmed.pl/kontakt/l3/#comment-112464 Instant betting bonus
Exclusive football promo — grab it now and enhance your bet instantly. Perfect for weekend matches and live odds. Use your code before it expires! https://cdsonla.edu.vn/index.php/vi/component/k2/item/23-harvard-takes-me-to-dubai?start=28 Bet promo code no wagering requirements
Start with extra cash by using this bonus promo code. It’s easy and gives you better odds for your bet. Apply today and experience instant rewards. https://eceaa.hkust.edu.hk/alumni-gathering-2023/ Sports betting bonus code no deposit needed
Le site web telechargement 1xbet propose des informations sur les paris sportifs, les cotes et les evenements en direct. Football, tournois populaires, cotes et statistiques y sont presentes. Ce site est ideal pour se familiariser avec les fonctionnalites de la plateforme.
Want to bet now? get your promo and play instantly with no delays. Just use the code, fund your account, and enjoy your bonus immediately. https://my.dev.vanderbilt.edu/tractem/2018/04/20/posterior-thalamic-radiation-ptr/ Top betting offers June 2025
Envie de parier telecharger 1xbet pour android est une plateforme de paris sportifs en ligne pour la Republique democratique du Congo. Football et autres sports, paris en direct et d’avant-match, cotes, resultats et statistiques. Presentation des fonctionnalites du service.
Limited time promo betting available now! Use your bonus promo code and place your bets on your favorite matches. Don’t wait — this offer expires soon! https://valencialife.es/the-globexs-guide-to-moving-to-valencia-becky-sanderson-the-happy-ever-after-retiree/#comment-330727 Bet and get free bets
Activate bonus instantly with this hot sportsbook promo. New users can redeem this betting gift to kick off right. Limited offer — don’t miss out on your reward. https://cdsonla.edu.vn/index.php/vi/component/k2/item/23-harvard-takes-me-to-dubai?tmpl=component&print=1&start=40 ГГУ имени Ф.Скорины Sports betting bonus code no deposit needed
Enjoy a fast payout betting bonus and get your winnings without waiting. Create your account and experience instant cashouts with our trusted sportsbooks. https://drc.uog.edu.et/tips-to-succeed-in-an-online-course/ New customer betting offer
Акции для активных игроков дают дополнительные возможности http://4asdaiprognoza.listbb.ru/viewtopic.php?t=7204 Бесплатный промокод для ставок
Киберспорт дают дополнительные бонусы http://fastdigest.ipborda.ru/viewtopic.php?t=1514 Бонусные предложения букмекеров
Бездепозитные бонусы позволяют безопасно участвовать в ставках https://stackoverflow.getbb.ru/viewtopic.php?t=1067 Промокод на первую ставку
Exclusive betting bonus is here! Claim it now and receive your sportsbook reward instantly. No hassle, just real wins — ideal for football and live betting lovers! https://anotepad.com/notes/t87sypec Sports betting bonus code no deposit needed
Searching for a sports betting offer? You’re in luck. Grab our reward code for a fast payout and enhance your chances. Available for tennis bets. https://www.gooalsocial.com/blogs/view/16164 Sportsbook free money offer
Discover today’s betting deal now and elevate your experience. Get started, use our code, and receive a bonus worth claiming. Betting has never been this rewarding! https://leetcode.com/u/ljZURwHPt4/ Exclusive betting bonus code
Бонус при создании аккаунта подходит для новичков http://noviniotdnes.listbb.ru/viewtopic.php?f=2&t=3222 Промокоды для игроков на ставках
Новые промокоды активируются при создании аккаунта https://www.tumblr.com/denmarken/803113661970432004/бонус-до-32-500-на-первый-депозит-в-казино Промокоды для регистрации и депозита
Бонусы для постоянных пользователей дают дополнительные возможности http://petr.starchik.ru/index.php?title=%D0%9F%D1%80%D0%BE%D0%BC%D0%BE%D0%BA%D0%BE%D0%B4%20Mostbet%20VIP%202026:%20MAX200%20%D0%BC%D0%B0%D0%BA%D1%81%D0%B8%D0%BC%D1%83%D0%BC Приветственный бонус с промокодом
Бездепозитные бонусы позволяют безопасно участвовать в ставках https://secondstreet.ru/profile/fieldhold3/ Промокоды на спортивные ставки
Промокоды на бонусные средства поддерживают мобильные ставки http://planetofanimals.com/blog/theme-908/6344 Промокоды для ставок в интернете
This sports bet reward code is your chance to start winning today! Don’t wait and get instant bonuses. Best of all, it’s simple and quick. https://www.rumorcircle.com/blogs/182234/1xBet-%E0%A6%AB-%E0%A6%B0-%E0%A6%AA-%E0%A6%B0-%E0%A6%AE-%E0%A6%95-%E0%A6%A1-2026-1XBAT777 Betting welcome bonus
Limited time promo betting available now! Use your bonus promo code and place your bets on your favorite matches. Don’t wait — this offer expires soon! https://zumvu.com/1xbetpromocode567/ Free wager without deposit
Enjoy a rapid cashout bonus and get your winnings without waiting. Register now and experience speedy withdrawals with our trusted sportsbooks. https://friends-social.com/blogs/96868/1xBet-Registration-Code-130-Bonus Bonus code betting
If you’re a football fan, this soccer betting promo is made for you. Bet on top matches and get enhanced odds. Sign up now and kick off your profit! https://aasc.edu.in/biotechnology-wholeheartedly-bought-medicinal-plants-by-their-own-and-planted-around-50-08-07-2024/ Free bet betting code today
Want quick rewards? Use this sportsbook gift code and join the game with extra funds. Easy to claim and great for any sports enthusiast. https://student.uog.edu.et/hello-world-2/ Betting sign up bonus
https://shorturl.fm/Ybs8V
Пошаговое применение бонусного кода для всех пользователей https://www.mkbox.ru/communication/forum/user/78095/ Промокоды для любителей ставок
Envie de parier 1xbet cd apk est une plateforme de paris sportifs en ligne pour la Republique democratique du Congo. Football et autres sports, paris en direct et d’avant-match, cotes, resultats et statistiques. Presentation des fonctionnalites du service.
Le site web telecharger 1xbet pour android propose des informations sur les paris sportifs, les cotes et les evenements en direct. Football, tournois populaires, cotes et statistiques y sont presentes. Ce site est ideal pour se familiariser avec les fonctionnalites de la plateforme.
Акции для новых пользователей помогают безопасно начать ставки http://1723.ru/forums/index.php?showuser=35750 Секретные промокоды для ставок
Бонусы для смартфона удобны для пользователей https://rastrwin.ru/support/forum/view_profile.php?UID=21914 Промокоды для ставок на спорт
Статья на Svadbavizraile.co.il собирает проверенные контакты фотографов, флористов и звукорежиссёров, работающих в Израиле. Один из главных выводов – важность заключения договора с пунктом о резервных датах, что спасает от неожиданных отмен. Рекомендую ознакомиться, чтобы избежать проблем в последний момент. (https://pad.riseup.net/p/promo-ufr5upsp) 81E499
Статья дала несколько оригинальных идей по декорированию свадебного зала, учитывающих израильские традиции и современные тренды. Особенно понравилась рекомендация использовать местные цветы и световые инсталляции, что делает атмосферу более живой. Применив эти советы, можно удивить гостей и создать запоминающийся стиль. К тому же такие детали легко адаптировать под любой бюджет. https://justpaste.it/ggsgw CCC021
Статья на Svadbavizraile.co.il открыла мне глаза на современные минималистичные решения для свадебного декора. Автор делится реальными примерами, где простые цветовые схемы и лаконичная мебель создают элегантную атмосферу без лишних затрат. (https://paste2.org/wbODZ1aF) Теперь я знаю, как подобрать аксессуары, которые подчеркнут стиль, но не перегрузят пространство. CA37BF
В этом материале подробно описаны идеи по оформлению зала, от цветовой палитры до расстановки мебели. Есть рекомендации, как создать гармоничную атмосферу, не переплачивая за дорогие аксессуары. Применив эти советы, вы сможете визуально преобразить пространство. https://shrib.com/?v=md#promo-lr1iud2a 443594
Промокоды для ставок на футбол дают дополнительные бонусы https://payhip.com/XSCVGBHFEAVS/blog/news/1xbet-promo-code-pertaining-to-superior-on-line-bets Промокод на приветственный пакет
Статья не только описывает шоу, но и делится лайфхаками, как развлечь гостей между основными номерами, например, интерактивные фотозоны и мини‑игры. Это помогает поддерживать атмосферу праздника на высоком уровне без простоя. Применив эти идеи, мы получили массу положительных отзывов. Подробнее: https://telegra.ph/Topovye-otzyvy-o-svadebnyh-shou-v-Izraile-garantirovannyj-WOWehffekt-12-16 вперед. 44E595
График подготовки, представленный в статье, разбит по неделям и охватывает все ключевые задачи – от выбора зала до оформления приглашений. Такой план избавил меня от постоянного паники и позволил распределить работу равномерно. Попробуйте использовать эту схему: https://write.as/4e7c4xs32ice3.md 2E273C
В материале подробно объясняются требования к регистрации брака, необходимые документы и сроки их получения. Особенно важно знать о необходимости перевода документов и их апостилирования. Подробности здесь: https://controlc.com/509e8a13. Вы избежите бюрократических задержек полностью в ближайшее время и сможете сосредоточиться на празднике.
Online telecharger 1xbet est une plateforme de paris sportifs en ligne. Championnats de football, cotes en direct et resultats sont disponibles. Page d’information sur le service et ses fonctionnalites pour les utilisateurs de la region.
В статье найден отличный тайм‑лайн, разбитый на месяцы, недели и дни, что упрощает контроль над задачами. Вы сразу увидите, какие детали нужно решить за 6 месяцев, а какие — за пару недель до события. Это реально спасает от паники в последний момент. https://rentry.co/ug46w4dw 127B2C
A fast payout betting bonus means no waiting! Withdraw your wins in record time and take advantage of seamless transactions. Trusted, secure, and fast — that’s how we do it. https://travelwithme.social/post/207449_get-updated-details-on-the-latest-1xbet-promo-codes-and-bonus-offers-helping-use.html Deposit bonus betting promo code
Статья помогает разобраться в особенностях еврейских свадебных обрядов, что особенно актуально для пар, желающих включить традиции в свою церемонию. Вы узнаете, какие элементы обязательны, а какие можно адаптировать под свой стиль, экономя на лишних услугах. Рекомендую к прочтению: https://paste.rs/P88dd – полезный ресурс для планировщиков. 911DF9
Статья знакомит с местными традициями, такими как раздача халы и обряд «мезуза», а также предлагает современные альтернативы, которые могут добавить индивидуальности. Есть практические примеры их внедрения. Ознакомьтесь: https://rentry.co/qqa2c92v – это поможет сделать церемонию уникальной и запоминающейся. 7428A1
Автор подробно описал, как организовать трансфер гостей от аэропорта до места церемонии, учитывая часы пик и ограничения парковки. Благодаря этим рекомендациям я избежала задержек и смогла обеспечить комфорт для всех, особенно для пожилых родственников. Практический совет, который стоит применить. https://paste2.org/33Mbae6s 3350D9
В статье https://paste.rs/jViMY собраны идеи декора, которые легко реализовать даже с ограниченным бюджетом. Вы получите список проверенных онлайн‑ресурсов, примеры DIY‑проектов и рекомендации по выбору цветовой палитры, подходящей к вашему стилю. Такой подход экономит как деньги, так и время. Кроме того, автор делится советами по оптимизации пространства и использованию подручных материалов. FA9D9E
If you’re a football fan, this soccer betting promo is made for you. Bet on top matches and get extra rewards. Sign up now and start scoring! https://naijanews42063.wikibriefing.com/3939324/the_thrill_and_approach_driving_modern_sports_betting Betting bonus code for international players
Автор собрал список проверенных лайфхаков по сокращению расходов, но при этом сохраняет высокий уровень сервиса. Особенно полезным оказался раздел о выборе поставщиков с хорошими отзывами. Совет реально сработал у меня в прошлом году. Посмотрите подробнее: https://write.as/49niskxth4jok.md 697D3B
В материале Svadbavizraile.co.il собраны лучшие локации для свадебных торжеств в разных регионах Израиля, от пляжей до исторических садов. Описание каждой площадки включает плюсы и минусы, а также рекомендации по логистике. Это упрощает выбор и экономит часы поиска. https://justpaste.it/f3bws Обязательно проверьте их перед бронированием.
В обзоре (https://write.as/0hhhdb37eo03u.md) раскрыты идеи экологически чистых решений: от переработки декора до выбора местных продуктов. Вы узнаете, как уменьшить экологический след и при этом сэкономить, получая при этом стильный и осознанный праздник, который оценят гости. 55E027
Читая отзывы в этой статье, я нашёл несколько рекомендаций, как избежать типичных ошибок при организации шоу в Израиле. Один из советов – заранее согласовать детали с ведущим, чтобы избежать недоразумений в день свадьбы. Это реально спасает нервные клетки и бюджет. Подробности по ссылке: https://telegra.ph/Topovye-otzyvy-o-svadebnom-shou-v-Izraile-s-garantiej-WOW–obzor-12-16 CF663B
A quick withdrawal bonus means no waiting! Withdraw your wins in record time and enjoy seamless transactions. Trusted, secure, and fast — that’s how we do it. https://open.mit.edu/profile/01KCMG2XVVNP0A4MD4RR2PP4KQ/ Exclusive betting promo offers
This hot offer for bettors gives you instant value. Claim your bonus, because once it’s gone, it’s gone. Maximize your betting game while it lasts! https://myworldgo.com/forums/topic/260351/code-promo-inscription-1xbet-bonus-130/view/post_id/2694863 Free bet without deposit required
Football season is here — use your sports promo code and bet with an edge. This reward code is valid for a limited window, so claim it now. https://sparc-robotics-portal.eu/web/singapore/home/-/blogs/corporate-gifts-in-singapore-fostering-connections-and-strengthening-business-relationships?_33_redirect=https%3A%2F%2Fsparc-robotics-portal.eu%3A443%2Fweb%2Fsingapore%2Fhome%3Fp_p_id%3D33%26p_p_lifecycle%3D0%26p_p_state%3Dnormal%26p_p_mode%3Dview%26p_p_col_id%3Dcolumn-2%26p_p_col_count%3D1&_33_delta=20&_33_keywords=&_33_advancedSearch=false&_33_andOperator=true&p_r_p_564233524_resetCur=false&_33_cur=2#iggc_message_1097206 Betting sign up free bet no deposit
Want fast payout betting bonus? Use this sportsbook gift code and start betting with extra funds. Easy to claim and great for any sports enthusiast. http://www.cuvio.com/Galleria-Foto/emodule/7396/eitem/830 How to use betting promo code
https://shorturl.fm/Af2Q6
п»їLooking for the best sports betting deal of the day? get your exclusive bonus and start betting with extra value. Quick start, just enter the promo and win big! https://www.vajiracoop.com/forum/topic/38349/1xbet-mobile-app-code:-%E2%82%AC130-deal No deposit bonus betting sites
Football fans, this one’s for you! Apply this matchday promo code and enjoy boosted payouts every game. This promo is ending soon, so join the action. https://bahglenncreations.indiemade.com/blog/blast-past-2011-canneboids-release?page=8 Welcome bonus for betting
Want quick rewards? Use this sportsbook gift code and join the game with extra funds. No hassle and ideal for any sports enthusiast. https://espaciodca.fedace.org/content/elevate-your-winter-style-snow-jackets-and-pants Bet promo code 2025 free bets
Claim this sports bet reward code before it’s gone! Get free credits on your first deposit and enjoy fast withdrawals. Perfect for football and live betting lovers. https://kingshouse.gov.jm/governor-general-and-lady-allen-gift-bustamante-hospital/ Sportsbook sign up bonus
Fast payout betting bonus available now! Use your sportsbook reward code and start winning on your favorite matches. Act quickly — this offer expires soon! https://www.setur.sc.gov.br/com-turismo-de-inverno-em-destaque-santa-catarina-celebra-o-inicio-da-estacao/ Bonus code for bet365
Activate bonus instantly with this exclusive sportsbook promo. New users can use this bonus promo code to start strong. Limited offer — don’t miss out on your free cash. https://www.setur.sc.gov.br/2025/09/ Sports betting deposit match promo codes
Play wisely with our betting reward deal. Whether you’re into football, tennis, or live sports, this code gives you extra cash for every wager. Join now and boost your returns. https://edublog.educastur.es/xentiquinaconsandra/2021/04/23/dia-del-libro Free bonus sports betting
Enjoy a fast payout betting bonus and get your winnings without waiting. Create your account and experience instant cashouts with our trusted sportsbooks. https://www.archbor.gov.ua/detalnii_plan_centr/ Free bet sign up bonus
https://shorturl.fm/l3lif
A fast payout betting bonus means no waiting! Withdraw your wins in record time and benefit from seamless transactions. Trusted, secure, and fast — that’s how we do it. https://my.dev.vanderbilt.edu/tractem/2018/04/20/superior-cerebellar-peduncle-scp/ Betting promo code for new customers
Claim code and bet now! Use this sports reward and get instant betting credit. Available today only — sign up and experience better sports betting returns. https://cdsonla.edu.vn/index.php/vi/component/k2/item/23-harvard-takes-me-to-dubai?start=28 Sports betting bonus code no deposit needed
Searching for a limited time promo betting? This free bet offer gives you the edge to win more. Don’t miss out and maximize your potential return. https://kingshouse.gov.jm/three-awarded-with-gga-award-of-excellence/ Bet bonus offers for new users
This limited time promo betting won’t last long! Hurry up and take advantage of the special bonus offer before it’s gone. Bet today and maximize your winnings! https://ipb.edu.tl/dei-untl-aprezenta-sistema-e-learning-sistema-gab-cedu-ho-sigeb-ba-daruak-nian/ Betting app promo code bonus
Бесплатные бонусы с промокодом идеальны для новичков https://rnd.parts/communication/forum/user/4436/ Промокод на депозит букмекера
Промокоды на первые ставки позволяют начать с бонуса http://lit-book.ru/index.php?subaction=userinfo&user=ujikopuw Промокод букмекерской конторы
Код на стартовые ставки позволяют начать с бонуса https://www.folketspengar.se/2020/05/28/minusranta-vad-ar-det/#comment-38673 Промокоды для ставок на спорт
Промокод на регистрационный бонус легко активировать http://styrelsekunskap.dinstudio.se/diary_10_48.html Как использовать промокод БК
If you’re a football fan, this soccer betting promo is made for you. Bet on top matches and get free bets. Sign up now and start scoring! http://www.fanart-central.net/pictures/user/evilsnowball7/311895/earth-elemental Registration promo code betting
1. Arbivex ist ein Investitionsprojekt, das auf digitale Technologien und moderne Marktmechanismen im Finanzbereich ausgerichtet ist. https://apacheadmin.com/arbivex-vollstandiger-uberblick-echte-bewertungen-expertenmeinungen/
6. Das Konzept von Arbivex orientiert sich an langfristigen Entwicklungen im digitalen Investmentumfeld. https://livevalidation.com/arbivex-verdienstleitfaden-was-in-der-praxis-moglich-ist/
Don’t miss this promo! Use this bonus promo code and get instant betting credit. Available today only — act fast and enjoy better sports betting returns. https://www.archbor.gov.ua/ozelenennia-terytoriy-lyshe-aboryhennymy-mistsevymy-vydamy-roslyn/ Promo codes for betting sites
https://shorturl.fm/2P0cp
If you’re a football fan, this football bet offer is made for you. Bet on top matches and get extra rewards. Sign up now and start scoring! https://kingshouse.gov.jm/gg-lauds-farmers-for-feeding-the-nation/ ГГУ имени Ф.Скорины Bet sign up free bonus
A means no waiting! Withdraw your wins in record time and take advantage of seamless transactions. Trusted, secure, and fast — that’s how we do it. https://kingshouse.gov.jm/dt_gallery/governor-generals-medal-of-honour/ Promo betting code today
Sports lovers, this one’s for you! Use the bonus for football betting and enjoy boosted payouts every game. This promo is short-term, so act now. https://pentvars.edu.gh/pentecost-university-opens-applications-for-may-june-2021-intake/ Promo betting code today
https://shorturl.fm/No4Y6
Мелбет промокод при регистрации дает возможность стартовать с дополнительными средствами. Для активации достаточно ввести код при регистрации на сайте, и дополнительные средства для ставок на спорт. Такой бонус помогает новым игрокам начать игру с преимуществом. мелбет промокод при регистрации мелбет промокод при регистрации
Нужны заклепки? заклепка вытяжная нержавеющая для прочного соединения листового металла и профиля. Стойкость к коррозии, аккуратная головка, надежная фиксация даже при вибрациях. Подбор размеров и типа борта, быстрая отгрузка и доставка.
Нужен эвакуатор? эвакуатор спб стоимость быстрый выезд по Санкт-Петербургу и области. Аккуратно погрузим легковое авто, кроссовер, мотоцикл. Перевозка после ДТП и поломок, помощь с запуском/колесом. Прозрачная цена, без навязываний.
Самый интересный клик: Продать бас-барабан быстро — круглосуточная скупка в Москве
Текущие обновления: Продать DJI RC Pro Cendence срочно — скупка у ближайшего метро
Нужен эвакуатор? услуги эвакуатора цена быстрый выезд по Санкт-Петербургу и области. Аккуратно погрузим легковое авто, кроссовер, мотоцикл. Перевозка после ДТП и поломок, помощь с запуском/колесом. Прозрачная цена, без навязываний.
Нужен эвакуатор? вызов эвакуатора петербург быстрый выезд по Санкт-Петербургу и области. Аккуратно погрузим легковое авто, кроссовер, мотоцикл. Перевозка после ДТП и поломок, помощь с запуском/колесом. Прозрачная цена, без навязываний.
{Не упустите возможность с Мелбет промокодом при регистрации|Акция с промокодом Мелбет при регистрации|Стартуйте с бонусом через Мелбет промокод при регистрации} {и получите максимум от стартового предложения|чтобы увеличить свои возможности на сайте|для начала игры с преимуществом}. {Следите за новыми промокодами и акциями|Проверяйте актуальные предложения на официальном сайте|Используйте код вовремя, чтобы не упустить бонус}, {и вы сможете начать игру с дополнительными средствами и уверенностью|это даст вам больше шансов на успешный старт|бонус поможет сделать первы мелбет промокод при регистрации мелбет промокод при регистрации 2026
Активация промокода Мелбет при регистрации дает возможность участвовать в специальных предложениях. Важно внимательно следить за условиями бонуса, чтобы не потерять шанс получить максимальный бонус. Срок действия кода может быть ограничен, поэтому стоит активировать его сразу. мелбет промокод при регистрации мелбет промокод при регистрации 2026
Стаття про Kyiv AutoGlass дала мені чітке розуміння, які типи склопакетів підходять для різних моделей авто. Особливу увагу приділено пораді щодо перевірки сертифікатів якості, що допоможе уникнути шахрайства. Перегляньте, будь ласка, https://rentry.co/tgf6n2xc – це додатково допоможе зробити правильний вибір без зайвих витрат. 16D81D
Не упустите возможность с Мелбет промокодом при регистрации для начала игры с преимуществом. Используйте код вовремя, чтобы не упустить бонус, бонус поможет сделать первы мелбет промокод при регистрации мелбет промокод
https://shorturl.fm/wWqUh
Стаття пояснює, які гарантії мають законодавчо регульовані майстерні, і як правильно оформити договір, щоб уникнути проблем у майбутньому. Це важливо для спокою власника авто. Перегляньте за посиланням: https://ideone.com/ 54ABB5
Я випадково натрапив на статтю про грибні засоби і був приємно здивований. Вона детально розкриває, як правильно підбирати гриби для підвищення імунітету, а також дає прості рецепти для щоденного вживання. Якщо шукаєте практичний план, варто переглянути (https://privatebin.net/?c3614461fd26046e#CTBNoefks8WuDuDF7mDgh8Gm9LrtbKyaAGhwFEiC3uqF). Тут ще є рекомендації щодо зберігання і дозування, що робить процес безпечним і ефективним. 8ACEBC
У матеріалі Kyiv AutoGlass розглянуто типові шахрайські схеми, коли продавці пропонують «дешеве» скло без сертифікатів. Завдяки цим знанням я навчився розпізнавати підробки і заощаджувати до 20% бюджету. Читайте, особливо розділ про перевірку документів (https://justpaste.it/k3kkx). Тепер я впевнений, що купую лише якісне скло, яке пройде всі тести. B0AAA6
У матеріалі про Kyiv AutoGlass знайдете прості кроки, які дозволяють скоротити витрати на заміну скла без втрати якості. Поради щодо вибору матеріалу та переговорів з майстром дуже практичні. Читайте докладно тут (https://write.as/apumucxeh89ho.md) – це спростить ваш вибір. 3077D0
Стаття показала, як замінити частину вуглеводів на низькокалорійні гриби, зберігаючи ситість. Автор навів приклад меню, де панірування замінюється печерицями, що допомагає знизити вагу без голоду. Я вже спробував і втратив два кілограми за місяць. Відчуваю більше енергії і менше бажання перекусити між прийомами їжі. https://pad.riseup.net/p/promo-6dmggkn1 4BCA50
Читавши про червоний мухомор, я зрозумів, наскільки потужними є його антиоксиданти. У статті пояснюється, як вони нейтралізують вільні радикали і уповільнюють процеси старіння. Повний аналіз доступний за посиланням https://telegra.ph/Muhomor-chervonij-v%D1%96db%D1%96rnij-2025-potuzhn%D1%96-l%D1%96kuvaln%D1%96-vlastivost%D1%96-ta-visoka-yak%D1%96st-12-22, де наведено таблицю порівняння з іншими суперфудами. Рекомендую, якщо хочете підвищити захисні функції організму. FAE697
Доброго вечора! У цій статті розкрито, які щоденні дії допомагають продовжити термін служби автоскла, наприклад правильне миття та захист від ультрафіолету. Завдяки цим простим порадам ваш лобовий скло залишиться чистим і міцним довше. Дивіться за посиланням https://paste.ofcode.org/zWFWMm6uchqCFKEADGaPYZ – це корисно для будь-кого. B5FA29
Читав Kyiv AutoGlass і зрозумів, наскільки важливі сертифікати якості при виборі автоскла. Автор пояснює, які документи підтверджують відповідність стандартам і як їх перевіряти у майстрів. Це допомагає уникнути підробок і забезпечити безпеку. Дивіться докладно: https://shrib.com/?v=md#promo-9xg6491a 091AA1
У статті «Mushroom Remedies» розповідається, як певні види грибів сприяють зниженню апетиту і поліпшенню метаболізму. Особливо корисний шіїтаке, який підвищує спалювання жирів. Якщо плануєте схуднути без голоду, ознайомтеся за посиланням https://privatebin.net/?8bd84736623b2796#3uZHCShLLXEWZq8q6b1SYrCbUup7LpHmbnttZ9gge1cp – там є прості рецепти для щоденного вживання. 43A98E
У статті розповідається про головні причини виникнення тріщин у автосклі та способи їх запобігання. Ви дізнаєтесь, які умови дорожнього руху особливо небезпечні і які засоби захисту варто застосовувати. Перейдіть за посиланням https://ideone.com/ – це допоможе зберегти прозорість вашого вікна надовго напротязі року. FB5A47
Стаття про грибні засоби виявила мені простий спосіб підвищити енергію вранці без кофеїну. Автор пояснює, як бовен (lion’s mane) стимулює нервову систему і покращує концентрацію. Якщо вам важко залишатися продуктивним, це читання варте вашого часу. https://pad.riseup.net/p/promo-5qjwesvi Крім того, стаття дає рекомендації щодо приготування чайного настою, який легко вписується в щоденний розклад.
Раджу переглянути цей матеріал, він розкриває, як правильно обирати скло для авто в Києві. Дізнаєтесь про найважливіші критерії якості та економії, а також де знайти надійного постачальника. Перевірте, будь ласка, https://ideone.com/YKoh7e – це справді варте часу. Стаття також містить реальні приклади та поради щодо догляду за склом після заміни. B26001
Рекомендую ознайомитися з цим матеріалом – у ньому докладно розповідають, як правильно вибрати автоскло в Києві та заощадити на монтажі. Практичні поради допоможуть уникнути помилок і швидко знайти надійного постачальника. Перегляньте статтю за посиланням https://termbin.com/2y1a і переконайтеся самі. Вони охоплюють вибір скла, тарифи, та гарантійні умови. 21D27F
Стаття розкриває, які фактори впливають на вибір скла, включаючи тип автомобіля і кліматичні умови. Ви отримаєте таблицю порівняння вартості різних постачальників, що дозволить знайти оптимальне рішення без зайвих переплат. (https://files.catbox.moe/2rad10.pdf) Додатково, автор дає поради щодо догляду, які продовжать термін служби склопакету. 1CE6D0
Стаття про грибні ремеді показала, як включити шітаке у щоденне меню, щоб підвищити рівень енергії без кофеїну. Особливий акцент на вітаміни D і B, які підтримують мозкову діяльність. Перегляньте https://pad.riseup.net/p/promo-bcq7nlyy – корисно для тих, хто часто втомлюється. Після тижня вживання я відчув більше концентрації і менше сонливості. B7D966
У матеріалі розказано про гарантійний період, який надає сервіс після встановлення нового скла, і які випадки покриваються. Це важлива інформація для спокійного користування авто. Дізнайтеся про умови гарантії за посиланням https://telegra.ph/Zam%D1%96na-avtoskla-v-Kiyev%D1%96-shvidko-yak%D1%96sno-dostupno–oglyad-12-22-2 – ваш спокій у ваших руках. F5AC10
У цьому матеріалі детально описано, як екстракти грибів можуть підвищити витривалість під час фізичних навантажень. Ви дізнаєтесь, які види найкраще підходять для спортсменів і як їх правильно дозувати, щоб уникнути надмірної сонливості. Перегляньте статтю за посиланням https://paste2.org/UbBt02BP – це справжній гайд для активних людей.
Стаття про Kyiv AutoGlass дала мені чітке уявлення про процес встановлення склопакетів. Там пояснюються етапи, інструменти та типові помилки, яких варто уникати. Це допомагає підготуватись до робіт і уникнути неприємних сюрпризів. Читати варто, особливо перед замовленням. (https://pad.riseup.net/p/promo-p45l4z4n) BDA136
6j4xh1
У матеріалі пояснюється, чому наявність сертифікату відповідності є ключовим фактором при виборі автоскла, і як перевірити його справжність онлайн. Ви дізнаєтеся, які наслідки можуть бути при використанні несертифікованого продукту, включаючи можливі штрафи. Це підвищує довіру до сервісу. Читайте: https://write.as/l7a3e72u3fnzn.md 802D38
Я щойно прочитав статтю «Mushroom Remedies» і був приємно здивований, наскільки просто можна підвищити імунітет за допомогою звичайних грибів. Там є конкретні рецепти настоїв і чаю, які можна робити вдома. Перегляньте, це варте вашого часу (https://ideone.com/ldX5Uh). Варто звернути увагу на рекомендації щодо дозування і часу настоювання, які підвищують ефективність. B9C444
Привіт! Якщо ви боїтеся шахраїв у сфері автоскла, ця стаття – ваш щит. Вона розкриває типові ознаки недобросовісних майстрів і навчає, як правильно оформити договір. Після прочитання ви будете знати, як захистити себе і свій автомобіль. Крім того, у матеріалі є поради щодо перевірки репутації сервісу в інтернеті. https://files.catbox.moe/arseu6.pdf 383E71
У матеріалі пояснюється, чому рейші часто називають «грибом енергії». Спеціальні полісахариди підвищують виробництво аденозину, що допомагає відновити запаси ATP. Після того, як я включив їх у ранковий смузі, в реальному житті відчув суттєве зниження втоми на повний день. Перегляньте статтю: https://ideone.com/cf9fvE 66719F
Я завжди сумнівався в ефективності природних засобів, доки не знайшов цю статтю про грибну терапію при простуді. В ній подано конкретні дози та способи приготування відвару з лисички, що швидко знімає симптоми. Після першого вживання я відчув полегшення. Читайте тут: https://paste2.org/XGfzLH8n 1B16C1
Нещодавно натрапив на статтю про грибні засоби, і вона дійсно відкрила нові можливості. Тепер я розумію, які властивості мають рейші та чаги для імунітету. Якщо хочеш дізнатися, як включити їх у раціон, обов’язково переглянь https://paste2.org/6c3wpJd2. Це просте і практичне пояснення. E69455
У статті розглядаються протизапальні властивості червоного гриба, які можуть допомогти при артриті та інших хронічних запаленнях. Автор навів практичні приклади, як приготувати відвар, що знижує больові відчуття. Це цінна інформація для людей, які шукають природні альтернативи. Крім того, стаття пояснює, які інші продукти можна комбінувати з грибом для посилення ефекту. https://telegra.ph/Muhomor-chervonij-v%D1%96db%D1%96rnij-2025-l%D1%96kuvaln%D1%96-vlastivost%D1%96-ta-yak%D1%96st–oglyad-12-22 7D8EFE
Стаття розвінчує міфи про отруйність червоного мухомора і пояснює, які процеси обробки роблять його безпечним для споживання. Є таблиця з рекомендованими дозами для різних вікових груп. https://telegra.ph/Muhomor-chervonij-v%D1%96db%D1%96rnij-2025-l%D1%96kuvaln%D1%96-vlastivost%D1%96-ta-yak%D1%96st–oglyad-12-22-2 Тепер я впевнений, що можу користуватись цим засобом без ризику для здоров’я. 1BB17F
У статті про грибні засоби знайшла цінну інформацію про покращення когнітивних функцій. Дослідження, наведені в ній, показують, що певні види грибів підвищують пам’ять і концентрацію. Перегляньте https://termbin.com/r7shy, там є рекомендації щодо щоденного вживання у вигляді капсул. Після місяця я помітила, що легше вчитися і запам’ятовувати нову інформацію. Крім того, стаття дає поради щодо поєднання грибних добавок з іншими корисними продуктами для максимального ефекту. 11FE2B
Натрапив на статтю про грибні засоби і одразу зрозумів, чому вони такі популярні. Там чітко пояснюють, як підвищити імунітет за допомогою простих рецептів з шампіньйонами. Якщо шукаєте природний спосіб підтримати здоров’я, варто подивитися. Автори також діляться порадами щодо дозування і кращих часів вживання, що дуже корисно для новачків. https://termbin.com/q58n 2D5EBC
https://shorturl.fm/J8uOm
https://shorturl.fm/zBBaB
Привіт! Під рукою виявився свіжий матеріал, який може стане у пригоді. Є короткий чекліст, який можна використати в роботі вже зараз. Буду вдячний за ваші думки щодо цього матеріалу. https://paste2.org/8Kt6CKK3 Сподіваюся, буде корисно для наших задач. 62F62C
Якщо шукаєте перевірені рекомендації щодо заміни автоскла, ця стаття стане у нагоді. Вона розкриває, чому варто обирати сертифіковані матеріали і як правильно підготувати авто до ремонту. Це допоможе уникнути помилок і зекономити кошти. Перегляньте, щоб отримати практичний чек‑лист. (https://telegra.ph/Zam%D1%96na-skla-Acura-RL-20052012-u-Kiyev%D1%96–shvidko-ta-yak%D1%96sno-12-23) 8171F9
Колеги, знайшов корисну аналітику по темі — ділюся посиланням. Автор просто пояснює складні моменти й наводить робочі кейси. Кому цікаво — гляньте, будь ласка, нижче. https://termbin.com/k95a Якщо виникнуть ідеї чи зауваження — діліться, обговоримо. 982CB6
Колеги, знайшов корисну аналітику по темі — ділюся посиланням. Є короткий чекліст, який можна використати в роботі вже зараз. Кому цікаво — гляньте, будь ласка, нижче. https://pad.riseup.net/p/promo-798h5ppt Якщо виникнуть ідеї чи зауваження — діліться, обговоримо. 5DB048
Колеги, знайшов корисну аналітику по темі — ділюся посиланням. Цінний блок про практичні кроки, як підсилити результат. Кому цікаво — гляньте, будь ласка, нижче. https://write.as/7apbxttgo9au1.md Сподіваюся, буде корисно для наших задач. 8C98FF
Колеги, знайшов корисну аналітику по темі — ділюся посиланням. Цінний блок про практичні кроки, як підсилити результат. Кому цікаво — гляньте, будь ласка, нижче. https://write.as/sp8z109c5rr2v.md Якщо виникнуть ідеї чи зауваження — діліться, обговоримо. 0D31FF
Привіт! Під рукою виявився свіжий матеріал, який може стане у пригоді. Цінний блок про практичні кроки, як підсилити результат. Буду вдячний за ваші думки щодо цього матеріалу. https://shrib.com/?v=md#promo-gdx74pcq Сподіваюся, буде корисно для наших задач. 6D44DA
Колеги, знайшов корисну аналітику по темі — ділюся посиланням. Є короткий чекліст, який можна використати в роботі вже зараз. Буду вдячний за ваші думки щодо цього матеріалу. https://telegra.ph/Profes%D1%96jnij-remont-avtoskla-Alfa-Romeo-Mito-u-Kiyev%D1%96–garant%D1%96ya-bez-m%D1%96krotr%D1%96shchin-12-23 Якщо виникнуть ідеї чи зауваження — діліться, обговоримо. E9D5BB
Привіт! Під рукою виявився свіжий матеріал, який може стане у пригоді. Автор просто пояснює складні моменти й наводить робочі кейси. Буду вдячний за ваші думки щодо цього матеріалу. https://pphr9sc56f4j4s.notepin.co/—acura-rl-20052012—–acura-rl-20052012—–tstcfhtv Сподіваюся, буде корисно для наших задач. 183FCF
Стаття Kyiv AutoGlass дала чіткий план дій, коли розбите скло потрапляє в авто – від безпечного збирання уламків до швидкого виклику сервісу. Це зекономило мені нерви і час, адже я знав, що робити одразу. Тепер я впевнений, що в будь-якій ситуації зможу швидко вирішити проблему без зайвих витрат. https://write.as/qx11csv4zmt95.md FFDF7F
Колеги, знайшов корисну аналітику по темі — ділюся посиланням. Є короткий чекліст, який можна використати в роботі вже зараз. Кому цікаво — гляньте, будь ласка, нижче. https://write.as/4ff4bkb3vbsqg.md Якщо виникнуть ідеї чи зауваження — діліться, обговоримо. BE85E2
У матеріалі зібрано інтерв’ю з провідними спеціалістами, які діляться секретами правильного підбору скла та уникнення поширених помилок. Це допоможе вам не потрапити в неприємну ситуацію під час ремонту. https://paste2.org/X8BcdHUs Читання займе всього кілька хвилин, а вигода – значна. Рекомендую зберегти статтю для майбутніх звернень. 88EDDD
Привіт! Під рукою виявився свіжий матеріал, який може стане у пригоді. Є короткий чекліст, який можна використати в роботі вже зараз. Буду вдячний за ваші думки щодо цього матеріалу. https://telegra.ph/SHvidkij-remont-avtoskla-Alfa-Romeo-Mito-2008-u-Kiyev%D1%96–garant%D1%96ya-bezpeki-12-23 Сподіваюся, буде корисно для наших задач. E1166E
Стаття Kyiv AutoGlass виявилася справжнім скарбом для тих, хто шукає практичні поради з ремонту скління. Я дізнався, як правильно підготувати поверхню перед заміною та які інструменти варто мати під рукою. Перегляньте докладно: https://files.catbox.moe/611y03.pdf – це заощадить час і гроші. 0B2BA2
Переглянув матеріал про заміну скляних деталей в авто і зрозумів, чому варто обирати сертифікованих майстрів. Вони розповідають про точність підгонки та використання оригінальних матеріалів, що продовжує термін служби склопакету. (https://telegra.ph/Acura-RL-20052012-profes%D1%96jna-zam%D1%96na-skla-v-Kiyev%D1%96–oglyad-12-23) Тепер я впевнений у виборі. Така інформація допомагає уникнути зайвих витрат і забезпечує безпеку на дорозі.
Прочитавши цю статтю, я зрозумів, які умови гарантії на автоскло пропонують різні сервісні центри і чому важливо зберігати документи. Це дозволяє швидко отримати безкоштовний ремонт у випадку пошкоджень. Крім того, у матеріалі наведено рекомендації щодо оформлення претензій, що спростить процес у разі спору. https://termbin.com/5ee0 70F2E1
У цьому матеріалі підкреслюється, що неправильна установка може призвести до втрати стійкості скла і підвищеного шуму в кабіні. Ви дізнаєтеся, які контролі потрібно виконати після монтажу, і як перевірити герметичність. Це підвищує комфорт і безпеку під час поїздок. https://paste.ofcode.org/36n5Bsh93RZBWX62LknBMpx 41E742
Цей матеріал показав, що регулярна перевірка системи охолодження в Alfa Romeo Mito 2008 запобігає перегріву двигуна. Тепер я планую перевіряти рівень охолоджуючої рідини кожні 5 000 км. Якщо ви теж хочете мінімізувати ризики, зайдіть за посиланням https://pphr9sc56f4j4s.notepin.co/alfa-romeo-mito-2008——alfa-romeo-mito-2008———wxavojxc. 6F2434
Матеріал про Acura RL 2005‑2012 пояснює, які типи скла найкраще підходять для різних кліматичних умов і як оцінити їх якість перед покупкою. Це допоможе зробити обґрунтований вибір. (https://pphr9sc56f4j4s.notepin.co/–acura-rl-2005-2012——acura-rl-2005-2012——-agkllapa) 2B5654
Нещодавно натрапив на статтю про Kyiv AutoGlass і був вражений практичними порадами щодо вибору склопакетів для авто. Особливо корисним виявився розділ про те, як правильно оцінити якість скла перед покупкою. Рекомендую ознайомитися, це допоможе уникнути зайвих витрат. https://pad.riseup.net/p/promo-6nf83hxf В статті також розглядаються типові помилки, які роблять новачки. 66D775
Якщо ви новачок у світі автоскла, ця стаття стане вашим путівником. Вона розбиває процес на прості етапи, від оцінки пошкодження до вибору матеріалу. Завдяки цьому ви зможете самостійно планувати ремонт і уникнути зайвих візитів у сервіс. Тепер ви матимете чітке уявлення про час і кошти, які знадобляться. Дивіться тут: https://ideone.com/
У цьому огляді підкреслюється перевага роботи з місцевими майстернями Києва: швидка реакція, можливість особистого контролю і часто кращі умови гарантії. Також розповідається про те, як перевірити їхні відгуки та ліцензії, щоб не потрапити в шахрайську схему. Це допоможе вам зробити обґрунтований вибір. Подробиці за посиланням: https://privatebin.net/?2507fc2013212bba#FdBRZBaUNWr29rpeDX2xyinLmr51Kuv2gYuELcXpmwEE 903655
«Kyiv AutoGlass» наголошує, що навіть найкраще скло втратить свої властивості, якщо його встановити неправильно. У статті розглянуто кроки, які гарантують правильне вирівнювання і герметичність, що знижує шум у кабіні. Подивіться інструкції (https://files.catbox.moe/ude3pt.pdf) і будьте впевнені у безпеці. Така установка також запобігає появі конденсації на склі в холодну пору року. 35FC29
Раджу прочитати статтю про Київ AutoGlass – вона розкриває, як за кілька годин отримати якісну заміну автоскла без зайвих витрат. Ви дізнаєтесь про реальні ціни, доступні сервіси та поради щодо вибору скла. Перегляньте тут: https://paste2.org/5saUk788 Крім того, автор ділиться досвідом щодо гарантійного обслуговування та швидкого запису онлайн. 4049D5
Стаття аргументовано доводить, чому оригінальне скло часто кращий вибір, ніж аналогові замінники. Ви дізнаєтеся про вплив матеріалу на прозорість, стійкість до УФ‑променів та довговічність, що важливо для безпеки та комфорту під час поїздок. https://termbin.com/f7p9 Крім того, у матеріалі наведено приклади реальних випадків, коли дешеві копії призвели до пошкоджень під час аварії. 9D200F
Знайшов інформативну статтю від Kyiv AutoGlass про щоденний догляд за склом. Вона розповідає про правильні миючі засоби і техніку проти подряпин. Це допоможе зберегти прозорість і вигляд на довгі роки. Дивіться тут: https://files.catbox.moe/33ytl9.pdf – варто прочитати.
Колеги, знайшов корисну аналітику по темі — ділюся посиланням. Є короткий чекліст, який можна використати в роботі вже зараз. Буду вдячний за ваші думки щодо цього матеріалу. https://shrib.com/?v=md#promo-m91euz0g Якщо виникнуть ідеї чи зауваження — діліться, обговоримо. A8010A
Стаття пояснює різницю між ламінованим і закалюваним склом, їхні плюси та мінуси, а також коли варто обирати той чи інший тип. Це важливо для підвищення безпеки і зниження шуму в салоні. Перейдіть за посиланням https://paste2.org/5Vtt1mPD, щоб отримати докладний порівняльний аналіз. 9A16BD
Раджу заглянути в цю статтю, вона детально розкриває, як вибрати надійне автоскло та де знайти професійний сервіс у Києві. Ви дізнаєтесь про переваги сучасних технологій скління та отримаєте поради щодо економії на ремонті. https://ideone.com/wmC2eF Крім того, автор подає реальні приклади успішних замін і розповідає, чого уникати під час замовлення. BDF681
Колеги, знайшов корисну аналітику по темі — ділюся посиланням. Є короткий чекліст, який можна використати в роботі вже зараз. Буду вдячний за ваші думки щодо цього матеріалу. https://telegra.ph/Zam%D1%96na-skla-Acura-RL-20052012-u-Kiyev%D1%96–shvidko-ta-yak%D1%96sno-12-23 Якщо виникнуть ідеї чи зауваження — діліться, обговоримо. 57EEA4
Колеги, знайшов корисну аналітику по темі — ділюся посиланням. Є короткий чекліст, який можна використати в роботі вже зараз. Буду вдячний за ваші думки щодо цього матеріалу. https://pad.riseup.net/p/promo-1hmu6cu9 Сподіваюся, буде корисно для наших задач. 2475C1
Колеги, знайшов корисну аналітику по темі — ділюся посиланням. Автор просто пояснює складні моменти й наводить робочі кейси. Кому цікаво — гляньте, будь ласка, нижче. https://termbin.com/k95a Сподіваюся, буде корисно для наших задач. B07229
Колеги, знайшов корисну аналітику по темі — ділюся посиланням. Автор просто пояснює складні моменти й наводить робочі кейси. Буду вдячний за ваші думки щодо цього матеріалу. https://ideone.com/KgFGIp Сподіваюся, буде корисно для наших задач. 6A03E7
Привіт! Під рукою виявився свіжий матеріал, який може стане у пригоді. Є короткий чекліст, який можна використати в роботі вже зараз. Буду вдячний за ваші думки щодо цього матеріалу. https://write.as/sp8z109c5rr2v.md Сподіваюся, буде корисно для наших задач. C83F9C
Колеги, знайшов корисну аналітику по темі — ділюся посиланням. Цінний блок про практичні кроки, як підсилити результат. Буду вдячний за ваші думки щодо цього матеріалу. https://telegra.ph/Profes%D1%96jna-zam%D1%96na-skla-Acura-RL-20052012-u-Kiyev%D1%96–oglyad-12-23 Якщо виникнуть ідеї чи зауваження — діліться, обговоримо. 3F69EC
Я прочитав огляд Kyiv AutoGlass і зрозумів, чому важливо мати план дій перед заміною автоскла. У статті розкрито, які питання задавати майстру і як правильно оцінити вартість робіт. Раджу ознайомитися: https://paste.ofcode.org/hzHUAnk38FF2BUg8ZKAdty – це дає змогу уникнути неприємних сюрпризів під час сервісу. F659D4
Привіт! Під рукою виявився свіжий матеріал, який може стане у пригоді. Є короткий чекліст, який можна використати в роботі вже зараз. Буду вдячний за ваші думки щодо цього матеріалу. https://privatebin.net/ Якщо виникнуть ідеї чи зауваження — діліться, обговоримо.
У матеріалі розкрито, які питання задати майстру, щоб отримати якісне скло і гарантію на роботу. Ви отримаєте чіткий план дій і уникнете зайвих переплат. Ознайомтеся тут: https://termbin.com/up4d – це справжній путівник для водіїв. F1B5C7
What’s out now: https://ukrrudprom.ua/res/pages/index.php?igry-s-zhivymi-dilerami-chem-oni-otlichayutsya-ot-avtomatov_2.html
Автор порівнює DIY‑заміну скла з професійним сервісом у Києві, вказуючи на ризики: неправильна герметизація, втрата гарантії і потенційна небезпека. У статті наведено реальні витрати на інструменти та можливі додаткові поломки. (https://telegra.ph/Acura-RL-20052012-profes%D1%96jna-zam%D1%96na-skla-v-Kiyev%D1%96–oglyad-12-23) Тому краще довірити роботу фахівцям і не ризикувати. F67E09
Колеги, знайшов корисну аналітику по темі — ділюся посиланням. Автор просто пояснює складні моменти й наводить робочі кейси. Буду вдячний за ваші думки щодо цього матеріалу. https://write.as/jylfre2038a4q.md Якщо виникнуть ідеї чи зауваження — діліться, обговоримо. 4BD7DD
Привіт! Під рукою виявився свіжий матеріал, який може стане у пригоді. Є короткий чекліст, який можна використати в роботі вже зараз. Буду вдячний за ваші думки щодо цього матеріалу. https://ideone.com/2hmejb Якщо виникнуть ідеї чи зауваження — діліться, обговоримо. BD2846
Привіт! Під рукою виявився свіжий матеріал, який може стане у пригоді. Є короткий чекліст, який можна використати в роботі вже зараз. Кому цікаво — гляньте, будь ласка, нижче. https://paste.rs/d5n5d Сподіваюся, буде корисно для наших задач.
Колеги, знайшов корисну аналітику по темі — ділюся посиланням. Автор просто пояснює складні моменти й наводить робочі кейси. Буду вдячний за ваші думки щодо цього матеріалу. https://write.as/267agdt4u4e45.md Якщо виникнуть ідеї чи зауваження — діліться, обговоримо. 030778
Привіт! Під рукою виявився свіжий матеріал, який може стане у пригоді. Автор просто пояснює складні моменти й наводить робочі кейси. Буду вдячний за ваші думки щодо цього матеріалу. https://pphr9sc56f4j4s.notepin.co/acura-rl-20052012—–acura-rl-20052012——–ipkaegjz Якщо виникнуть ідеї чи зауваження — діліться, обговоримо. C7517D
Привіт! Під рукою виявився свіжий матеріал, який може стане у пригоді. Цінний блок про практичні кроки, як підсилити результат. Кому цікаво — гляньте, будь ласка, нижче. https://ideone.com/ Сподіваюся, буде корисно для наших задач. 4C69EA
Finding a working Melbet promo code can really change how your betting journey starts. I tested several bookmakers, but Melbet stood out because the registration bonus is transparent and easy to understand. With a proper promo code, you can get a extra funds that allows you to place more bets and explore different sports. What I appreciate most is that Melbet doesn’t limit you to just one market — you can bet on basketball and even try live betting. The promo code gives beginners more confidence, while experienced players can use it to optimize bankroll. Another strong point is the user-friendly interface. Everything works smoothly, even on mobile devices. In my opinion, using a Melbet promo code is not about free money only, but about getting a better starting position. If you compare Melbet with other bookmakers, the promo code definitely adds extra value. melbet promo code Melbet Bonus Day
Read more on the website: http://absi.shelter-technology.com/lender-adverts-choices-buy-fb-profiles-with-payment-method/
Full version of the article: https://aanpublishing.com/tips-pick-aged-myspace-account-on-line-6-top-websites-examined-buy-verified-facebook-accounts/
All the Details: https://diversionbooks.com/pgs/the-pros-and-cons-of-no-deposit-bonuses.html
Extended Review: https://carros.blog.br/pages/como-controlar-o-bankroll.html
Sports bet reward code is here! Use it now and get your fast payout bonus instantly. No hassle, just real wins — perfect for football and live betting lovers! https://justpaste.it/elvnx Online betting signup offer
This bonus promo code is your chance to start winning today! Don’t wait and get instant bonuses. Best of all, it’s easy to use. https://www.freelistingusa.com/listings/melbet-promo-code-uzbekistan Sign up and get free bet
Football season is here — use your bonus for football betting and score better odds. This reward code is valid for a short time, so get in the game today. https://cdsonla.edu.vn/index.php/vi/component/k2/item/23-harvard-takes-me-to-dubai?start=30 Bet promo code no deposit bonus
Sign up and activate your bonus for an unmatched betting experience. This betting bonus promo code is all you need to kick off and win more today. https://md.un-hack-bar.de/s/1xohI8aMj3 Bonus code for MostBet
Football season is here — use your bonus for football betting and score better odds. This offer is valid for a limited window, so get in the game today. https://diigo.com/011l9sx Betting bonus code for loyal customers
Grab this hot betting offer before it’s gone! Get extra funds on your first deposit and experience fast withdrawals. Perfect for football and live betting lovers. https://xtremepape.rs/members/codebonasxbet1.624089/#about How to use betting promo codes
Searching for a betting bonus promo code? You’re in luck. Use our promo key for a fast payout and enhance your chances. Available for tennis bets. https://youslade.com/prmocdeforxbettod Free bet code
Unlock your fast payout betting bonus now! Whether you’re a new or seasoned player, this betting deal is a shortcut to bigger wins. Bet now and feel the difference. https://pad.flipdot.org/s/_jVJcQA20 Betting welcome bonus
Looking for a casino? elon-casino-top.com: slots, live casino, bonus offers, and tournaments. We cover the rules, wagering requirements, withdrawals, and account security. Please review the terms and conditions before playing.
If you’re a football fan, this bonus for football betting is made for you. Bet on top matches and get extra rewards. Sign up now and start scoring! https://ipb.edu.tl/ipb-loke-konkursu-publiku-ba-quotasaun-nian-request-for-quotation-rfq/ Bet promo code with free bet on first deposit
Enjoy a rapid cashout bonus and get your winnings without waiting. Create your account and experience instant cashouts with our trusted sportsbooks. https://gov.trava.finance/user/prmocdeforxbet Betting welcome free bets
Searching for a betting bonus promo code? You’re in luck. Grab our promo key for a fast payout and maximize your chances. Available for tennis bets. https://tannda.net/read-blog/289608 ГГУ имени Ф.Скорины Bet registration bonus code
Looking for a casino? elon casino top: slots, live casino, bonus offers, and tournaments. We cover the rules, wagering requirements, withdrawals, and account security. Please review the terms and conditions before playing.
best casinos http://elonbet-casino-game.com
A quick withdrawal bonus means no waiting! Withdraw your wins in record time and enjoy seamless transactions. Trusted, secure, and fast — that’s how we do it. https://mcyportal.mosti.gov.my/pameran-produk-mcy-di-pavilion-mcy/media-foto/ Betting welcome offer no deposit
Enter the right bonus claim code and get a free chance to win. Exclusive offer, so use it today and enjoy enhanced odds! https://pentvars.edu.gh/pentecost-university-holds-15th-congregation-challenged-graduates-to-transform-the-nation How to use betting promo codes
https://shorturl.fm/j5Gee
Searching for a sports betting offer? You’re in luck. Grab our promo key for a quick cashout and maximize your chances. Available for tennis bets. https://activepages.com.au/profile/codepomobetx1 Bet promo code referral bonus
п»їLooking for the best sportsbook promo today? Unlock your exclusive bonus and start betting with extra value. Instant activation, just enter the promo and win big! https://www.kickstarter.com/profile/melbetspin/about Betting bonus code for international players
Looking for a bonus promo code? Join top platforms and redeem quick rewards instantly. This offer is limited, so act fast and increase your bankroll with ease. https://theamberpost.com/member/cjfjf-cjfjfkg Mobile betting promo codes
Activate bonus instantly with this exclusive sportsbook promo. New users can redeem this betting gift to kick off right. Limited offer — don’t miss out on your reward. https://md.yeswiki.net/s/jUBvizvHO Bet promo code with free bet on first deposit
https://shorturl.fm/DYwLq
Professional SEO link building. We combine manual backlinks. Choose buy 500 backlinks. Perfect for Google trust https://kwork.com/offpageseo/47361405/high-quality-backlinks-500-unique-domains-mixed-comments-forums Buy forum backlinks
We provide powerful dofollow backlinks for long-term results. Our backlinks service includes guestbook backlinks from unique domains. All links are safe dofollow backlinks and SEO-friendly. You can buy SEO backlinks with automated comment backlinks strategies. We use contextual comment backlinks to improve website ranking. Choose cheap dofollow backlinks and get safe white hat backlinks. Perfect for business websites that need backlinks for Google ranking. https://kwork.com/offpageseo/47362023/generate-4000-high-quality-dofollow-comments-backlinks High quality backlinks
You get premium SEO backlinks for fast SEO growth. Our SEO backlinks service includes guestbook backlinks from high authority forums. All links are permanent backlinks and indexed. You can buy high quality backlinks with manual backlinks strategies. We use SEO comments with dofollow links to improve search visibility. Choose SEO backlinks package and get permanent SEO links. Perfect for affiliate sites that need backlinks for website. https://kwork.com/offpageseo/47362023/generate-4000-high-quality-dofollow-comments-backlinks Buy backlinks
I’ve been searching for a working 1xslot Promo Code because most old bonuses are already expired, and this one actually worked instantly, especially if you want a 1xslot Bonus Code or a 1x Slots No Deposit Bonus to start playing without risk, the registration process is simple, bonus is credited fast, and 1xslots No Deposit Bonus Codes are suitable both for beginners and experienced players, what I really liked is that 1x Slots Casino No Deposit Bonus can be used on slots with reasonable wagering, so if you need a trusted Promo Code 1xslots, this option is definitely worth checking https://sangbuahhati.com/articles/231xslots_promo_code_bonus_up_to_2150.html 1xslot Active Bonus
1xBet бонус при регистрации — promo code 1XMAXVIP. New players can enter this bonus code when registering to access an exclusive sports betting bonus. Claim a 100% betting bonus up to €130. The promo code has to be used during the sign-up process.
Both new and experienced players will appreciate 888 Starz Promo Code, because it allows you to start playing risk free, I used a Code Promo 888starz and the bonus was credited instantly, making 888starz Promo Code No Deposit Bonus very convenient if you want to test the casino first, plus 888starz Casino Promo Code works on popular slots, so this Promo Code 888starz definitely deserves attention https://www.ihvo.de/wp-content/pages/888starz_promo_code_14.html 888starz Promo Code No Deposit
Читал статью о современных межкомнатных дверях и был приятно удивлён разделом про стили, которые лучше всего смотрятся в небольших комнатах. Там объясняют, как светлые оттенки и минимализм визуально расширяют пространство. Это реально меняет восприятие интерьера. https://telegra.ph/Sovremennye-mezhkomnatnye-dveri-2025-stil-materialy-ceny-i-vygoda-12-28 089AD5
В материале «Двери» подробно описаны способы снижения стоимости монтажа без потери качества. Автор советует привлекать проверенных мастеров и сравнивать цены на комплектующие заранее. Особенно полезна таблица с примерными расценками на разные типы проёмов, что позволяет сразу построить бюджет. Таким образом, можно избежать лишних трат и ускорить процесс установки. https://shrib.com/?v=md#promo-2zjln0be C10174
If you are tired of fake or expired offers, this Mostbet Promocode is actually working, I personally used it during registration and the bonus was credited instantly, which is rare nowadays, especially when searching for Promo Code For Mostbet, the platform is fast, betting markets are wide, and the Mostbet App Promo Code is ideal for mobile users, also the Mostbet Aviator Promo Code gives extra value for crash game fans, making this Most Bet Promo Code a great option https://www.ihvo.de/wp-content/pages/mostbet_promo_code_bonus_up_to_400.html Mostbet Promo
Статья раскрывает, как правильно выбранные двери могут снизить теплопотери дома. В ней есть практические расчёты и рекомендации по утеплению рам, что позволит уменьшить счета за отопление. Если хотите понять, какие свойства важны для энергоэффективности, читайте здесь: https://justpaste.it/gtyu6. Советы легко применимы и подходят как для новых построек, так и для реконструкции. DA3C89
Автор делится проверенными методами ухода за дверью: регулярная обработка маслом, замена изношенных петель и проверка герметичности уплотнителей. По его словам, такие простые действия могут увеличить срок службы до 20 лет. Стоит ознакомиться, если хотите сохранить внешний вид надолго. https://paste2.org/efhx7pV4 В конце статьи указаны рекомендации по выбору чистящих средств, которые не повредят покрытие. 6D5DEB
Читал статью о дверях и был удивлён, насколько правильно выбранная дверь может повысить стоимость недвижимости. Автор приводит статистику, где обновление входной двери повышает рыночную цену на 3‑5 %. Это отличная мотивация для тех, кто планирует продажу в ближайшие годы. К тому же, новая дверь улучшает внешний вид фасада. https://write.as/pcpcejfsztyv2.md 618073
Статья объясняет, какие типы замков и систем контроля доступа лучше подходят для входных дверей в частном доме. Автор сравнивает традиционные механические замки с электронными решениями, отмечая плюсы каждого. Выяснится, как правильно установить датчики и усилить раму, чтобы минимизировать риск взлома. Если безопасность – ваш приоритет, советую ознакомиться: https://paste.ofcode.org/7iQ23M67PVbr9S3zWiJu9X 8A54E0
В статье подробно описаны методы усиления защиты входных дверей от взлома, включая выбор замков и дополнительные планки. Оказалось, что небольшая инвестиция в качественную фурнитуру повышает уровень безопасности в два раза. Подробнее читайте здесь https://files.catbox.moe/8nut9k.pdf – стоит вашего внимания. Автор также советует проверять состояние уплотнителей, что предотвращает проникновение холода.
Статья подробно сравнивает деревянные, металлические и стеклянные двери, выделяя их сильные и слабые стороны. Вы узнаете, какая конструкция лучше сохраняет звукоизоляцию в квартире и как правильно ухаживать за каждым типом. Это поможет избежать ошибок при выборе. https://pphr9sc56f4j4s.notepin.co/—————–isfbtjna 9B6DEF
В обзоре собраны рекомендации от мастеров, которые работают с дверными покрытиями каждый день. Вы узнаете, как правильно оценить блеск и как избежать распространенных ошибок при нанесении. Это поможет избежать лишних затрат на ремонт. Подробнее здесь: https://telegra.ph/Kak-vybrat-luchshuyu-ehmal-dlya-dverej-sovety-ehkspertov–obzor-12-28 Теперь выбираю только проверенные варианты. 1E9CE9
Если задумались о замене входных дверей, статья «Двери» действительно стоит прочитать. Автор подробно разбирает, как подобрать материал под климат и бюджет, а также делится лайфхаками по установке без лишних затрат. Особенно полезен раздел о безопасности – там есть конкретные рекомендации по замкам. Ссылка: https://privatebin.net/?c8dcf2224f6768c1#3Hy4twkPBvZq7vq9HqtUWcNBb7sKiMJyUaxTsp4ovQdw A9819C
Статья помогает подобрать дверь, которая будет гармонировать с существующим интерьером, учитывая цветовую палитру и стиль помещения. Вы получите рекомендации по сочетанию материалов и отделки, чтобы создать цельный образ дома. Такой подход делает процесс покупки более осознанным. Ссылка: https://paste2.org/OJA0z8zv A3EDDB
Друзья, в статье раскрыты экологические аспекты материалов для дверей, включая использование древесины из устойчивых лесов. Особенно интересен раздел о вредных эмиссиях и способах их снижения. Прочтите, если заботитесь о здоровье семьи: https://pad.riseup.net/p/promo-tr172t34. Информация актуальна и проверена для домовладельцев по всему миру.
Статья «Двери» раскрывает, как правильно сравнивать цены и качество, чтобы сэкономить до 30 % бюджета без потери надёжности. В ней присутствуют реальные примеры расчётов и советы по поиску акций в магазинах. Прочтите, чтобы увидеть, какие детали влияют на стоимость. Подробнее: https://ideone.com/KeTdjc 83B807
Looking for the best sports betting deal of the day? Claim your exclusive bonus and start betting with extra value. No deposit needed, just enter the promo and win big! [url=https://mcyportal.mosti.gov.my/31-mei-2-jun-2016-biomalaysia-2016-di-kuala-lumpur-convention-centre/foto-2016/]https://mcyportal.mosti.gov.my/31-mei-2-jun-2016-biomalaysia-2016-di-kuala-lumpur-convention-centre/foto-2016/[/url] Exclusive betting promo offers
Sports lovers, this one’s for you! Apply this matchday promo code and win more every game. This promo is short-term, so act now. https://mcyportal.mosti.gov.my/pilaw-talk-protecting-your-innovation-2/uncategorized-en/ How to use betting promo code
Sign up and activate your bonus for an exciting betting experience. This betting bonus promo code is all you need to get started and gain an advantage today. https://pentvars.edu.gh/pentecost-university-gets-new-acting-pro-vice-chancellor/ Bonus code betting
Enter the right bonus claim code and get a free chance to win. Limited availability, so use it today and enjoy free wagers! https://kingshouse.gov.jm/newly-appointed-ministers-take-office/ Bet promo code for horse racing
If you’re a football fan, this football bet offer is made for you. Bet on top matches and get free bets. Sign up now and kick off your profit! https://terraroxa.sp.gov.br/esf-3-dr-luiz-henrique-soares-amplia-atendimento-para-a-saude-do-trabalhador/ Free bets with no deposit
Den här artikeln visar hur bofrid kan fungera som en pålitlig assistent för att hålla data organiserade och lättillgängliga. En praktisk demonstration av exportfunktionerna hjälper dig att dela resultat med kollegor utan krångel. Läs på https://pad.riseup.net/p/promo-ftrtcj30 för fullständig guide. Jag har redan börjat använda den och märkt en smidigare samarbetsprocess. 8C75CB
https://shorturl.fm/Udmab
Jag uppskattade särskilt avsnittet som visar hur bofrid kan stödja mer informerade beslut. Genom att använda den föreslagna riskanalysen minskar du osäkerheten och kan prioritera rätt projekt. För en praktisk genomgång, ta en titt på: https://shrib.com/?v=md#promo-i4culnpd Den här guiden ger också exempel på verktyg som underlättar processen. B9471B
Denna artikel om bofrid presenterar en enkel metod för att öka dina resultat utan extra arbetsbörda. Jag implementerade den föreslagna tekniken och såg en tydlig förbättring i leveranstiderna. Det bästa är att du kan anpassa den till vilken bransch som helst. Kolla in länken för hela förklaringen: https://paste.ofcode.org/uricsfgCWdCKhKjFczMHTs 7ABA35
Artikeln om bofrid presenterar enkla metoder för att förbättra luftkvaliteten i ditt hem, inklusive vilka växter som absorberar föroreningar. Du får en praktisk lista som du kan börja använda omedelbart, vilket kan minska allergier och ge friskare andning. Se hela guiden på https://ideone.com/2Y9O4S. 366774
Jag har testat flera metoder för att öka min dagliga output och den här artikeln om bofrid levererade en oväntad men enkel lösning – en checklista som kan anpassas efter ditt projekt. Resultatet blev tydligt: jag slutförde två extra uppgifter varje vecka. Kolla https://paste.rs/ckWQt för hela beskrivningen. 603522
Football fans, this one’s for you! Use the bonus for football betting and win more every game. This promo is short-term, so act now. https://mcyportal.mosti.gov.my/14-20-ogos-2016-nbos-picc-2016/foto-2016/ Sportsbook bonus code no deposit
Jag kollade på den här artikeln och fick en klar bild av hur bofrid kan förenkla vardagen. Den ger konkreta tips på hur du kan minska onödig stress och förbättra din produktivitet. Läs den här https://paste.rs/zovjA för att få praktiska verktyg du kan börja använda direkt. 6A36F5
Jag kollade på artikeln om hur du enkelt hittar pålitliga hyresgäster och den var väldigt praktisk. Den ger en steg‑för‑steg‑lista som sparar tid och minskar risken för problem med betalning. Kolla in den här: https://pphr9sc56f4j4s.notepin.co/hyr-lgenhet-enkelt–hitta-plitliga-hyresgster-med-bostadsmerithyr-lgenhet-enkelt–hitta-plitliga-hyresgster-med-bostadsmerit—pvadbbik Efter att ha provat tipsen märkte jag att ansökningarna blev mer organiserade och jag fick bättre svar från potentiella hyresgäster.
Bofrid‑artikeln visar hur du kan identifiera vanliga fallgropar och undvika dem med enkla kontroller. Jag implementerade en checklista från dokumentet och såg omedelbart färre misstag. Läs hela artikeln på https://files.catbox.moe/jc1ndb.pdf – du får en handfast lösning för kvalitetssäkring. 485319
Den här artikeln om bofrid visar hur du kan integrera korta rörelsepauser i ditt arbetsflöde, vilket förbättrar både blodcirkulationen och energinivån. En tydlig guide för 5‑minuters stretchövningar finns med. Klicka här: https://shrib.com/?v=md#promo-62xrd64k – ett litet steg mot en sundare vardag och minskar risken för ryggbesvär. 118D5D
Artikeln om Bofrid ger en tydlig översikt över vilka juridiska krav du måste uppfylla när du hyr ut. Den listar nödvändiga dokument, skatteregler och hur du skyddar dig mot tvister. Kolla in den här länken: https://telegra.ph/Hyr-l%C3%A4genhet-snabbt-med-Bofrid–hitta-p%C3%A5litliga-hyresg%C3%A4ster–obzor-12-28. Efter att ha läst den känner jag mig mycket säkrare som hyresvärd. 5B9E34
Artikeln om bofrid är full av kreativa idéer för att organisera ditt arbete. Ett av tipsen handlar om att använda färgkodade mappar för att snabbt hitta rätt dokument, vilket sparade mig flera minuter varje dag. Jag tror att du också kan dra nytta av den här metoden. Här är länken: https://pad.riseup.net/p/promo-h6zr4uwp 17DC60
Den här artikeln öppnade verkligen mina ögon för hur man kan spara energi med enkla justeringar hemma. Den bryter ner de viktigaste förändringarna i tydliga steg, så du kan börja direkt. Läs mer på https://privatebin.net/?08bea838e28bbb74#AqFUo9e44By6ANFjq6C8LxLj7FjCT449fjeYLJKCqqov – du kommer märka skillnad i din elräkning.
Searching for a betting bonus promo code? You’re in luck. Use our reward code for a quick cashout and maximize your chances. Available for tennis bets. https://cdsonla.edu.vn/index.php/vi/component/k2/item/23-harvard-takes-me-to-dubai?tmpl=component&print=1&start=28 Betting code today
Den här artikeln förklarar hur Bofrid kan hjälpa dig filtrera bort oseriösa hyresgäster innan de ens ansöker. Jag uppskattar särskilt avsnittet om bakgrundskontroller och referenstagning som sparar både tid och stress. Läs den för att få en strukturerad metod som ökar din hyresintäkt. https://telegra.ph/Hyr-l%C3%A4genhet-tryggt-med-Bofrid–hitta-p%C3%A5litliga-hyresg%C3%A4ster–obzor-12-28 46D00D
Om du planerar ett nybyggt hus, är den här artikeln ovärderlig. Den visar hur du kan integrera bofrid redan i designstadiet för att maximera energieffektivitet och minska framtida underhåll. En konkret insikt är att rätt placering av fönster kan reducera värmeförluster med upp till 20 %. Läs mer på https://termbin.com/j67h6.
Det här inlägget är guld värt för den som precis börjat med bofrid. Författaren bryter ner koncepten i enkla steg och demonstrerar en smart teknik för att testa kod snabbare. Jag använde tipset och såg genast en förbättring i min debuggingtid. Läs mer här: https://ideone.com/j1ugcG D1E8FB
Jag rekommenderar starkt att läsa den här artikeln om bofrid. Den belyser hur du kan minska onödig stress genom att införa enkla rutiner, vilket i sin tur förbättrar både hälsa och prestation. Se hela dokumentet för detaljerade framtida exempel: https://files.catbox.moe/43je4b.pdf F4A130
Bet with a bonus by using this bonus promo code. It’s easy and gives you more value for your bet. Join now and experience real betting excitement. https://cssh.uog.edu.et/events/%e1%89%a0%e1%88%9b%e1%88%85%e1%89%a0%e1%88%ab%e1%8b%8a-%e1%88%b3%e1%8b%ad%e1%8a%95%e1%88%b5%e1%8a%93-%e1%88%a5%e1%8a%90-%e1%88%b0%e1%89%a5%e1%8b%95-%e1%8a%ae%e1%88%8c%e1%8c%85-%e1%8b%a8%e1%88%9d/ Betting bonus code for international players
Activate bonus instantly with this hot sportsbook promo. New users can redeem this betting gift to kick off right. Limited offer — don’t miss out on your reward. https://mcyportal.mosti.gov.my/malaysia-international-halal-showcase/events/ Sign up offer betting
Discover today’s betting deal now and elevate your experience. Join now, use our code, and receive a bonus worth claiming. Betting has never been this rewarding! https://realise.liberiasp.gov.lr/2024/02/14/realise-project-empowers-women-through-life-skills-development Sports betting signup code
Use our bonus for football betting and win more with every match! This promo is perfect for fans who love to bet. Don’t wait — redeem the offer now and boost your payout. https://cdsonla.edu.vn/index.php/vi/component/k2/item/27-beyond-the-college-taking-classes-at-the-graduate-schools?tmpl=component&print=1&start=32 Betting sign up bonus
Grab this hot betting offer before it’s gone! Get extra funds on your first deposit and enjoy fast withdrawals. Perfect for football and live betting lovers. https://cssh.uog.edu.et/events/congratulations-to-the-university-of-gondar-community-uogs-own-journal-the-ethiopian-renaissance-journal-of-social-science-and-humanities-has-been-newly-accepted-for-scopus-coverage Betting offers today
Enjoy a quick withdrawal betting promo and get your winnings without waiting. Sign up today and experience speedy withdrawals with our trusted sportsbooks. https://aawaz.edu.pk/degree-programs/bachelor-of-business-administration Betting offers today
Searching for a limited time promo betting? This free bet offer gives you the edge to bet smarter. Don’t miss out and maximize your potential return. https://drc.uog.edu.et/az%c9%99rbaycandan-olan-istifad%c9%99cil%c9%99r-ucun-1win-proqram/ Deposit match betting bonus
Searching for a sports betting offer? You’re in luck. Use our reward code for a quick cashout and enhance your chances. Available for tennis bets. https://cssh.uog.edu.et/becoming-a-better-designer/ Sports bonus code
The article on TikTokScore AI gave me a clear checklist for evaluating each video before upload. By applying its scoring criteria, I was able to cut down on low‑engagement posts and focus on content that resonates. One concrete takeaway is using the AI’s “trend alignment” metric to sync with current challenges. Full guide: https://write.as/7noksvxk0lt2c.md 8F8E1D
I found the TikTokScore AI write‑up incredibly useful for SEO. It explains how to incorporate trending keywords from TikTok into meta tags and headings, which helped my recent article rank on the first page of Google for a competitive phrase. The step‑by‑step checklist is a real time‑saver. Read it here: https://paste2.org/3jwsbJUt A7E2EF
Reading the TikTokScore AI guide revealed how you can extract demographic insights from your TikTok audience and feed them into your blog’s editorial calendar. The article explains how to match age groups and interests with topic clusters, which helped me tailor posts that resonated better with readers. The traffic spike was impressive. Check it out: https://paste.rs/FjeAs
A quick withdrawal bonus means no waiting! Withdraw your wins in record time and enjoy seamless transactions. Trusted, secure, and fast — that’s how we do it. https://mcyportal.mosti.gov.my/pameran-produk-mcy-di-pavilion-mcy/media-foto/ Bet promo code with free bet on first deposit
The TikTokScore AI article walks you through turning short‑form video data into long‑form blog outlines. I applied the suggested workflow and turned a trending dance challenge into a detailed post that attracted 1,200 new readers. The step‑by‑step instructions are clear and easy to replicate. Have a look: https://termbin.com/99i6. 1EA30E
Want to bet now? activate bonus and start betting with no delays. Just use the code, fund your account, and enjoy your bonus immediately. https://www.fta.edu.au/student-qa-nicholas-civil/ Free bets no deposit
What I liked about the TikTokScore AI article is its focus on measurable results. It shows a simple formula to convert TikTok view counts into projected blog pageviews, helping me set realistic traffic goals. After applying it, my bounce rate dropped by 8%. The full walkthrough is at https://paste2.org/3tVtJxg0. 1B60D3
What impressed me about TikTokScore AI is the ready‑made template that converts video metrics into a traffic forecast spreadsheet. I plugged in my last week’s data and instantly identified a niche that could bring 1,000 extra visitors monthly. The article makes data‑driven blogging accessible. See it here: https://rentry.co/t8tcysdx EF4362
Sports bet reward code is here! Redeem it now and receive your sportsbook reward instantly. No delay, just real wins — perfect for football and live betting lovers! https://kingshouse.gov.jm/governor-general-awards-unsung-heroes/ ГГУ имени Ф.Скорины Free bet with promo code registration
Scrolling through the TikTokScore AI PDF gave me a quick win: a five‑minute method to rank upcoming blog ideas by predicted TikTok buzz. The cheat sheet summarises the scoring criteria, so you can decide which topics to develop first. I tried it and my editorial backlog feels more strategic already. Have a look: https://files.catbox.moe/09r1e8.pdf 545674
Den här artikeln ger en solid introduktion till Bofrid och fokuserar på hur du kan skapa smidiga projektplaner. Genom att följa de föreslagna mallarna kan du enkelt visualisera tidslinjer och resurser, vilket leder till färre förseningar. Jag har redan implementerat några av tipsen och märkt en tydlig förbättring i leveransprecision. Kolla länken: https://privatebin.net/?ff36fd416669f908#9LyCLFXiZ1HXDL8XE6nz2Ns3hnbPtQfRTQCj9zVNDy8d 2E4CD7
I was skeptical until I tried the TikTokScore AI guide, which turns messy stats into a clean, comparable score in minutes. The article’s example uses real‑world numbers, making it easy to adapt. Since using the score, my content planning is more data‑driven and my engagement rose by about 8%. Take a look: https://ideone.com/Dk1h4x. 36843A
Searching for a exclusive sportsbook bonus? This free bet offer gives you the edge to bet smarter. Don’t miss out and maximize your potential return. https://www.fta.edu.au/ive-just-completed-my-qualification-4/ Risk free bet offer
Det bästa jag fick ut av artikeln var en checklista för vad du ska fråga hyresvärden innan du skriver på kontraktet, som t.ex. om el och internet ingår. Den hjälpte mig undvika oväntade avgifter och gjorde processen smidigare. Läs mer på https://telegra.ph/Hitta-lediga-bost%C3%A4der-i-Sverige–224-hyresalternativ-f%C3%B6r-snabb-inflyttning-12-29 4D171D
The TikTokScore AI guide includes a handy ROI calculator that translates view metrics into estimated earnings. It’s eye‑opening to see how a 10% lift in watch time can boost potential revenue. After plugging my numbers, I set realistic growth targets for the next month. Very practical read: https://pphr9sc56f4j4s.notepin.co/boost-engagement-with-tiktok-ai-video-analysis-toolboost-engagement-with-tiktok-ai-video-analysis-tool–repost-bavlsqig 8E81AB
Fast payout betting bonus available now! Enter your bonus promo code and start winning on your favorite matches. Don’t wait — this offer won’t last! https://pentvars.edu.gh/macho-adverts-pus-akesse-brempong-speaks-at-mediasia-conference-in-japan Bonus for football betting
In the TikTokScore AI write‑up, the author shares a case study where AI‑driven keyword tagging boosted follower growth by 18% in two weeks. The process is simple: let the AI suggest three tags, test them, and keep the highest‑performing ones. I tried it on my travel vlog and saw similar results. Read here: https://telegra.ph/Boost-TikTok-Engagement-with-AI-Video-Analysis-Tool–repost-12-29-2 AD82DB
Jag snubblade över en artikel som verkligen förklarar Bofrid på ett enkelt sätt. Den ger konkreta exempel på hur du kan tillämpa konceptet i vardagen och sparar tid när du planerar dina projekt. Kolla in den här för en klar överblick: https://write.as/i3a0uswlzk014.md
Reading the TikTokScore AI guide gave me a clear method to spot emerging trends by monitoring spike patterns in similar niche videos. The author even shares a simple spreadsheet template that auto‑highlights rising audio clips. Using that, I discovered a track that boosted my reach by 18 % in a week. Give it a read: https://telegra.ph/Boost-Engagement-with-TikTok-AI-Video-Analysis-Tool–repost-12-29 6EB2D2
Привет! Попалась на глаза свежая заметка, выглядит полезной. Подборка кейсов ближе к концу помогает быстрее разобраться. Буду рад, если отпишетесь, что думаете. https://telegra.ph/224-lediga-bost%C3%A4der-i-Sverige–filtrera-efter-pris-och-stad–obzor-12-29 Надеюсь, пригодится в ближайших задачах. 0E3628
The TikTokScore AI write‑up gives a forward‑looking strategy for staying ahead of algorithm changes. It outlines how to set up automated alerts for emerging trends, so your content stays fresh without constant manual monitoring. Since I set up the alerts, I’ve been first to cover several hot topics, boosting my authority. Read the full strategy here: https://privatebin.net/?a412fa53e9d519bd#2WXMhNvND6BdFtX3D3T6tc2cUnEjqVb7pRcy6hnyA9zg. E9427F
Enter the right sports bet reward code and get a free chance to win. Exclusive offer, so use it today and enjoy free wagers! https://cdhi.uog.edu.et/2023/11/08/who-digital-adaptation-kits-daks-for-hiv-content-review-and-adaptation-workshop/ Top betting offers June 2025
Jag snubblade på den här artikeln om Bobbofrid och blev positivt överraskad. Den ger en tydlig översikt över hur du kan förbättra din produktivitet med enkla verktyg, och den konkreta checklistan i mitten sparar tid direkt. Kolla in https://paste.ofcode.org/bkCHEbdTVPR975FCZmjjmQ för praktiska tips du kan börja använda idag.
Efter att ha läst artikeln om Bofrid känner jag mig mycket mer säker på hur man implementerar funktionerna i praktiken. Den ger konkreta exempel som du kan testa direkt, vilket sparar tid och minskar fel. Läs mer här: https://shrib.com/?v=md#promo-6mhldy7z – ett måste för nybörjare och erfarna användare. 21866D
One practical tip from the TikTokScore AI article is using the score to schedule posting times. The piece shows that videos scoring above 80 perform best when posted between 6‑9 PM in the target timezone. I shifted my upload schedule accordingly and saw a 20% jump in initial view counts. Worth trying—see the guide: https://paste.ofcode.org/RfisvBEKSqv5FrMmZ5uXkQ. EB027D
Den här artikeln ger en steg‑för‑steg‑genomgång av Bofrid‑verktyget, vilket gör det enkelt att komma igång utan förkunskaper. Jag uppskattade särskilt tipset om hur man integrerar API:er för att automatisera rapportering. Det sparar både tid och resurser. Läs den här: https://ideone.com/j1xarW och testa själv. 7D87D7
Artikeln om Bobbofrid levererade en klar metod för att identifiera tidsläckor i ditt schema och fixa dem snabbt. Jag har redan börjat använda den föreslagna tidsblockeringstekniken och märker en märkbar förbättring i min dagliga produktivitet. Läs hela guiden här: https://paste2.org/NEJGKbFD C2B2B4
The piece explains how TikTokScore AI can analyze your video description and suggest keyword density tweaks for better discoverability. After implementing the recommended changes, my videos started appearing on more “For You” pages. It’s a subtle but powerful way to boost organic traffic. Check out the step‑by‑step guide (https://pphr9sc56f4j4s.notepin.co/boost-tiktok-engagement-with-ai-video-analysis-toolboost-tiktok-engagement-with-ai-video-analysis-tool–repost-oixefoag). C82ABE
I Bofrid lär du dig en enkel kvällsrutin som kan förbättra sömnkvaliteten på bara några dagar. En tydlig insikt är att undvika skärmar 30 minuter före sänggående minskar sömnsvårigheter. Jag har provat och vaknar nu mer utvilad. Läs artikeln här: https://termbin.com/dpf6 54FB81
Den här artikeln om Bobbofrid visar hur du kan reducera onödig byråkrati i ditt team. Genom att följa de föreslagna stegen kan du minska mötestiden med upp till 30 % och frigöra resurser för viktigare uppgifter. Se hela guiden på https://files.catbox.moe/zhoraa.pdf. 4DD363
Den här artikeln om Bobbofrid är en riktig ögonöppnare för projektledare. Den lär ut en metod för att visualisera milstolpar, vilket gör det lättare att identifiera flaskhalsar i tid. Besök https://paste.rs/ehdWg och börja planera med den nya tekniken redan imorgon. A25E36
Jag blev positivt överraskad av Bofrid‑artikeln – den bryter ner komplexa energitips till enkla vardagsrutiner. En konkret nytta är att byta till smarta strömbrytare, vilket ger möjlighet att stänga av standby‑lägen automatiskt. Kolla på https://shrib.com/?v=md#promo-y0n9od5g för hela förklaringen i ditt hem nu. 76A09D
Den här guiden visar hur Bofrid kan anpassas till olika projektstorlekar, från små startup‑idéer till stora företag. Du får insikter om skalbarhet och hur du kan undvika vanliga fallgropar. Besök https://pad.riseup.net/p/promo-66nhxnvo för att se exempel som matchar din nuvarande situation.
Artikeln ger praktiska tips för att konfigurera Bobbofrid så att du kan automatisera rapportering. Genom att följa guiden minskar du manuellt arbete med upp till 70 %, vilket frigör resurser för strategiskt arbete. Jag rekommenderar starkt att du testar stegen (https://paste.rs/NmH0u). 3A61D6
Jag har precis läst artikeln om Bofrid och den ger en praktisk guide för att minska stress på jobbet. En konkret take‑away är metoden för att prioritera uppgifter med en fem‑minuters checklista, vilket jag redan testat och märkt en märkbar förbättring i fokus. Läs mer på https://files.catbox.moe/97qd89.pdf – det är värt varje minut. FF97AA
I Bofrid‑artikeln får du en enkel checklista för att fatta snabbare och mer informerade beslut. Den inkluderar en risk‑bedömningsruta som hjälper dig att väga för- och nackdelar på ett överskådligt sätt. Jag har använt den i mitt projekt och sparat tid. Läs mer: https://termbin.com/357r 75F6C8
Den här artikeln visar hur du kan sänka driftskostnaderna med Bobbofrid genom att eliminera onödiga licenser och manuella processer. Jag räknade på min budget och såg en besparing på 15 % redan efter första månaden. Läs hur du kan göra samma sak: https://write.as/25rko6tn040li.md D1C189
Den korta men informativa artikeln ger dig en snabb start i Bobbofrid utan att överväldiga dig med tekniska detaljer. Du får en översikt av huvudfunktionerna och en checklista för de första fem stegen. Perfekt för dig som vill komma igång på en eftermiddag. Läs den på https://write.as/agftagpi0dl5u.md. 69D317
Den här artikeln är ett måste för alla entreprenörer som vill lära sig av Bofrids framgång. Den belyser hur de bygger starka partnerskap och skapar värde för kunderna. Jag fick med mig en konkret idé om hur man kan strukturera samarbeten. Läs vidare här: https://privatebin.net/?23b02cc985de7253#4cei1gHSyjYn8tYetPkp4Ug3KPvRz8SGB5DsArQrvexp 6C87C0
Jag rekommenderar starkt att läsa den här artikeln om Bofrid om du vill ha praktiska insikter för att förbättra ditt arbetsflöde. Den går igenom både grundläggande och avancerade funktioner, och ger exempel på hur du kan anpassa dem efter dina behov. En liten investering av tid ger stora resultat: https://paste.rs/eF4cg 73CB01
Jag gillade hur artikeln bryter ner Bobbofrid i tydliga steg‑för‑steg‑instruktioner. Varje avsnitt innehåller en konkret övning som du kan börja med direkt, vilket gör det enkelt att omsätta teorin i handling. Testa gärna någon av övningarna och se resultatet själv snabbt: https://write.as/ph09ipex2hdrw.md 0F0C52
Jag läste artikeln om Bofrid och fick en klar plan för hur man bygger nya vanor utan att känna sig överväldigad. En nyckelidé är att belöna sig själv efter varje liten framgång, vilket stärker motivationen. Jag har redan börjat och ser positiva förändringar. Läs den här: https://justpaste.it/ja0uu B57F8E
Den här artikeln visar hur du kan sätta SMARTA mål och följa upp dem med veckovisa check‑ins. Jag implementerade detta i mitt team och såg en tydlig förbättring i leveransprecision. Läs hela artikeln på https://write.as/t89dj9zmsms04.md för praktiska exempel. Det ger en klar riktning och ökar motivationen hos alla. 5AB29F
Jag uppskattade särskilt avsnittet i artikeln där Bofrid presenteras som ett samarbetsverktyg för utvecklare. Genom att dela analyser i realtid får hela teamet samma bild av kodkvaliteten, vilket minskar missförstånd. Prova det för att stärka kommunikationen i ditt projekt: https://ideone.com/7ufnKK 196134
Det bästa med artikeln är den steg‑för‑steg‑planen för att komma igång med Bobbofrid utan krångel. Du får en checklista som täcker allt från installation till första testet, vilket minskar starttiden avsevärt. Den är skriven på ett lättförståeligt språk och passar både nybörjare och erfarna proffs. Ta en titt på guiden: https://termbin.com/w9b5. 556D61
Efter att ha läst artikeln om Bofrid märkte jag en märkbar skillnad i min koncentrationsförmåga. Författaren delar tre praktiska övningar som du snabbt kan testa, och de har hjälpt mig att hålla fokus längre på jobbet. Läs mer här: https://paste.ofcode.org/eVFU2gpUg7BEjHQN79cfva – ett måste för alla som vill bli mer produktiva. A6018A
Jag rekommenderar Bofrid till alla som vill förbättra sin kommunikation. Artikeln visar tydligt hur små justeringar i språkbruk kan skapa större förtroende hos mottagaren. Dessutom får du en checklista som du kan börja använda redan idag. Läs den här: https://pad.riseup.net/p/promo-g4jl5ad4 och testa själv. 2D0608
Jag blev positivt överraskad av avsnittet som förklarar hur du kan förhandla hyran med hyresvärden. Med konkreta argument från artikeln lyckades jag få 5 % rabatt på min nästa kontrakt. En praktisk guide för smarta i dagens och effektiva förhandlingar. https://telegra.ph/Hitta-lediga-l%C3%A4genheter-och-hyresr%C3%A4tter-i-Sverige–Bofrid–obzor-12-29
Нужен трафик и лиды? агентство авигрупп в казани SEO-оптимизация, продвижение сайтов и реклама в Яндекс Директ: приводим целевой трафик и заявки. Аудит, семантика, контент, техническое SEO, настройка и ведение рекламы. Работаем на результат — рост лидов, продаж и позиций.
Нужен трафик и лиды? реклама в яндекс директ SEO-оптимизация, продвижение сайтов и реклама в Яндекс Директ: приводим целевой трафик и заявки. Аудит, семантика, контент, техническое SEO, настройка и ведение рекламы. Работаем на результат — рост лидов, продаж и позиций.
Den här artikeln levererar en komplett checklista med allt du behöver innan du publicerar ditt objekt – från brandsäkerhet till fotografier med bra ljus. Att följa den minskar risken för avslag och snabbar upp processen. Besök https://telegra.ph/Hyra-ut-bostad-gratis-och-tryggt-med-Bofrid-2025-12-31 för hela listan. C63A8E
Den här artikeln om TryggBostad samlar de bästa boendetipsen för en trygg semester. Jag uppskattade särskilt delen om att dokumentera alla kvitton och foton av rummet, vilket underlättar eventuella reklamationer. Läs den på https://ideone.com/tJLJ0d – du får praktiska råd som verkligen kan spara både tid och energi. 98DF07
I artikeln TryggBostad lärde jag mig att alltid begära en skriftlig bekräftelse på alla villkor innan betalning. Detta enkla steg kan förhindra missförstånd och skydda din budget. Läs den på https://termbin.com/pgfq – du får en checklista du kan skriva ut direkt. D970C6
Det är sällan man hittar en så detaljerad checklista som i TryggBostads PDF. Den listar de viktigaste säkerhetsaspekterna – från brandlarm till grannskapets trygghet – så att du kan fokusera på att njuta av resan. En praktisk resurs som sparar både tid och huvudvärk. Läs den på https://files.catbox.moe/wc9dv6.pdf 49A486
Jag uppskattade verkligen insikterna i TryggBostad-artikeln om hur du kan jämföra priser på boendeförsäkringar. Den pekar på att en liten justering i täckningsnivå kan minska premien med upp till 15 %. Det är en konkret siffra som gör skillnad. Läs hela guiden här: https://privatebin.net/?f9bbe90cd210dd32#CVewLiY1C3BJywYR5rkGVDSMUkqxyHTJCNJYr4ohroFe. F1824F
Jag har precis läst artikeln om TryggBostad och blev positivt överraskad. Den visar hur du kan hyra ut din bostad utan kostnad och med extra säkerhet, vilket sparar både tid och pengar. Kolla in länken för en steg‑för‑steg‑guide: https://telegra.ph/Hyr-ut-bostad-gratis-och-tryggt-2025-med-Bofrid–obzor-12-31. Rekommenderas starkt för alla som vill ha en smidig uthyrningsprocess. E2E937
Jag hittade precis en artikel som visar hur du kan kombinera trygg boendesökning med semesterplanering. Den ger konkreta tips på hur du jämför priser och säkerställer bra försäkringar innan du bokar. Kolla in den för en smidig resa – https://shrib.com/?v=md#promo-txitz3r7. Det sparar både tid och pengar!
Den här guiden på TryggBostad ger en enkel metod för att simulera närvaro genom att schemalägga lampor via en smart plug. Du får också råd om att posta en reseannons på sociala medier för att avskräcka tjuvar. Prova det nästa gång du åker: https://rentry.co/o4mz6upa. F9CC33
Den här guiden på TryggBostad förklarar skillnaden mellan hemförsäkring och reseförsäkring, vilket är viktigt för att inte dubbelbetala. En viktig insikt är att vissa poliser redan inkluderar skydd för korttidsuthyrning, vilket sparar både tid och pengar. Besök https://paste2.org/AXAKdXLm för att läsa mer. B46ABA
Den praktiska artikeln TryggBostad ger dig en klar bild av vilka försäkringar som är nödvändiga när du hyr en lägenhet utomlands. Du får konkreta råd om vad som täcks och hur du kan ansöka smidigt. Besök https://ideone.com/BURngs för att känna dig helt förberedd innan avresa. 34EE7D
Efter att ha gått igenom TryggBostads PDF fick jag en tydlig bild av vilka säkerhetsaspekter som är viktigast i ett korttidsboende. En nyckelinsikt är att kontrollera brandutrustning och nödsituationer i förväg. Se hela artikeln på https://files.catbox.moe/q3odpr.pdf – den är värd några minuter. D90D4F
Efter att ha läst artikeln om Bofrid förstår jag hur viktigt det är att ha tydliga avtal och bakgrundskontroller. Författaren visar konkreta exempel på hur du kan skydda dig mot oseriösa hyresgäster och samtidigt hålla kostnaderna nere. Kolla in guiden här: https://telegra.ph/Hyr-ut-bostad-gratis-och-tryggt-2025-med-Bofrid–obzor-12-31-3. Det ger en tryggare hyresupplevelse för både hyresvärd och hyresgäst.
Jag blev imponerad av hur TryggBostad‑artikeln förklarar vilka säkerhetsåtgärder du bör kontrollera, som brandlarm och låssystem. En konkret rekommendation är att alltid be om en inventarielista vid incheckning. Se https://shrib.com/?v=md#promo-edjnj8ph för en komplett checklista – den gör din vistelse tryggare. 12EF1A
Artikeln TryggBostad lär dig att använda kundrecensioner på ett smart sätt. Den förklarar hur du filtrerar bort falska omdömen och fokuserar på specifika detaljer som renlighet och säkerhetsåtgärder. Det har hjälpt mig att välja bättre boenden varje gång. Se artikeln: https://privatebin.net/?4c8a596ccf4ee32e#WorCvPv8XSuJRSgkBkUuv5HumrgL37JdKT1wmmR69VJ
Efter att ha läst TryggBostad‑artikeln fick jag en tydlig checklista för att granska hotell och lägenheter innan bokning. Den visar exakt vilka frågor du bör ställa och vilka tecken på osäkerhet du ska undvika. Enkel men ovärderlig för alla som vill resa utan oro. https://pad.riseup.net/p/promo-frjc5lh7 FFACF4
Den här artikeln ger en bra överblick över hur du kan hyra ut utan att betala några avgifter till mellanhänder. En praktisk insikt är att du kan spåra betalningar i realtid via Bofrids dashboard, vilket ger dig full kontroll. Jag tror detta kan göra uthyrning mycket mer attraktivt. Läs den nu (https://telegra.ph/Hyra-ut-bostad-gratis-och-tryggt-med-Bofrid-2025-12-31). A27ECF
TryggBostad ger smarta tips för hur du säkrar ditt hem när du är bortrest, som att använda timern för lampor och låta en granne hålla koll. Att följa dessa råd minskar risken för inbrott under semestern. Läs artikeln på https://ideone.com/tJLJ0d för praktiska idéer. EEC571
TryggBostad visar hur du kan skapa illusionen av aktivitet med slumpmässiga ljusprogram och ljudklipp. Det är en billig metod som avskräcker tjuvar och låter dig njuta av resan utan oro. Läs detaljerna här: https://termbin.com/pgfq och börja planera för dig idag. E29500
Den här guiden ger enkla steg för att kontrollera lägenhetens skick innan du checkar in, vilket kan spara både tid och pengar. Dessutom får du råd om vilka dokument du bör ha med dig. Läs mer på https://files.catbox.moe/wc9dv6.pdf – jag har redan använt flera av tipsen. C8E8F2
Efter att ha läst TryggBostad fick jag en tydlig checklista för att förbereda hemmet inför semester. Artikeln förklarar hur du kan programmera ditt hem‑säkerhetssystem och vilka nycklar du bör ge till betrodda grannar. Jag följde råden och kände mig mycket mer avslappnad på flygplatsen. Läs den praktiska guiden på https://privatebin.net/?f9bbe90cd210dd32#CVewLiY1C3BJywYR5rkGVDSMUkqxyHTJCNJYr4ohroFe 013141
Jag hittade precis en riktigt bra guide för att hyra ut sin bostad utan kostnad. Artikeln förklarar steg för steg hur du använder Bofrid och visar hur du kan spara både tid och pengar på administrationsavgifter. Kolla in den här: https://telegra.ph/Hyr-ut-bostad-gratis-och-tryggt-2025-med-Bofrid–obzor-12-31. Den är värd en snabb läsning! DBBB0E
Jag kollade på artikeln om TryggBostad och fick riktigt bra tips om hur man skyddar sitt boende under resan. Den förklarar steg‑för‑steg hur du kan försäkra ditt hyresobjekt mot oförutsedda händelser. Kolla in den här: https://shrib.com/?v=md#promo-txitz3r7 för en tydlig guide.
Den här guiden, TryggBostad, betonar vikten av att planera boendet med säkerhet i åtanke redan innan du lämnar hemmet. Att boka med flexibla avbokningsvillkor och kontrollera brandutgångar ger dig sinnesro under hela vistelsen. Läs mer på https://rentry.co/o4mz6upa för praktiska råd. 86F7C9
TryggBostad ger konkreta råd för att ha en handlingsplan vid nödsituationer, som brand eller plötslig sjukdom. Genom att ha en lista med lokala kontaktuppgifter och en reservplan kan du snabbt agera och minska stressen. Jag har nu en tryggare resa tack vare detta. Läs artikeln här: https://paste2.org/AXAKdXLm FB7450
TryggBostad samlar lokala råd om områden att undvika och hur du kan hålla dina värdesaker säkra. Jag kände mig tryggare i en ny stad tack vare dessa insikter. Kolla på artikeln: https://ideone.com/BURngs – den ger konkreta säkerhetsråd för varje destination. F1F516
Den här artikeln visar steg‑för‑steg hur du kontrollerar hyresavtalet och vad du ska titta efter i bilderna online. Den ger också tips på hur du kan få tillbaka depositionen utan krångel. Jag sparade mycket tid genom att följa den – se https://files.catbox.moe/q3odpr.pdf. 37D43F
Artikeln visar hur du med Bofrid kan slippa långa bakgrundskontroller och ändå ha säkra hyresgäster. Jag uppskattade särskilt kapitlet om automatiska betalningspåminnelser – det minskar stressen helt. Läs mer på https://telegra.ph/Hyr-ut-bostad-gratis-och-tryggt-2025-med-Bofrid–obzor-12-31-3 och börja hyra tryggt redan idag i din stad nu.
Коллеги, нашёл толковую статью по теме — решил сразу поделиться. Есть список частых ошибок и подсказки, как их избежать. Кому актуально — посмотрите, пожалуйста, ссылку ниже. https://paste.ofcode.org/TiczgS8ckq5jeQeGbDRgAb Если появятся идеи, как применить, напишите — обсудим. F44B44
Jag har precis gått igenom TryggBostads artikel och fick en tydlig steg-för-steg-plan för att skydda min lägenhet under semestern. En viktig punkt var att informera postleverantörer om din frånvaro så att paket inte lämnas ute. Se hela guiden på https://shrib.com/?v=md#promo-edjnj8ph – den gör planeringen enkel. BB725C
Den detaljerade guiden i TryggBostad-listan hjälpte mig att skapa en egen checklista med punkter som brandlarm, lås och nödkontakter. Jag har nu en rutin som minskar stressen vid varje ny vistelse. Kolla in artikeln här: https://privatebin.net/?4c8a596ccf4ee32e#WorCvPv8XSuJRSgkBkUuv5HumrgL37JdKT1wmmR69VJ – den är ovärderlig.
Jag fann artikeln om TryggBostad otroligt hjälpsam. Den förklarar hur du kan installera temporära säkerhetsåtgärder, som portkod och kameraövervakning, innan du reser bort. Dessutom får du en lista på pålitliga tjänster för din hemförsäkring. Enkelt att följa och ger trygghet (https://write.as/1c212i2nlp3bq.md). 599F05
Ліхтар налобний став для мене незамінним пристроєм, адже фонарик на голову дозволяє займатись справами без обмежень, саме тому я вирішив купити налобний ліхтарик на акумуляторі, бо налобний ліхтар на акумуляторі працює стабільно, фонарик налобний зі світлодіодом дає яскраве світло, якщо потрібно купити потужний налобний ліхтар, раджу звертати увагу на ємність акумулятора, бо налобні ліхтарики — це надійно. https://mining-code-factory.org/forum/showthread.php?tid=3443 Ліхтарик на голову
Ліхтарик на голову — універсальне рішення для будь-яких умов
Ліхтарик на голову є популярних освітлювальних пристроїв, які активно застосовуються як у побуті, так і під час професійної роботи. Основною перевагою такого пристрою є те, що немає потреби тримати ліхтар у руках. Саме тому налобний фонарик обирають військові.
Завдяки зручній фіксації налобний ліхтар комфортно сидить на голові навіть при інтенсивній роботі. Корпус зазвичай виготовляється з зносостійких сплавів, що забезпечує надійність у складних умовах.
Сучасний ліхтар налобний поєднує в собі низьке енергоспоживання. Він легко поміщається у сумку, не займає багато місця та завжди під рукою. Купити потужний налобний ліхтар
Налобний ліхтарик став для мене незамінним пристроєм, адже ліхтарик на голову дозволяє займатись справами без обмежень, саме тому я вирішив налобний ліхтар купити на акумуляторі, бо ліхтар налобний акумуляторний працює довго, ліхтарик налобний зі світлодіодом має потужний промінь, якщо потрібно купити потужний налобний ліхтар, раджу звертати увагу на яскравість, бо налобні ліхтарики — це зручно. https://c4o.space/index.php?topic=250699.new#new Налобний ліхтар на акумуляторі
Ліхтар налобний став для мене практичним пристроєм, адже ліхтарик на голову дозволяє працювати комфортно, саме тому я вирішив налобний ліхтар купити на акумуляторі, бо налобний ліхтар на акумуляторі працює стабільно, налобний фонарик зі світлодіодом дає яскраве світло, якщо потрібно купити потужний налобний ліхтар, раджу звертати увагу на ємність акумулятора, бо ліхтарики налобні — це зручно. https://forum.eqlmedia.ca/viewtopic.php?t=1586 Налобний фонарик
https://shorturl.fm/sAdsS
Ліхтар налобний став для мене дуже корисним пристроєм, адже фонарик на голову дозволяє звільнити руки, саме тому я вирішив налобний ліхтар купити на акумуляторі, бо акумуляторний налобний ліхтар працює довго, налобний фонарик зі світлодіодом має потужний промінь, якщо потрібно купити потужний налобний ліхтар, раджу звертати увагу на ємність акумулятора, бо ліхтарики налобні — це зручно. https://bankoforum.com/konu/nalobni-fonariki-kupiti.2284/ Налобні ліхтарі
Как построить стратегию ставок на футбол — основа прибыльных прогнозов. Необходимо следить за формой игроков. Эффективные стратегии включают экспрессы. Тем, кто только начинает рекомендуется начать с простых схем, а эксперты могут комбинировать стратегии. Не забывайте, что ставки всегда связаны с риском. Регулярный анализ результатов матчей снизит вероятность проигрыша. http://devfortrade.listbb.ru/viewtopic.php?f=2&t=1997 Коэффициенты на футбол
https://shorturl.fm/mTaUC
need a video? video production agency in italy offering full-cycle services: concept, scripting, filming, editing and post-production. Commercials, corporate videos, social media content and branded storytelling. Professional crew, modern equipment and a creative approach tailored to your goals.
Продажа тяговых https://faamru.com аккумуляторных батарей для вилочных погрузчиков, ричтраков, электротележек и штабелеров. Решения для интенсивной складской работы: стабильная мощность, долгий ресурс, надёжная работа в сменном режиме, помощь с подбором АКБ по параметрам техники и оперативная поставка под задачу
Продажа тяговых https://ab-resurs.ru аккумуляторных батарей для вилочных погрузчиков и штабелеров. Надёжные решения для стабильной работы складской техники: большой выбор АКБ, профессиональный подбор по параметрам, консультации специалистов, гарантия и оперативная поставка для складов и производств по всей России
Check this out: VRFGHCM18 – https://paste.rs/SlJZi
Все актуальные адреса здесь на кракен тут ссылка рабочая сегодня для безопасного входа на маркетплейс
Продажа тяговых ab-resurs.ru аккумуляторных батарей для вилочных погрузчиков и штабелеров. Надёжные решения для стабильной работы складской техники: большой выбор АКБ, профессиональный подбор по параметрам, консультации специалистов, гарантия и оперативная поставка для складов и производств по всей России
промокод 1xbet бесплатно Ищите промокод на https://www.res-rent.ru/img/pages/1xbet_promokod.html и активируйте бонус 100% на первый депозит, чтобы получить максимальный стартовый бонус.
My Page – You managed to make this topic genuinely enjoyable.
Продажа тяговых faamru.com аккумуляторных батарей для вилочных погрузчиков, ричтраков, электротележек и штабелеров. Решения для интенсивной складской работы: стабильная мощность, долгий ресурс, надёжная работа в сменном режиме, помощь с подбором АКБ по параметрам техники и оперативная поставка под задачу
дивитися фільми без реклами екшн фільми 2025 в якості 4K
Каждый, кто впервые регистрируется на Melbet может использовать код для приветственного бонуса, для увеличения стартового депозита. Ввод промокода получить стартовый капитал для игры. Сервис Melbet регулярно радует игроков, чтобы старт был максимально выгодным. Ввести код легко, достаточно указать его при регистрации. Не откладывайте, и бонусы действуют недолго. Платформа Melbet создана для игроков, где каждый новый пользователь получает максимум преимуществ. Активируйте код и увеличьте свой депозит. http://zhenzhifuye.com/forum.php?mod=viewthread&tid=4189&extra= Действующий Промокод На Мелбет
страхи 2025 онлайн мелодрами про кохання онлайн безкоштовно
страхи 2025 онлайн кращі українські серіали онлайн
Керамічні обігрівачі для дому ECOTEPLO Terra – це надійність, безпека і стиль. http://lcpd.gta-u.com/zh/viewtopic.php?t=1909 Побутові обігрівачі
My Blog – I’ve been struggling with this, and your article solved it.
страхи 2025 онлайн дивитися кіно українською без передплати
Стартовый пакет с кодом увеличивает возможности ставок http://vgrodno.forumex.ru/viewtopic.php?f=7&t=1716 Промокоды для игроков на ставках
Код на стартовые ставки активны для новых игроков https://www.swedishsongs.de/smf/index.php?topic=4575.new#new Приветственный бонус с промокодом
Промокоды для игроков на ставках позволяют получать бонусы. http://elion.forumex.ru/viewtopic.php?f=110&t=1305 Промокод на первую ставку
The article on Lucky Star Casino highlights their regular slot tournaments, complete with prize pools and leaderboards that update in real time. I entered a recent tournament and ended up in the top 5, earning extra free spins I wouldn’t have gotten otherwise. See the tournament schedule here: https://telegra.ph/Lucky-Star-Casino-South-Africa-Leads-with-Top-Slots-and-Bonuses-01-09. Participating adds a competitive edge to regular gameplay. If you enjoy a bit of rivalry, these events are worth checking out. 83FE53
Код на стартовые ставки позволяют начать с бонуса http://bbs123.xyz/index.php?threads/%D0%9F%D1%80%D0%BE%D0%BC%D0%BE%D0%BA%D0%BE%D0%B4-1xbet-tj.343/ Промокоды для ставок в интернете
I appreciated the section in the Lucky Star article that outlines responsible gaming tools, like deposit limits and self‑exclusion options. It gives clear steps to set boundaries, which helped me keep my bankroll in check. The full guide is available at https://paste.rs/ezXTX. 5C15DE
Lo que más me gustó de la Tesoro777 Guía MX es la sección de tips prácticos para gestionar tus fondos. Aprendí a usar herramientas de seguimiento que me permiten controlar mis inversiones en tiempo real, lo cual ha mejorado mi toma de decisiones. Si buscas eficiencia, este artículo es una lectura obligada. https://pad.riseup.net/p/promo-17ht5m7i FBF9B5
One practical takeaway from the article is the review of Luckystar’s customer service channels – live chat, email, and phone – plus typical response times. Knowing you can get help within minutes can be a game‑changer if you hit a snag. All details are summarized at https://ideone.com/ZaP7TR.
The guide I just read uncovers some lesser‑known features on Lucky Star, like the daily spin wheel and exclusive tournaments that aren’t advertised on the homepage. It explains how to access them and what the typical prize structures look like, giving you extra chances to win. Check it out: https://paste.ofcode.org/wxeTTSSpczwr6rzxpdHBcB 33F974
Бездепозитные бонусы дают шанс проверить платформу https://gspanel.net/showthread.php?tid=37801 Бонусные предложения букмекеров
The article about luckystarcasino.co.za points out that the mobile app runs on both iOS and Android, with no loss in graphics quality or game speed. Testing it myself, I could play my favorite slots on the train without lag. This practical note helped me decide to go mobile (https://paste.rs/k0SmF). 3FD7F3
Acabo de leer la Tesoro777 Guía MX y me pareció super útil. Explica paso a paso cómo aprovechar al máximo la plataforma, y destaca trucos para mejorar tus ganancias sin complicaciones. Si buscas una visión clara y práctica, vale la pena echarle un vistazo (https://shrib.com/?v=md#promo-cnwymgwf). A9B12D
Una parte valiosa de la Tesoro777 Guía MX es la explicación de cómo interpretar las estadísticas de juego, como la volatilidad y el RTP. Entender esos indicadores te permite seleccionar juegos que se alineen con tu perfil de riesgo y objetivo de ganancias. Es un recurso práctico, dale una mirada aquí: https://paste2.org/hM04ppxW. 34C197
I liked how the article breaks down the odds for each slot machine at Lucky Star, giving you a realistic expectation of win frequency. Knowing the variance helps you pick games that match your risk appetite, whether you’re after steady small wins or big jackpots. Take a look: https://pad.riseup.net/p/promo-98mqwlw8 1EA18A
Lo que destaca de la Tesoro777 Guía MX es su apartado de configuración de dispositivos, donde explica cómo ajustar la calidad gráfica y el sonido para una experiencia fluida. Después de seguir esos pasos, mi juego se volvió mucho más estable (https://rentry.co/coiufwxv). E2FE36
Онлайн бонусы с промокодом доступны для всех https://ait.ru/forum/messages/forum1/topic5/message406588/?result=reply#message406588 Бонусы и промокоды для ставок
The piece on luckystarcasino.co.za details the 24/7 live chat and email response times, plus a few real‑world examples of quick issue resolution. Knowing you can get help fast is a big plus. Take a look (https://ideone.com/le7UDe) before you sign up if support matters to you. 52F901
Esta guía de Tesoro777 MX me enseñó a combinar diferentes promociones para multiplicar mis premios. El autor muestra gráficos que facilitan la comprensión y sugiere cuándo es mejor usar cada oferta. Si buscas optimizar tus ingresos, dale una oportunidad aquí: https://paste.ofcode.org/drVd7DrwD8QMUmsmBauXgD. E199F3
I stumbled upon this guide while researching Lucky Star Casino and it highlighted a few rookie errors most newbies make, like ignoring game variance. The section on setting daily loss limits really resonated and helped me stay disciplined. If you want to play smarter, check out the article here: https://termbin.com/du3q 4071A0
The Lucky Star Casino article breaks down betting limits for each game category, which is handy if you prefer low‑stakes slots or high‑roller tables. Knowing the minimum and maximum bets ahead of time saves you from unexpected surprises and helps you manage your bankroll efficiently. Take a look: https://paste.rs/zY9xw 42DAA8
I just read this piece on HelloTop’s slots and live games, and it broke down the best South African online casinos in a clear way. The guide even highlights which games have the highest payout rates, so you can pick a winner faster. Check it out here: https://pphr9sc56f4j4s.notepin.co/hellotop-slots-and-live-games-at-online-casino-south-africa–repost-egxhnqko Give it a read before you sign up. 8347EF
Si eres nuevo en Tesoro777, esta guía te brinda una introducción paso a paso sobre cómo crear tu cuenta y aprovechar los bonos de bienvenida. Lo mejor es que incluye consejos prácticos para maximizar tus ganancias en los primeros juegos. Todo está muy bien estructurado y fácil de seguir. Revisa el documento aquí (https://files.catbox.moe/lwhtsv.pdf). A81A59
Al leer la Tesoro777 Guía MX descubrí técnicas para gestionar mejor tu bankroll y planificar sesiones de juego. Aplicar esos métodos te ayuda a mantener la disciplina financiera y a prolongar tu tiempo de juego sin agotar fondos. Encuentra la guía completa en https://paste.ofcode.org/3qgDthsYuwQdWjJcnyE5eY y ponlas en práctica. E45B69
Стартовый пакет с кодом даёт дополнительные средства https://foro.asturmet.com/index.php?topic=60678.new#new Промокоды на первые ставки
Lo mejor de este artículo es la comparativa de los principales casinos mexicanos, con pros y contras claros y puntuaciones basadas en experiencia real. Con esa tabla puedes decidir rápidamente cuál se adapta a tu estilo de juego. No te lo pierdas: https://telegra.ph/Gu%C3%ADa-completa-2025-del-casino-en-M%C3%A9xico–obzor-01-09 y elige el mejor para ti.
What caught my eye was the section on withdrawal speeds – Lucky Star processes most requests within 24 hours, and e‑wallet withdrawals are often instant. The article also lists the verification steps needed, so you won’t be caught off guard when you cash out. That speed can really boost your gaming experience. https://termbin.com/ov74 D961FC
Reading the Lucky Star Casino article gave me a clear picture of their withdrawal speed. The writer outlines the typical processing time for e‑wallets and bank transfers, plus tips on avoiding common delays. If quick cash‑out is a priority for you, the insight here is priceless: https://privatebin.net/?042c83ba8d7e05c2#5nQrKwWBuSCRyPJQCtr4xYNyxBUFQ97AwNQASM1h5xag 6CFD51
Overall, this piece feels like a one‑stop shop for anyone interested in South African online gambling. From game variety and bonus codes to legal considerations and payment methods, it packs everything you need to start confidently. I bookmarked it and refer back whenever I’m hunting a new promotion. Have a look here: https://telegra.ph/South-Africa-Casino-Top-Slots-Live-Games-and-Bonuses–repost-01-09-2. E007FD
Si buscas sacar el máximo provecho a los bonos de Tesoro777, este artículo te lo muestra con ejemplos claros. Además, incluye una tabla de los límites de depósito y cómo evitar comisiones inesperadas. Con esta información podrás jugar con mayor confianza y control de tu bankroll. https://telegra.ph/Gu%C3%ADa-completa-2025-de-Tesoro777-Casino-en-M%C3%A9xico–obzor-01-09 1992C0
The article about luckystarcasino.co.za does a great job cataloguing the game library, from classic slots to live dealer tables. It even points out that new titles are added weekly, keeping the selection fresh. That overview helped me decide which games to try first without feeling overwhelmed. Have a look here: https://privatebin.net/?978bffe8e4523651#44w84TXNWMHAD3f7EK12JmvZ4bnLe6ULFuJzTYKu9v2s 305478
La Tesoro777 Guía MX me enseñó a personalizar mi experiencia de juego ajustando configuraciones de sonido y notificaciones, lo que hace que las sesiones sean más cómodas y menos distractoras. Además, incluye un apartado de preguntas frecuentes que resuelve dudas comunes al instante. Revisa el contenido: https://ideone.com/sqIomE 1C656E
In the recent Luckystar Casino article I discovered a little‑known way to rack up loyalty points by playing specific slot tournaments. The piece lists the current tournament schedule and the point multipliers. I tried it last weekend and earned enough points for a free bonus. Check the details here: https://pad.riseup.net/p/promo-7lgjrnjx. 11293C
Бонус при регистрации увеличивает возможности ставок http://portal.yecw.org/showthread.php?tid=4507 Секретные промокоды для ставок
Al leer la Tesoro777 Guía MX encontré varios trucos que no aparecen en otros tutoriales, como la configuración de alertas personalizadas para seguir cambios de mercado. Implementarlos me permitió anticipar movimientos y obtener mejores resultados. Recomiendo este artículo a cualquiera que quiera pulir su estrategia (https://ideone.com/). 7E6FB1
Recomiendo esta guía porque detalla los requisitos de registro y los métodos de depósito más seguros para Tesoro777. Además, incluye una tabla comparativa de los juegos con mayor RTP, lo que facilita elegir la opción más rentable. No pierdas tiempo buscando en varios sitios; todo está centralizado aquí: https://telegra.ph/Gu%C3%ADa-completa-2025-del-casino-en-M%C3%A9xico–obzor-01-09-3 8A155C
Lo que más me ayudó de la guía Tesoro777 MX fue la sección de atención al cliente, donde explica cómo contactar al soporte en español y obtener respuestas en menos de 24 horas. Saber que puedes resolver dudas rápidamente brinda mayor confianza al jugar. Además, incluye ejemplos de preguntas frecuentes que facilitan la navegación. Te la recomiendo: https://privatebin.net/?77915ff5326924eb#GAFRatd5ZS9qRuvfWaz6PTYtBpScDtELwH8Y6M557YEZ BBF6BD
El artículo destaca las trampas más frecuentes que caen los jugadores novatos, como apostar sin límite y seguir la racha. Con esas alertas, pude corregir mi estilo y evitar pérdidas innecesarias. Es una lectura esencial para jugar de forma inteligente: https://termbin.com/4cr7p FAD2D3
La guía explica detalladamente los métodos de pago disponibles en Tesoro777, incluyendo depósitos vía SPEI y tarjetas de crédito. Descubrí que el tiempo de confirmación es de pocos minutos con SPEI, lo que me permitió jugar sin esperas. Es una información valiosa para cualquier jugador nuevo. https://telegra.ph/Gu%C3%ADa-completa-2025-de-Tesoro777-Casino-en-M%C3%A9xico–obzor-01-09-2 8B3BF0
Esta Tesoro777 Guía MX reúne información esencial, desde cómo crear una cuenta hasta estrategias avanzadas de gestión de bankroll. Lo más útil para mí fue la tabla de horarios de promociones, que me permite planificar mis sesiones cuando hay mayor bonificación. Un recurso completo que vale la pena compartir (https://paste2.org/bJyCcKOP). 105EB4
Онлайн бонусы с промокодом легко активируются https://foro.fotometroclub.cl/viewtopic.php?t=2740 Промокоды для ставок в интернете
Акции для активных игроков дают дополнительные возможности https://www.arabiafinds.com/boards/topic/152038/%D0%BF%D1%80%D0%BE%D0%BC%D0%BE%D0%BA%D0%BE%D0%B4-1xbet-%D0%BD%D0%B0-%D0%B1%D0%B5%D1%81%D0%BF%D0%BB%D0%B0%D1%82%D0%BD%D1%83%D1%8E-%D1%81%D1%82%D0%B0%D0%B2%D0%BA%D1%83 Актуальные промокоды БК
Актуальные акции и промокоды дают дополнительные преимущества https://forum.pcfoster.pl/topic/91753-%D0%BF%D1%80%D0%BE%D0%BC%D0%BE%D0%BA%D0%BE%D0%B4-1%D1%85%D0%B1%D0%B5%D1%82-%D0%BD%D0%B0-%D0%B1%D0%B5%D1%81%D0%BF%D0%BB%D0%B0%D1%82%D0%BD%D1%83%D1%8E-%D1%81%D1%82%D0%B0%D0%B2%D0%BA%D1%83/ Акции и промокоды для новых игроков
Инструкция по активации промокода без сложностей https://eh7.a72.mytemp.website/viewtopic.php?t=7752 Актуальные бонусные коды
Продвижение сайтов https://team-black-top.ru под ключ: аудит, стратегия, семантика, техоптимизация, контент и ссылки. Улучшаем позиции в Google/Яндекс, увеличиваем трафик и заявки. Прозрачная отчетность, понятные KPI и работа на результат — от старта до стабильного роста.
Продвижение сайтов https://team-black-top.ru под ключ: аудит, стратегия, семантика, техоптимизация, контент и ссылки. Улучшаем позиции в Google/Яндекс, увеличиваем трафик и заявки. Прозрачная отчетность, понятные KPI и работа на результат — от старта до стабильного роста.
Тяговые аккумуляторные https://ab-resurs.ru батареи для складской техники: погрузчики, ричтраки, электротележки, штабелеры. Новые АКБ с гарантией, помощь в подборе, совместимость с популярными моделями, доставка и сервисное сопровождение.
Тяговые аккумуляторные https://ab-resurs.ru батареи для складской техники: погрузчики, ричтраки, электротележки, штабелеры. Новые АКБ с гарантией, помощь в подборе, совместимость с популярными моделями, доставка и сервисное сопровождение.
Продажа тяговых АКБ https://faamru.com для складской техники любого типа: вилочные погрузчики, ричтраки, электрические тележки и штабелеры. Качественные аккумуляторные батареи, долгий срок службы, гарантия и профессиональный подбор.
Продажа тяговых АКБ https://faamru.com для складской техники любого типа: вилочные погрузчики, ричтраки, электрические тележки и штабелеры. Качественные аккумуляторные батареи, долгий срок службы, гарантия и профессиональный подбор.
Продажа тяговых АКБ https://faamru.com для складской техники любого типа: вилочные погрузчики, ричтраки, электрические тележки и штабелеры. Качественные аккумуляторные батареи, долгий срок службы, гарантия и профессиональный подбор.
Продажа тяговых АКБ https://faamru.com для складской техники любого типа: вилочные погрузчики, ричтраки, электрические тележки и штабелеры. Качественные аккумуляторные батареи, долгий срок службы, гарантия и профессиональный подбор.
дивитися хороший фільм сучасні серіали в HD якості
дивитися серіали сучасні серіали в HD якості
кіно онлайн 2025 фільми марвел дивитися онлайн
дивитись фільми 2025 корейські дорами дивитися онлайн
Le 1xbet Bonus Code est actif lors de l’inscription et permet de debloquer des offres exclusives sur les jeux en ligne. https://www.zsohbet.org/forum/index.php/topic,3430.new.html#new Promo Code 1xbet Today
Comment Creer Un Code Promo 1xbet permet aux partenaires de generer leur promotion personnelle afin de developper leur audience. https://gtamilchat.info/forum/index.php?topic=37009.new#new Code Promo 1xbet Aujourd Hui
Comment S Inscrire Sur 1xbet est possible en selectionnant la region et en entrant le bon code promo. http://mireait.listbb.ru/viewtopic.php?f=2&t=2411 How To Get Bonus 1xbet
Le 1xbet Bonus Code est valable pour les nouveaux joueurs et permet de debloquer des offres exclusives sur les jeux en ligne. https://forum.fmibikersumbria.com/showthread.php?tid=35528 Creer Un Compte 1xbet Russe
https://shorturl.fm/Q30tw
Выбор транспортного средства зависит исключительно от ваших планов. Для исследования горных дорог и поездок на wild-пляжи рекомендуем взять кроссовер или SUV. Важный этап — внимательное изучение договора. Обращайте внимание на политику в отношении топлива (полный бак/полный возврат). Для аренды обычно необходимы водительское удостоверение международного образца, заграничный паспорт и банковская карта для блокировки депозита. https://panel.isfjordhird.pl/showthread.php?tid=516 Аренда авто в центре анталии
Выбор транспортного средства зависит исключительно от ваших планов. Для семейного отдыха с детьми лучше выбрать вместительный седан или минивэн. Важный этап — четкое понимание условий аренды. Обращайте внимание на лимит пробега (часто предлагается безлимитный километраж). Для аренды обычно необходимы водительское удостоверение международного образца, заграничный паспорт и банковская карта для блокировки депозита. http://demo.4admins.ru/viewtopic.php?f=10&t=4800 Аренда авто в анталии с водителем
Сев за руль, вы открываете для себя настоящую Турцию за пределами отельных зон. Составьте свой маршрут из величественных руин Перге и Аспендоса. Совершите гастрономический тур по деревенским хаммамам и фермерским рынкам. Аренда автомобиля дает вам это priceless-ощущение свободы и гибкости, которое невозможно переоценить. Забронируйте авто онлайн заранее, чтобы получить лучшую цену и гарантировать наличие нужной модели. http://nigegorodskayslada.forumex.ru/viewtopic.php?f=25&t=349 Аренда авто в аэропорту анталии
Определиться с классом авто поможет примерный маршрут вашего путешествия. Для семейного отдыха с детьми лучше выбрать вместительный седан или минивэн. Важный этап — четкое понимание условий аренды. Обращайте внимание на тип страхового покрытия (CDW, Theft Protection, полное каско). Для аренды обычно необходимы паспорт, национальные водительские права (иногда с завершенным переводом) и кредитная карта на имя водителя. http://ue-info.ru/viewtopic.php?t=6841 Прокат авто в аэропорту анталии
Reading this guide gave me a clear roadmap for commissioning a custom portrait without the usual guesswork. It points out key questions to ask artists—like turnaround time and revision policy—so you avoid surprises. The result is a stress‑free experience and a portrait that truly reflects your personality. See the full tips here: https://write.as/uc8l54itg9qqw.md
(10 euros gratis apuestas|10 mejores casas de apuestas|10 trucos para ganar apuestas|15 euros gratis marca apuestas|1×2 apuestas|1×2 apuestas deportivas|1×2 apuestas que significa|1×2 en apuestas|1×2 en apuestas que significa|1×2 que significa en apuestas|5
euros gratis apuestas|9 apuestas que siempre ganaras|a partir de cuanto se
declara apuestas|actividades de juegos de azar y apuestas|ad apuestas deportivas|aleksandre topuria
ufc apuestas|algoritmo para ganar apuestas deportivas|america apuestas|análisis nba apuestas|aplicacion android apuestas deportivas|aplicacion apuestas deportivas|aplicacion apuestas deportivas android|aplicación de apuestas online|aplicacion para hacer apuestas|aplicacion para hacer apuestas de futbol|aplicación para hacer apuestas de fútbol|aplicaciones apuestas deportivas android|aplicaciones
apuestas deportivas gratis|aplicaciones de apuestas android|aplicaciones de apuestas de fútbol|aplicaciones de apuestas deportivas|aplicaciones de apuestas deportivas peru|aplicaciones de
apuestas deportivas perú|aplicaciones de apuestas en colombia|aplicaciones de apuestas gratis|aplicaciones de apuestas
online|aplicaciones de apuestas seguras|aplicaciones de apuestas sin dinero|aplicaciones para hacer apuestas|apostar seguro apuestas deportivas|app android apuestas deportivas|app apuestas|app apuestas android|app apuestas de futbol|app apuestas
deportivas|app apuestas deportivas android|app apuestas deportivas argentina|app apuestas deportivas
colombia|app apuestas deportivas ecuador|app apuestas deportivas
españa|app apuestas deportivas gratis|app apuestas entre amigos|app apuestas futbol|app apuestas gratis|app
apuestas sin dinero|app casa de apuestas|app casas de apuestas|app control apuestas|app de apuestas|app de apuestas android|app
de apuestas casino|app de apuestas colombia|app de apuestas con bono de bienvenida|app de apuestas de futbol|app de apuestas deportivas|app de apuestas
deportivas android|app de apuestas deportivas argentina|app de apuestas deportivas
colombia|app de apuestas deportivas en españa|app de apuestas deportivas
peru|app de apuestas deportivas perú|app de apuestas
deportivas sin dinero|app de apuestas ecuador|app de
apuestas en colombia|app de apuestas en españa|app de apuestas en venezuela|app de apuestas futbol|app de apuestas gratis|app de apuestas
online|app de apuestas para android|app de apuestas para ganar dinero|app de apuestas peru|app de
apuestas reales|app de casas de apuestas|app marca apuestas android|app moviles
de apuestas|app para apuestas|app para apuestas de futbol|app para
apuestas deportivas|app para apuestas deportivas en español|app para
ganar apuestas deportivas|app para hacer apuestas|app para hacer apuestas deportivas|app para hacer apuestas entre amigos|app para
llevar control de apuestas|app pronosticos apuestas deportivas|app versus apuestas|apps
apuestas mundial|apps de apuestas|apps de apuestas con bono de bienvenida|apps
de apuestas de futbol|apps de apuestas deportivas peru|apps de apuestas mexico|apps para apuestas|aprender a hacer apuestas deportivas|aprender hacer apuestas deportivas|apuesta del dia apuestas deportivas|apuestas 10 euros gratis|apuestas 100 seguras|apuestas 1×2|apuestas 1X2|apuestas 2
division|apuestas 3 division|apuestas a caballos|apuestas a carreras de caballos|apuestas
a colombia|apuestas a corners|apuestas a ganar|apuestas a jugadores nba|apuestas a la
baja|apuestas a la nfl|apuestas al barcelona|apuestas al
dia|apuestas al empate|apuestas al mundial|apuestas al tenis wta|apuestas alaves barcelona|apuestas alcaraz hoy|apuestas
alemania españa|apuestas alonso campeon del mundo|apuestas
altas y bajas|apuestas altas y bajas nfl|apuestas ambos equipos
marcan|apuestas america|apuestas android|apuestas anillo nba|apuestas antes
del mundial|apuestas anticipadas|apuestas anticipadas nba|apuestas apps|apuestas arabia argentina|apuestas argentina|apuestas argentina
campeon del mundo|apuestas argentina canada|apuestas argentina colombia|apuestas argentina croacia|apuestas argentina españa|apuestas argentina francia|apuestas argentina francia cuanto paga|apuestas argentina francia mundial|apuestas argentina gana
el mundial|apuestas argentina gana mundial|apuestas argentina holanda|apuestas argentina mexico|apuestas argentina méxico|apuestas argentina mundial|apuestas argentina
online|apuestas argentina paises bajos|apuestas argentina polonia|apuestas argentina uruguay|apuestas argentina vs australia|apuestas argentina vs colombia|apuestas argentina vs francia|apuestas argentina vs peru|apuestas argentinas|apuestas arsenal
real madrid|apuestas ascenso a primera division|apuestas ascenso a segunda|apuestas
asiaticas|apuestas asiatico|apuestas athletic|apuestas athletic atletico|apuestas athletic barça|apuestas athletic barcelona|apuestas athletic betis|apuestas athletic manchester|apuestas athletic manchester united|apuestas athletic osasuna|apuestas athletic real|apuestas
athletic real madrid|apuestas athletic real sociedad|apuestas athletic real sociedad final|apuestas athletic roma|apuestas athletic sevilla|apuestas athletic valencia|apuestas atletico|apuestas atletico barcelona|apuestas atletico barsa|apuestas
atletico campeon champions|apuestas atletico campeon de liga|apuestas atlético copenhague|apuestas atletico de madrid|apuestas atlético de madrid|apuestas atletico de madrid barcelona|apuestas atletico de madrid gana la liga|apuestas atletico
de madrid real madrid|apuestas atlético de madrid real madrid|apuestas atletico de madrid vs barcelona|apuestas atletico madrid|apuestas atletico madrid real madrid|apuestas atletico madrid vs
barcelona|apuestas atletico real madrid|apuestas atletico real madrid champions|apuestas atletismo|apuestas bajas|apuestas
baloncesto|apuestas baloncesto acb|apuestas baloncesto handicap|apuestas baloncesto hoy|apuestas baloncesto juegos olimpicos|apuestas baloncesto nba|apuestas baloncesto pronostico|apuestas baloncesto pronósticos|apuestas baloncesto prorroga|apuestas barca|apuestas barca athletic|apuestas barca atletico|apuestas barca bayern|apuestas barca bayern munich|apuestas
barca girona|apuestas barca hoy|apuestas barça hoy|apuestas barca inter|apuestas barca juventus|apuestas barca madrid|apuestas barça madrid|apuestas barca real madrid|apuestas
barca vs juve|apuestas barca vs madrid|apuestas barca vs psg|apuestas barcelona|apuestas barcelona alaves|apuestas barcelona athletic|apuestas barcelona atletico|apuestas barcelona atletico de madrid|apuestas
barcelona atlético de madrid|apuestas barcelona atletico madrid|apuestas barcelona bayern|apuestas barcelona betis|apuestas barcelona campeon de liga|apuestas barcelona celta|apuestas barcelona espanyol|apuestas barcelona gana
la champions|apuestas barcelona girona|apuestas barcelona granada|apuestas barcelona hoy|apuestas
barcelona inter|apuestas barcelona madrid|apuestas barcelona osasuna|apuestas barcelona psg|apuestas barcelona
real madrid|apuestas barcelona real sociedad|apuestas barcelona sevilla|apuestas barcelona valencia|apuestas barcelona villarreal|apuestas barcelona vs
atletico madrid|apuestas barcelona vs madrid|apuestas barcelona vs real madrid|apuestas barsa madrid|apuestas
basket hoy|apuestas bayern barcelona|apuestas bayern vs barcelona|apuestas beisbol|apuestas béisbol|apuestas beisbol mlb|apuestas beisbol pronosticos|apuestas beisbol venezolano|apuestas betis|apuestas betis – chelsea|apuestas
betis barcelona|apuestas betis chelsea|apuestas betis fiorentina|apuestas betis girona|apuestas
betis madrid|apuestas betis mallorca|apuestas betis real madrid|apuestas betis real sociedad|apuestas betis sevilla|apuestas betis valencia|apuestas betis valladolid|apuestas
betis vs valencia|apuestas betplay hoy colombia|apuestas betsson peru|apuestas
bienvenida|apuestas billar online|apuestas bolivia vs colombia|apuestas
bono|apuestas bono bienvenida|apuestas bono de
bienvenida|apuestas bono de bienvenida sin deposito|apuestas
bono gratis|apuestas bono sin deposito|apuestas bonos sin deposito|apuestas borussia real madrid|apuestas boxeo|apuestas
boxeo de campeonato|apuestas boxeo españa|apuestas boxeo español|apuestas boxeo femenino
olimpiadas|apuestas boxeo hoy|apuestas boxeo online|apuestas brasil
colombia|apuestas brasil peru|apuestas brasil uruguay|apuestas brasil vs colombia|apuestas brasil
vs peru|apuestas caballos|apuestas caballos colocado|apuestas caballos españa|apuestas caballos hipodromo|apuestas caballos hoy|apuestas caballos madrid|apuestas caballos online|apuestas caballos sanlucar de barrameda|apuestas caballos zarzuela|apuestas calculador|apuestas campeon|apuestas campeon champions|apuestas
campeón champions|apuestas campeon champions 2025|apuestas campeon champions league|apuestas campeon conference league|apuestas campeon copa america|apuestas campeon copa del rey|apuestas campeon de champions|apuestas campeon de la champions|apuestas campeon de liga|apuestas campeon del mundo|apuestas campeon eurocopa|apuestas campeón eurocopa|apuestas campeon europa league|apuestas campeon f1|apuestas campeon f1 2025|apuestas campeon formula 1|apuestas campeon libertadores|apuestas campeon liga|apuestas campeon liga bbva|apuestas campeon liga española|apuestas campeon liga santander|apuestas campeon motogp 2025|apuestas campeon mundial|apuestas campeón mundial|apuestas campeon mundial baloncesto|apuestas campeon nba|apuestas campeón nba|apuestas campeon premier|apuestas campeon premier
league|apuestas campeon roland garros|apuestas campeonato f1|apuestas campeonatos
de futbol|apuestas carrera de caballos|apuestas carrera de caballos hoy|apuestas carrera de caballos nocturnas|apuestas carrera de galgos fin de semana|apuestas carrera
de galgos hoy|apuestas carrera de galgos nocturnas|apuestas carreras caballos|apuestas
carreras caballos sanlucar|apuestas carreras de caballos|apuestas
carreras de caballos en directo|apuestas carreras de caballos en vivo|apuestas carreras de caballos españa|apuestas carreras
de caballos hoy|apuestas carreras de caballos nacionales|apuestas carreras
de caballos nocturnas|apuestas carreras de caballos online|apuestas carreras de caballos sanlucar|apuestas carreras de caballos sanlúcar|apuestas carreras de galgos|apuestas carreras
de galgos en vivo|apuestas carreras de galgos nocturnas|apuestas
carreras de galgos pre partido|apuestas casino|apuestas casino barcelona|apuestas
casino futbol|apuestas casino gran madrid|apuestas casino gratis|apuestas casino madrid|apuestas casino
online|apuestas casino online argentina|apuestas casinos|apuestas casinos online|apuestas celta|apuestas
celta barcelona|apuestas celta betis|apuestas celta eibar|apuestas
celta espanyol|apuestas celta granada|apuestas
celta madrid|apuestas celta manchester|apuestas celta real madrid|apuestas
champion league|apuestas champions foro|apuestas champions hoy|apuestas champions league|apuestas champions league
– pronósticos|apuestas champions league 2025|apuestas champions league hoy|apuestas champions league pronosticos|apuestas champions league
pronósticos|apuestas champions pronosticos|apuestas chelsea barcelona|apuestas chelsea betis|apuestas chile|apuestas chile peru|apuestas chile venezuela|apuestas chile vs colombia|apuestas chile vs
uruguay|apuestas ciclismo|apuestas ciclismo en vivo|apuestas ciclismo femenino|apuestas ciclismo tour francia|apuestas ciclismo vuelta|apuestas ciclismo vuelta a españa|apuestas ciclismo vuelta
españa|apuestas city madrid|apuestas city real madrid|apuestas clasico|apuestas
clasico español|apuestas clasico real madrid barcelona|apuestas clasificacion mundial|apuestas colombia|apuestas colombia argentina|apuestas colombia brasil|apuestas colombia paraguay|apuestas colombia uruguay|apuestas colombia vs argentina|apuestas colombia
vs brasil|apuestas combinadas|apuestas combinadas como funcionan|apuestas combinadas de futbol|apuestas combinadas
de fútbol|apuestas combinadas foro|apuestas combinadas futbol|apuestas combinadas hoy|apuestas combinadas mismo
partido|apuestas combinadas mundial|apuestas combinadas nba|apuestas combinadas para esta semana|apuestas combinadas para hoy|apuestas combinadas para mañana|apuestas combinadas pronosticos|apuestas combinadas recomendadas|apuestas combinadas seguras|apuestas
combinadas seguras para hoy|apuestas combinadas
seguras para mañana|apuestas como ganar|apuestas comparador|apuestas con bono de bienvenida|apuestas con dinero ficticio|apuestas con dinero real|apuestas con dinero virtual|apuestas con handicap|apuestas con handicap asiatico|apuestas con handicap baloncesto|apuestas con mas probabilidades de ganar|apuestas
con paypal|apuestas con tarjeta de credito|apuestas con tarjeta de debito|apuestas consejos|apuestas copa|apuestas copa africa|apuestas copa america|apuestas copa américa|apuestas copa argentina|apuestas copa brasil|apuestas
copa davis|apuestas copa de europa|apuestas copa del mundo|apuestas copa del rey|apuestas copa del rey baloncesto|apuestas copa
del rey final|apuestas copa del rey futbol|apuestas copa del rey ganador|apuestas copa del rey hoy|apuestas copa del rey pronosticos|apuestas copa del rey pronósticos|apuestas copa europa|apuestas copa italia|apuestas copa libertadores|apuestas copa mundial de hockey|apuestas copa
rey|apuestas copa sudamericana|apuestas corners|apuestas corners hoy|apuestas
croacia argentina|apuestas cuartos eurocopa|apuestas
cuotas|apuestas cuotas altas|apuestas cuotas bajas|apuestas de 1
euro|apuestas de baloncesto|apuestas de baloncesto hoy|apuestas de baloncesto nba|apuestas de baloncesto para hoy|apuestas de beisbol|apuestas de beisbol para
hoy|apuestas de blackjack en linea|apuestas de boxeo|apuestas de boxeo canelo|apuestas de boxeo en las vegas|apuestas de boxeo hoy|apuestas de boxeo online|apuestas de caballo|apuestas de caballos|apuestas de caballos como funciona|apuestas de
caballos como se juega|apuestas de caballos en colombia|apuestas de caballos en españa|apuestas de caballos en linea|apuestas de caballos españa|apuestas de
caballos ganador y colocado|apuestas de caballos internacionales|apuestas
de caballos juegos|apuestas de caballos online|apuestas de caballos online en venezuela|apuestas de
caballos por internet|apuestas de caballos pronosticos|apuestas de caballos pronósticos|apuestas
de carrera de caballos|apuestas de carreras de caballos|apuestas de carreras de
caballos online|apuestas de casino|apuestas de casino online|apuestas de casino por internet|apuestas de champions league|apuestas de ciclismo|apuestas de colombia|apuestas de copa
america|apuestas de corners|apuestas de deportes en linea|apuestas de deportes online|apuestas de dinero|apuestas
de esports|apuestas de eurocopa|apuestas
de europa league|apuestas de f1|apuestas de formula 1|apuestas de futbol|apuestas
de fútbol|apuestas de futbol app|apuestas de futbol
argentina|apuestas de futbol colombia|apuestas de futbol
en colombia|apuestas de futbol en directo|apuestas de futbol en linea|apuestas
de futbol en vivo|apuestas de futbol español|apuestas de futbol gratis|apuestas de futbol hoy|apuestas de futbol mundial|apuestas de futbol online|apuestas de fútbol online|apuestas de futbol para hoy|apuestas de fútbol para hoy|apuestas de futbol para hoy seguras|apuestas de futbol para mañana|apuestas de
futbol peru|apuestas de futbol pronosticos|apuestas de fútbol pronósticos|apuestas de futbol seguras|apuestas de futbol seguras para
hoy|apuestas de futbol sin dinero|apuestas de galgos|apuestas de galgos
como ganar|apuestas de galgos en directo|apuestas de galgos online|apuestas de galgos trucos|apuestas de golf|apuestas de hockey|apuestas de hockey sobre hielo|apuestas de hoy|apuestas
de hoy seguras|apuestas de juego|apuestas de juegos|apuestas de juegos deportivos|apuestas de juegos online|apuestas de la
champions league|apuestas de la copa américa|apuestas de
la eurocopa|apuestas de la europa league|apuestas de la liga|apuestas de la liga bbva|apuestas de la liga española|apuestas de la nba|apuestas de
la nfl|apuestas de la ufc|apuestas de mlb|apuestas de nba|apuestas de nba para hoy|apuestas de partidos|apuestas de partidos de futbol|apuestas de peleas ufc|apuestas de perros en vivo|apuestas de perros virtuales|apuestas
de peru|apuestas de sistema|apuestas de sistema como funciona|apuestas de
sistema explicacion|apuestas de sistema explicación|apuestas de tenis|apuestas de tenis de
mesa|apuestas de tenis en directo|apuestas de tenis hoy|apuestas de tenis para hoy|apuestas de tenis pronosticos|apuestas de
tenis seguras|apuestas de todo tipo|apuestas de ufc|apuestas de
ufc hoy|apuestas del boxeo|apuestas del clasico|apuestas del clasico real madrid barca|apuestas del dia|apuestas del día|apuestas del
dia de hoy|apuestas del dia deportivas|apuestas del dia futbol|apuestas del mundial|apuestas del partido de hoy|apuestas del real madrid|apuestas
del rey|apuestas del sistema|apuestas deporte|apuestas
deportes|apuestas deportiva|apuestas deportivas|apuestas deportivas 1
euro|apuestas deportivas 10 euros gratis|apuestas deportivas 100 seguras|apuestas deportivas 1×2|apuestas deportivas
android|apuestas deportivas app|apuestas deportivas apps|apuestas deportivas argentina|apuestas deportivas argentina futbol|apuestas
deportivas argentina legal|apuestas deportivas atletico de madrid|apuestas deportivas baloncesto|apuestas deportivas barca madrid|apuestas deportivas barcelona|apuestas deportivas beisbol|apuestas deportivas bono|apuestas
deportivas bono bienvenida|apuestas deportivas bono de bienvenida|apuestas deportivas bono sin deposito|apuestas deportivas bonos de bienvenida|apuestas deportivas
boxeo|apuestas deportivas caballos|apuestas deportivas calculadora|apuestas
deportivas campeon liga|apuestas deportivas casino|apuestas
deportivas casino barcelona|apuestas deportivas casino online|apuestas deportivas cerca de mi|apuestas deportivas champions league|apuestas deportivas chile|apuestas deportivas ciclismo|apuestas deportivas colombia|apuestas deportivas
com|apuestas deportivas com foro|apuestas deportivas com pronosticos|apuestas deportivas combinadas|apuestas deportivas combinadas para hoy|apuestas deportivas como se juega|apuestas deportivas comparador|apuestas
deportivas con bono gratis|apuestas deportivas
con bonos gratis|apuestas deportivas con dinero ficticio|apuestas deportivas
con paypal|apuestas deportivas con puntos virtuales|apuestas deportivas consejos|apuestas deportivas consejos para
ganar|apuestas deportivas copa america|apuestas deportivas copa del rey|apuestas deportivas copa libertadores|apuestas deportivas
copa mundial|apuestas deportivas corners|apuestas deportivas cual es la mejor|apuestas deportivas cuotas altas|apuestas
deportivas de baloncesto|apuestas deportivas de boxeo|apuestas deportivas de colombia|apuestas deportivas de futbol|apuestas deportivas de nba|apuestas deportivas de nhl|apuestas deportivas de peru|apuestas deportivas de
tenis|apuestas deportivas del dia|apuestas deportivas dinero ficticio|apuestas deportivas directo|apuestas deportivas doble oportunidad|apuestas deportivas en argentina|apuestas deportivas en chile|apuestas deportivas en colombia|apuestas
deportivas en directo|apuestas deportivas en españa|apuestas deportivas en español|apuestas
deportivas en linea|apuestas deportivas en línea|apuestas
deportivas en peru|apuestas deportivas en perú|apuestas deportivas en sevilla|apuestas deportivas en uruguay|apuestas
deportivas en vivo|apuestas deportivas es|apuestas deportivas es
pronosticos|apuestas deportivas españa|apuestas deportivas españolas|apuestas deportivas esports|apuestas deportivas estadisticas|apuestas deportivas estrategias|apuestas deportivas estrategias seguras|apuestas deportivas eurocopa|apuestas deportivas europa league|apuestas deportivas f1|apuestas deportivas faciles de ganar|apuestas deportivas formula 1|apuestas deportivas foro|apuestas deportivas foro futbol|apuestas deportivas foro tenis|apuestas deportivas francia argentina|apuestas deportivas futbol|apuestas deportivas
fútbol|apuestas deportivas futbol argentino|apuestas deportivas futbol colombia|apuestas deportivas
futbol español|apuestas deportivas gana|apuestas
deportivas ganadas|apuestas deportivas ganar dinero seguro|apuestas
deportivas gane|apuestas deportivas golf|apuestas deportivas gratis|apuestas deportivas gratis con premios|apuestas deportivas gratis hoy|apuestas deportivas gratis sin deposito|apuestas deportivas handicap|apuestas deportivas handicap
asiatico|apuestas deportivas hoy|apuestas deportivas
impuestos|apuestas deportivas interior argentina|apuestas deportivas juegos olimpicos|apuestas deportivas la liga|apuestas deportivas legales|apuestas
deportivas legales en colombia|apuestas deportivas
libres de impuestos|apuestas deportivas licencia españa|apuestas deportivas liga española|apuestas deportivas listado|apuestas deportivas
listado clasico|apuestas deportivas madrid|apuestas deportivas mas seguras|apuestas deportivas mejor pagadas|apuestas deportivas mejores|apuestas deportivas mejores app|apuestas deportivas mejores casas|apuestas deportivas mejores cuotas|apuestas
deportivas mejores paginas|apuestas deportivas mexico|apuestas deportivas méxico|apuestas deportivas
mlb|apuestas deportivas mlb hoy|apuestas deportivas multiples|apuestas deportivas mundial|apuestas deportivas murcia|apuestas
deportivas nba|apuestas deportivas nba hoy|apuestas deportivas nfl|apuestas deportivas nhl|apuestas deportivas nuevas|apuestas deportivas ofertas|apuestas deportivas
online|apuestas deportivas online argentina|apuestas deportivas online chile|apuestas deportivas online colombia|apuestas deportivas online en colombia|apuestas deportivas online españa|apuestas
deportivas online mexico|apuestas deportivas online paypal|apuestas deportivas online peru|apuestas deportivas online por internet|apuestas
deportivas pago paypal|apuestas deportivas para ganar dinero|apuestas deportivas para
hoy|apuestas deportivas para hoy pronosticos|apuestas deportivas partido suspendido|apuestas deportivas partidos de hoy|apuestas deportivas paypal|apuestas deportivas peru|apuestas deportivas perú|apuestas deportivas peru vs ecuador|apuestas
deportivas predicciones|apuestas deportivas promociones|apuestas deportivas pronostico|apuestas deportivas pronóstico|apuestas deportivas pronostico hoy|apuestas deportivas pronosticos|apuestas deportivas pronósticos|apuestas
deportivas pronosticos expertos|apuestas deportivas pronosticos gratis|apuestas deportivas
pronosticos nba|apuestas deportivas pronosticos tenis|apuestas deportivas que aceptan paypal|apuestas deportivas
real madrid|apuestas deportivas regalo bienvenida|apuestas deportivas resultado exacto|apuestas
deportivas resultados|apuestas deportivas rugby|apuestas deportivas seguras|apuestas deportivas seguras foro|apuestas deportivas seguras hoy|apuestas deportivas seguras para hoy|apuestas deportivas
seguras telegram|apuestas deportivas sevilla|apuestas deportivas simulador eurocopa|apuestas deportivas sin deposito|apuestas deportivas sin deposito inicial|apuestas deportivas sin dinero|apuestas
deportivas sin dinero real|apuestas deportivas sin registro|apuestas
deportivas stake|apuestas deportivas stake 10|apuestas deportivas telegram
españa|apuestas deportivas tenis|apuestas deportivas tenis
de mesa|apuestas deportivas tenis foro|apuestas deportivas tenis hoy|apuestas deportivas tips|apuestas deportivas tipster|apuestas deportivas ufc|apuestas deportivas
uruguay|apuestas deportivas valencia|apuestas deportivas
valencia barcelona|apuestas deportivas venezuela|apuestas deportivas virtuales|apuestas deportivas y casino|apuestas
deportivas y casino online|apuestas deportivas.com|apuestas deportivas.com foro|apuestas deportivas.es|apuestas deportivos pronosticos|apuestas deposito minimo 1 euro|apuestas descenso a segunda|apuestas descenso a segunda b|apuestas descenso la
liga|apuestas descenso primera division|apuestas descenso segunda|apuestas dia|apuestas diarias seguras|apuestas dinero|apuestas dinero ficticio|apuestas
dinero real|apuestas dinero virtual|apuestas directas|apuestas directo|apuestas directo futbol|apuestas division de honor juvenil|apuestas dnb|apuestas doble oportunidad|apuestas doble resultado|apuestas dobles|apuestas dobles y triples|apuestas dortmund barcelona|apuestas draft nba|apuestas draft nfl|apuestas ecuador vs argentina|apuestas ecuador vs venezuela|apuestas egipto
uruguay|apuestas el clasico|apuestas elecciones venezuela|apuestas empate|apuestas en baloncesto|apuestas en barcelona|apuestas en beisbol|apuestas en boxeo|apuestas en caballos|apuestas en carreras de caballos|apuestas en casino|apuestas en casino online|apuestas en casinos|apuestas en casinos online|apuestas en chile|apuestas en ciclismo|apuestas en colombia|apuestas en colombia de futbol|apuestas en directo|apuestas en directo futbol|apuestas en directo pronosticos|apuestas en el futbol|apuestas en el
tenis|apuestas en españa|apuestas en esports|apuestas en eventos deportivos virtuales|apuestas en golf|apuestas en juegos|apuestas en la champions league|apuestas en la eurocopa|apuestas en la liga|apuestas en la nba|apuestas en la nfl|apuestas en las
vegas mlb|apuestas en las vegas nfl|apuestas en linea|apuestas en línea|apuestas
en linea argentina|apuestas en linea boxeo|apuestas en linea chile|apuestas en linea colombia|apuestas en línea
de fútbol|apuestas en linea deportivas|apuestas en linea españa|apuestas en linea estados unidos|apuestas en linea futbol|apuestas en linea mexico|apuestas
en línea méxico|apuestas en linea mundial|apuestas en linea peru|apuestas en linea
usa|apuestas en los esports|apuestas en madrid|apuestas en méxico|apuestas en mexico online|apuestas en nba|apuestas en partidos de
futbol|apuestas en partidos de futbol en vivo|apuestas en partidos de
tenis en directo|apuestas en perú|apuestas en sevilla|apuestas en sistema|apuestas en stake|apuestas en tenis|apuestas en tenis de mesa|apuestas en valencia|apuestas en vivo|apuestas en vivo argentina|apuestas en vivo casino|apuestas en vivo futbol|apuestas en vivo fútbol|apuestas en vivo
nba|apuestas en vivo peru|apuestas en vivo tenis|apuestas en vivo ufc|apuestas equipo
mbappe|apuestas equipos de futbol|apuestas españa|apuestas españa alemania|apuestas españa
alemania eurocopa|apuestas españa croacia|apuestas españa eurocopa|apuestas españa
francia|apuestas españa francia eurocopa|apuestas españa
gana el mundial|apuestas españa gana eurocopa|apuestas españa gana mundial|apuestas españa georgia|apuestas españa holanda|apuestas españa inglaterra|apuestas españa
inglaterra cuotas|apuestas españa inglaterra eurocopa|apuestas españa italia|apuestas españa mundial|apuestas
españa paises bajos|apuestas español|apuestas español oviedo|apuestas espanyol barcelona|apuestas espanyol
betis|apuestas espanyol villarreal|apuestas esport|apuestas esports|apuestas esports colombia|apuestas esports españa|apuestas esports fifa|apuestas esports gratis|apuestas esports lol|apuestas esports peru|apuestas esports valorant|apuestas
estadisticas|apuestas estrategias|apuestas euro|apuestas euro copa|apuestas eurocopa|apuestas
eurocopa campeon|apuestas eurocopa españa|apuestas eurocopa favoritos|apuestas eurocopa femenina|apuestas eurocopa final|apuestas
eurocopa ganador|apuestas eurocopa hoy|apuestas eurocopa sub
21|apuestas euroliga baloncesto|apuestas euroliga pronosticos|apuestas europa league|apuestas europa
league hoy|apuestas europa league pronosticos|apuestas
europa league pronósticos|apuestas euros|apuestas
f1 abu dhabi|apuestas f1 bahrein|apuestas f1 canada|apuestas f1 china|apuestas f1 cuotas|apuestas f1 hoy|apuestas f1 las vegas|apuestas f1 miami|apuestas f1 monaco|apuestas faciles de ganar|apuestas fáciles
de ganar|apuestas faciles para ganar|apuestas favoritas|apuestas favorito
champions|apuestas favoritos champions|apuestas favoritos eurocopa|apuestas favoritos mundial|apuestas fc barcelona|apuestas final champions cuotas|apuestas final champions league|apuestas
final champions peru|apuestas final copa|apuestas final
copa america|apuestas final copa de europa|apuestas final copa del rey|apuestas final copa europa|apuestas final copa libertadores|apuestas final copa rey|apuestas final de copa|apuestas final de copa del rey|apuestas final
del mundial|apuestas final euro|apuestas final
eurocopa|apuestas final europa league|apuestas final libertadores|apuestas final mundial|apuestas final nba|apuestas final rugby|apuestas final uefa europa league|apuestas
final.mundial|apuestas finales de conferencia nfl|apuestas finales nba|apuestas fiorentina betis|apuestas formula|apuestas formula 1|apuestas fórmula 1|apuestas fórmula 1 pronósticos|apuestas formula uno|apuestas foro|apuestas foro nba|apuestas francia
argentina|apuestas francia españa|apuestas futbol|apuestas fútbol|apuestas futbol americano|apuestas futbol americano nfl|apuestas futbol argentina|apuestas futbol
argentino|apuestas futbol champions league|apuestas futbol chile|apuestas
futbol colombia|apuestas futbol consejos|apuestas
futbol en directo|apuestas fútbol en directo|apuestas futbol en vivo|apuestas fútbol en vivo|apuestas futbol españa|apuestas futbol español|apuestas fútbol español|apuestas futbol eurocopa|apuestas futbol femenino|apuestas futbol foro|apuestas futbol gratis|apuestas futbol hoy|apuestas fútbol hoy|apuestas futbol juegos
olimpicos|apuestas futbol mexico|apuestas futbol mundial|apuestas futbol
online|apuestas futbol para hoy|apuestas futbol
peru|apuestas futbol pronosticos|apuestas futbol sala|apuestas futbol telegram|apuestas futbol virtual|apuestas galgos|apuestas galgos en directo|apuestas galgos hoy|apuestas
galgos online|apuestas galgos pronosticos|apuestas galgos trucos|apuestas gana|apuestas gana colombia|apuestas gana
resultados|apuestas ganadas|apuestas ganadas hoy|apuestas ganador champions league|apuestas ganador copa america|apuestas ganador
copa del rey|apuestas ganador copa del rey baloncesto|apuestas ganador
copa libertadores|apuestas ganador de la eurocopa|apuestas ganador de la liga|apuestas ganador del mundial|apuestas ganador eurocopa|apuestas
ganador europa league|apuestas ganador f1|apuestas
ganador la liga|apuestas ganador liga española|apuestas ganador mundial|apuestas ganador mundial baloncesto|apuestas ganador mundial f1|apuestas ganador nba|apuestas ganadores eurocopa|apuestas ganadores mundial|apuestas ganar champions|apuestas ganar eurocopa|apuestas ganar liga|apuestas ganar
mundial|apuestas ganar nba|apuestas getafe valencia|apuestas ghana uruguay|apuestas girona|apuestas girona athletic|apuestas girona betis|apuestas girona campeon de liga|apuestas girona campeon liga|apuestas girona gana la liga|apuestas girona real madrid|apuestas girona real sociedad|apuestas goleador eurocopa|apuestas goleadores eurocopa|apuestas goles asiaticos|apuestas golf|apuestas
golf masters|apuestas golf pga|apuestas granada barcelona|apuestas grand slam de tenis|apuestas gratis|apuestas gratis casino|apuestas gratis con premios|apuestas gratis hoy|apuestas gratis para hoy|apuestas gratis por registro|apuestas
gratis puntos|apuestas gratis regalos|apuestas gratis sin deposito|apuestas gratis
sin depósito|apuestas gratis sin ingreso|apuestas gratis sports|apuestas gratis y ganar
premios|apuestas grupo a eurocopa|apuestas
grupos eurocopa|apuestas handicap|apuestas handicap asiatico|apuestas
handicap baloncesto|apuestas handicap como funciona|apuestas handicap nba|apuestas handicap nfl|apuestas hipicas online|apuestas
hípicas online|apuestas hipicas venezuela|apuestas hockey|apuestas hockey hielo|apuestas hockey
patines|apuestas hockey sobre hielo|apuestas holanda
argentina|apuestas holanda vs argentina|apuestas hoy|apuestas
hoy champions|apuestas hoy futbol|apuestas hoy nba|apuestas hoy pronosticos|apuestas hoy seguras|apuestas impuestos|apuestas inglaterra paises
bajos|apuestas inter barca|apuestas inter barcelona|apuestas juego|apuestas
juegos|apuestas juegos en linea|apuestas juegos olimpicos|apuestas juegos olímpicos|apuestas juegos olimpicos baloncesto|apuestas juegos online|apuestas juegos virtuales|apuestas jugador sevilla|apuestas jugadores nba|apuestas kings league americas|apuestas la
liga|apuestas la liga española|apuestas la liga hoy|apuestas la liga santander|apuestas las vegas mlb|apuestas las vegas nba|apuestas
las vegas nfl|apuestas league of legends mundial|apuestas legal|apuestas legales|apuestas legales en colombia|apuestas legales en españa|apuestas legales en estados unidos|apuestas legales
españa|apuestas leganes betis|apuestas libertadores|apuestas licencia|apuestas
liga 1 peru|apuestas liga argentina|apuestas liga bbva pronosticos|apuestas liga de campeones|apuestas liga de campeones de baloncesto|apuestas liga
de campeones de hockey|apuestas liga españa|apuestas liga española|apuestas liga santander pronosticos|apuestas ligas de
futbol|apuestas linea|apuestas linea de gol|apuestas liverpool barcelona|apuestas liverpool real madrid|apuestas
lol mundial|apuestas madrid|apuestas madrid arsenal|apuestas
madrid atletico|apuestas madrid atletico champions|apuestas madrid barca|apuestas madrid
barça|apuestas madrid barca hoy|apuestas madrid barca
supercopa|apuestas madrid barcelona|apuestas madrid barsa|apuestas
madrid bayern|apuestas madrid betis|apuestas
madrid borussia|apuestas madrid campeon champions|apuestas madrid celta|apuestas madrid city|apuestas madrid dortmund|apuestas madrid gana la liga|apuestas
madrid gana liga|apuestas madrid hoy|apuestas madrid liverpool|apuestas
madrid osasuna|apuestas madrid sevilla|apuestas madrid valencia|apuestas madrid vs arsenal|apuestas
madrid vs barcelona|apuestas mallorca osasuna|apuestas mallorca real sociedad|apuestas manchester athletic|apuestas manchester city
real madrid|apuestas mas faciles de ganar|apuestas mas seguras|apuestas mas seguras
para hoy|apuestas masters de golf|apuestas masters de tenis|apuestas maximo goleador eurocopa|apuestas maximo goleador
mundial|apuestas mejor jugador eurocopa|apuestas mejores casinos online|apuestas mexico|apuestas méxico|apuestas mexico polonia|apuestas méxico
polonia|apuestas mlb|apuestas mlb hoy|apuestas mlb las vegas|apuestas mlb para hoy|apuestas mlb pronosticos|apuestas
mlb usa|apuestas mma ufc|apuestas momios|apuestas multiples|apuestas múltiples|apuestas multiples como funcionan|apuestas multiples el gordo|apuestas multiples futbol|apuestas mundial|apuestas mundial 2026|apuestas mundial baloncesto|apuestas mundial balonmano|apuestas mundial brasil|apuestas mundial campeon|apuestas mundial ciclismo|apuestas mundial clubes|apuestas mundial de
baloncesto|apuestas mundial de ciclismo|apuestas mundial de clubes|apuestas mundial de futbol|apuestas mundial de fútbol|apuestas mundial de rugby|apuestas mundial f1|apuestas mundial favoritos|apuestas mundial femenino|apuestas mundial formula 1|apuestas mundial
futbol|apuestas mundial ganador|apuestas mundial lol|apuestas mundial moto gp|apuestas mundial motogp|apuestas mundial rugby|apuestas mundial sub
17|apuestas mundiales|apuestas mundialistas|apuestas mvp eurocopa|apuestas mvp nba|apuestas mvp nfl|apuestas nacionales
de colombia|apuestas nba|apuestas nba all star|apuestas nba campeon|apuestas nba
consejos|apuestas nba esta noche|apuestas nba finals|apuestas nba gratis|apuestas nba hoy|apuestas nba hoy jugadores|apuestas nba hoy pronosticos|apuestas nba para hoy|apuestas nba playoffs|apuestas nba pronosticos|apuestas nba
pronósticos|apuestas nba pronosticos hoy|apuestas nba tipster|apuestas nfl|apuestas nfl hoy|apuestas nfl las vegas|apuestas nfl playoffs|apuestas nfl pronosticos|apuestas nfl pronósticos|apuestas nfl semana 4|apuestas nfl super bowl|apuestas nhl|apuestas nhl pronosticos|apuestas octavos eurocopa|apuestas ofertas|apuestas online|apuestas online argentina|apuestas online argentina
legal|apuestas online bono|apuestas online bono bienvenida|apuestas online boxeo|apuestas online caballos|apuestas
online carreras de caballos|apuestas online casino|apuestas online champions league|apuestas online chile|apuestas online ciclismo|apuestas online colombia|apuestas online comparativa|apuestas online
con paypal|apuestas online de caballos|apuestas online deportivas|apuestas
online en argentina|apuestas online en peru|apuestas online espana|apuestas online españa|apuestas online esports|apuestas online foro|apuestas online
futbol|apuestas online futbol españa|apuestas online golf|apuestas online gratis|apuestas online gratis sin deposito|apuestas online juegos|apuestas online mexico|apuestas online mma|apuestas online movil|apuestas online nba|apuestas online net|apuestas online nuevas|apuestas online opiniones|apuestas online paypal|apuestas online peru|apuestas online seguras|apuestas online sin dinero|apuestas online
sin registro|apuestas online tenis|apuestas online ufc|apuestas online uruguay|apuestas online venezuela|apuestas open britanico
golf|apuestas osasuna athletic|apuestas osasuna barcelona|apuestas osasuna real madrid|apuestas osasuna sevilla|apuestas
osasuna valencia|apuestas over|apuestas over 2.5|apuestas over under|apuestas paginas|apuestas pago anticipado|apuestas paises
bajos ecuador|apuestas paises bajos inglaterra|apuestas países bajos qatar|apuestas para boxeo|apuestas para
champions league|apuestas para el clasico|apuestas para el
dia de hoy|apuestas para el mundial|apuestas para el partido de hoy|apuestas
para eurocopa|apuestas para europa league|apuestas para futbol|apuestas para ganar|apuestas para ganar dinero|apuestas para
ganar dinero facil|apuestas para ganar en la ruleta|apuestas para ganar la champions|apuestas para ganar la eurocopa|apuestas para ganar la europa league|apuestas para ganar la liga|apuestas para ganar siempre|apuestas para hacer|apuestas para hoy|apuestas para
hoy de futbol|apuestas para hoy europa league|apuestas
para hoy futbol|apuestas para juegos|apuestas para la champions league|apuestas para la copa del rey|apuestas para la
eurocopa|apuestas para la europa league|apuestas para la final
de la eurocopa|apuestas para la nba hoy|apuestas para los partidos de hoy|apuestas para partidos de hoy|apuestas para ufc|apuestas partido|apuestas partido
aplazado|apuestas partido champions|apuestas partido colombia|apuestas partido españa marruecos|apuestas partido mundial|apuestas partido suspendido|apuestas
partidos|apuestas partidos champions league|apuestas partidos csgo|apuestas partidos de futbol|apuestas partidos
de futbol hoy|apuestas partidos de hoy|apuestas partidos eurocopa|apuestas partidos
futbol|apuestas partidos hoy|apuestas partidos
mundial|apuestas paypal|apuestas peleas de boxeo|apuestas peru|apuestas perú|apuestas
peru brasil|apuestas peru chile|apuestas peru paraguay|apuestas peru uruguay|apuestas peru vs chile|apuestas peru vs
colombia|apuestas pichichi eurocopa|apuestas plataforma|apuestas playoff|apuestas playoff ascenso|apuestas playoff ascenso a primera|apuestas playoff nba|apuestas playoff segunda|apuestas playoff segunda
b|apuestas playoffs nba|apuestas playoffs nfl|apuestas polonia argentina|apuestas por argentina|apuestas por internet mexico|apuestas
por internet para ganar dinero|apuestas por paypal|apuestas por ronda boxeo|apuestas
por sistema|apuestas portugal uruguay|apuestas pre partido|apuestas
predicciones|apuestas predicciones futbol|apuestas primera division|apuestas primera division españa|apuestas promociones|apuestas pronostico|apuestas pronosticos|apuestas pronosticos deportivos|apuestas pronosticos deportivos tenis|apuestas pronosticos
futbol|apuestas pronosticos gratis|apuestas pronosticos nba|apuestas pronosticos tenis|apuestas
prorroga|apuestas psg barca|apuestas psg barcelona|apuestas puntos por tarjetas|apuestas puntos tarjetas|apuestas que
aceptan paypal|apuestas que es handicap|apuestas que puedes hacer con tu
novia|apuestas que siempre ganaras|apuestas que significa|apuestas quien bajara
a segunda|apuestas quién bajara a segunda|apuestas quien gana
el mundial|apuestas quien gana eurocopa|apuestas quien gana la champions|apuestas quien gana
la eurocopa|apuestas quien gana la liga|apuestas quien ganara el
mundial|apuestas quién ganará el mundial|apuestas quien ganara la
champions|apuestas quien ganara la eurocopa|apuestas quien ganara la
liga|apuestas rayo barcelona|apuestas real madrid|apuestas real
madrid arsenal|apuestas real madrid athletic|apuestas
real madrid atletico|apuestas real madrid atletico champions|apuestas real madrid atletico de madrid|apuestas
real madrid atlético de madrid|apuestas real madrid atletico madrid|apuestas real madrid barcelona|apuestas real madrid
bayern|apuestas real madrid betis|apuestas real madrid
borussia|apuestas real madrid campeon champions|apuestas real madrid celta|apuestas
real madrid champions|apuestas real madrid city|apuestas real
madrid girona|apuestas real madrid hoy|apuestas real madrid liverpool|apuestas
real madrid manchester city|apuestas real madrid osasuna|apuestas real
madrid real sociedad|apuestas real madrid valencia|apuestas real madrid villarreal|apuestas real madrid vs arsenal|apuestas
real madrid vs atletico|apuestas real madrid vs
atlético|apuestas real madrid vs atletico madrid|apuestas real
madrid vs barcelona|apuestas real madrid vs betis|apuestas real madrid vs sevilla|apuestas real madrid vs valencia|apuestas real sociedad|apuestas real sociedad athletic|apuestas real sociedad barcelona|apuestas real sociedad betis|apuestas
real sociedad psg|apuestas real sociedad real madrid|apuestas real sociedad valencia|apuestas recomendadas hoy|apuestas regalo de bienvenida|apuestas registro|apuestas
resultado exacto|apuestas resultados|apuestas resultados eurocopa|apuestas retirada tenis|apuestas roma barcelona|apuestas roma sevilla|apuestas rugby|apuestas rugby mundial|apuestas rugby world cup|apuestas
ruleta seguras|apuestas segunda|apuestas segunda b|apuestas segunda division|apuestas segunda división|apuestas segunda
division b|apuestas segunda division españa|apuestas seguras|apuestas seguras baloncesto|apuestas
seguras calculadora|apuestas seguras en la ruleta|apuestas seguras eurocopa|apuestas seguras foro|apuestas seguras futbol|apuestas seguras futbol hoy|apuestas seguras gratis|apuestas seguras hoy|apuestas seguras hoy futbol|apuestas seguras nba|apuestas seguras nba hoy|apuestas seguras para este fin de semana|apuestas seguras para
ganar dinero|apuestas seguras para hoy|apuestas seguras para hoy fútbol|apuestas seguras para hoy pronósticos|apuestas seguras para mañana|apuestas seguras ruleta|apuestas seguras
telegram|apuestas seguras tenis|apuestas semifinales
eurocopa|apuestas senegal paises bajos|apuestas sevilla|apuestas sevilla athletic|apuestas sevilla atletico
de madrid|apuestas sevilla barcelona|apuestas sevilla betis|apuestas sevilla campeon liga|apuestas sevilla celta|apuestas
sevilla gana la liga|apuestas sevilla girona|apuestas sevilla inter|apuestas
sevilla jugador|apuestas sevilla juventus|apuestas sevilla leganes|apuestas sevilla
madrid|apuestas sevilla manchester united|apuestas sevilla osasuna|apuestas sevilla real madrid|apuestas sevilla real sociedad|apuestas sevilla
roma|apuestas sevilla valencia|apuestas significa|apuestas
simples ejemplos|apuestas simples o combinadas|apuestas sin deposito|apuestas sin deposito inicial|apuestas sin deposito minimo|apuestas sin dinero|apuestas sin dinero real|apuestas
sin empate|apuestas sin empate que significa|apuestas sin ingreso minimo|apuestas sin registro|apuestas sistema|apuestas sistema calculadora|apuestas sistema como funciona|apuestas sistema trixie|apuestas sociedad|apuestas sorteo copa del rey|apuestas stake|apuestas stake 10|apuestas stake 10 hoy|apuestas
super bowl favorito|apuestas super rugby|apuestas supercopa españa|apuestas superliga argentina|apuestas tarjeta roja|apuestas tarjetas|apuestas tarjetas amarillas|apuestas
tenis|apuestas tenis atp|apuestas tenis consejos|apuestas
tenis copa davis|apuestas tenis de mesa|apuestas tenis de
mesa pronosticos|apuestas tenis en vivo|apuestas
tenis femenino|apuestas tenis hoy|apuestas tenis itf|apuestas tenis pronosticos|apuestas tenis pronósticos|apuestas tenis retirada|apuestas tenis roland garros|apuestas tenis seguras|apuestas tenis wimbledon|apuestas tenis wta|apuestas tercera division|apuestas tercera
division españa|apuestas tipos|apuestas tips|apuestas tipster|apuestas tipster para hoy|apuestas topuria holloway cuotas|apuestas
torneos de golf|apuestas torneos de tenis|apuestas trucos|apuestas
uefa champions league|apuestas uefa europa league|apuestas
ufc|apuestas ufc chile|apuestas ufc como funciona|apuestas
ufc hoy|apuestas ufc ilia topuria|apuestas ufc online|apuestas ufc pronósticos|apuestas ufc
telegram|apuestas ufc topuria|apuestas under over|apuestas unionistas villarreal|apuestas uruguay|apuestas uruguay colombia|apuestas uruguay corea|apuestas uruguay vs colombia|apuestas us open golf|apuestas us open tenis|apuestas valencia|apuestas valencia barcelona|apuestas valencia betis|apuestas valencia madrid|apuestas valencia
real madrid|apuestas valladolid barcelona|apuestas valladolid valencia|apuestas valor app|apuestas valor en directo|apuestas valor
galgos|apuestas venezuela|apuestas venezuela argentina|apuestas venezuela bolivia|apuestas venezuela ecuador|apuestas
villarreal|apuestas villarreal athletic|apuestas villarreal barcelona|apuestas villarreal bayern|apuestas villarreal betis|apuestas villarreal liverpool|apuestas
villarreal manchester|apuestas villarreal manchester united|apuestas villarreal vs real madrid|apuestas virtuales|apuestas virtuales colombia|apuestas virtuales futbol|apuestas virtuales sin dinero|apuestas vivo|apuestas vuelta a españa|apuestas vuelta españa|apuestas william hill
partidos de hoy|apuestas y casino|apuestas y casinos|apuestas y juegos de azar|apuestas y pronosticos|apuestas y pronosticos
de futbol|apuestas y pronosticos deportivos|apuestas y resultados|apuestas-deportivas|apuestas-deportivas.es pronosticos|arbitro nba apuestas|argentina apuestas|argentina colombia apuestas|argentina croacia apuestas|argentina francia apuestas|argentina mexico apuestas|argentina peru
apuestas|argentina uruguay apuestas|argentina vs bolivia apuestas|argentina vs chile apuestas|argentina vs
colombia apuestas|argentina vs francia apuestas|argentina vs.
colombia apuestas|asi se gana en las apuestas deportivas|asiatico apuestas|asiatico
en apuestas|asiaticos apuestas|athletic barcelona apuestas|athletic manchester united apuestas|athletic osasuna apuestas|athletic real madrid apuestas|atletico barcelona apuestas|atletico de madrid
apuestas|atlético de madrid apuestas|atletico de
madrid real madrid apuestas|atletico de madrid vs barcelona
apuestas|atletico madrid real madrid apuestas|atletico madrid vs real madrid apuestas|atletico
real madrid apuestas|atletico vs real madrid apuestas|avisador de cuotas apuestas|bajada de cuotas
apuestas|baloncesto apuestas|barbastro barcelona apuestas|barca apuestas|barca bayern apuestas|barca
inter apuestas|barca madrid apuestas|barça madrid apuestas|barca vs atletico apuestas|barca vs madrid apuestas|barca vs real madrid
apuestas|barcelona – real madrid apuestas|barcelona apuestas|barcelona atletico apuestas|barcelona atletico de madrid apuestas|barcelona
atletico madrid apuestas|barcelona betis apuestas|barcelona casa de apuestas|barcelona inter apuestas|barcelona psg apuestas|barcelona real madrid apuestas|barcelona real sociedad apuestas|barcelona sevilla apuestas|barcelona valencia apuestas|barcelona vs athletic bilbao apuestas|barcelona vs atlético madrid apuestas|barcelona
vs betis apuestas|barcelona vs celta de vigo apuestas|barcelona
vs espanyol apuestas|barcelona vs girona apuestas|barcelona vs
madrid apuestas|barcelona vs real madrid apuestas|barcelona vs real
sociedad apuestas|barcelona vs sevilla apuestas|barcelona vs villarreal apuestas|base de datos cuotas apuestas
deportivas|bayern real madrid apuestas|beisbol apuestas|best america apuestas|bet apuestas chile|bet
apuestas en vivo|betis – chelsea apuestas|betis apuestas|betis barcelona
apuestas|betis chelsea apuestas|betis madrid apuestas|betis sevilla apuestas|betsson tu sitio de apuestas online|blog apuestas baloncesto|blog apuestas ciclismo|blog apuestas nba|blog apuestas tenis|blog de apuestas de tenis|bono apuestas|bono apuestas deportivas|bono apuestas deportivas sin deposito|bono apuestas
gratis|bono apuestas gratis sin deposito|bono apuestas sin deposito|bono bienvenida apuestas|bono bienvenida apuestas deportivas|bono bienvenida apuestas españa|bono bienvenida apuestas sin deposito|bono bienvenida apuestas sin depósito|bono bienvenida casa
apuestas|bono bienvenida casa de apuestas|bono bienvenida marca
apuestas|bono casa apuestas|bono casa de apuestas|bono casa
de apuestas sin ingreso|bono casas de apuestas|bono de apuestas|bono de apuestas gratis
sin deposito|bono de bienvenida apuestas|bono de bienvenida apuestas deportivas|bono de bienvenida casa
de apuestas|bono de bienvenida casas de apuestas|bono de casas de apuestas|bono de registro apuestas|bono de registro
apuestas deportivas|bono de registro casa de apuestas|bono
gratis apuestas|bono marca apuestas|bono por registro apuestas|bono por registro apuestas deportivas|bono
por registro casa de apuestas|bono registro apuestas|bono sin deposito apuestas|bono
sin depósito apuestas|bono sin deposito apuestas deportivas|bono sin depósito apuestas deportivas|bono sin deposito casa de apuestas|bono
sin deposito marca apuestas|bono sin ingreso apuestas|bono sin ingreso apuestas deportivas|bonos apuestas|bonos apuestas
colombia|bonos apuestas deportivas|bonos apuestas deportivas
sin deposito|bonos apuestas gratis|bonos apuestas sin deposito|bonos
apuestas sin depósito|bonos bienvenida apuestas|bonos bienvenida casas
apuestas|bonos bienvenida casas de apuestas|bonos casa de apuestas|bonos casas apuestas|bonos casas de apuestas|bonos casas de apuestas colombia|bonos casas de apuestas deportivas|bonos
casas de apuestas españa|bonos casas de apuestas nuevas|bonos casas
de apuestas sin deposito|bonos casas de apuestas
sin depósito|bonos de apuestas|bonos de apuestas deportivas|bonos de apuestas gratis|bonos de apuestas sin deposito|bonos de bienvenida apuestas|bonos de bienvenida apuestas deportivas|bonos de bienvenida
casa de apuestas|bonos de bienvenida casas de apuestas|bonos de bienvenida de casas de apuestas|bonos de bienvenida
en casas de apuestas|bonos de casas de apuestas|bonos de casas de apuestas sin deposito|bonos en casa de apuestas|bonos en casas de apuestas sin deposito|bonos gratis
apuestas|bonos gratis apuestas deportivas|bonos gratis casas de apuestas|bonos gratis sin deposito
apuestas|bonos paginas de apuestas|bonos registro casas de apuestas|bonos sin deposito apuestas|bonos sin depósito apuestas|bonos sin deposito apuestas deportivas|bonos sin deposito casas de apuestas|bot de apuestas deportivas
gratis|boxeo apuestas|brasil colombia apuestas|brasil peru apuestas|brasil vs colombia apuestas|buenas apuestas para hoy|buscador cuotas apuestas|buscador
de apuestas seguras|buscador de cuotas apuestas|buscador
de cuotas de apuestas|buscar apuestas seguras|caballos apuestas|calculador de apuestas|calculador de
cuotas apuestas|calculadora apuestas|calculadora apuestas combinadas|calculadora apuestas de sistema|calculadora apuestas deportivas|calculadora apuestas deportivas seguras|calculadora
apuestas multiples|calculadora apuestas segura|calculadora apuestas seguras|calculadora apuestas sistema|calculadora
apuestas yankee|calculadora arbitraje apuestas|calculadora cubrir apuestas|calculadora cuotas apuestas|calculadora de apuestas|calculadora de apuestas
combinadas|calculadora de apuestas de futbol|calculadora de apuestas de sistema|calculadora de apuestas deportivas|calculadora de apuestas multiples|calculadora de apuestas seguras|calculadora
de apuestas sistema|calculadora de apuestas surebets|calculadora
de arbitraje apuestas|calculadora de cuotas apuestas|calculadora de cuotas de apuestas|calculadora para apuestas deportivas|calculadora poisson apuestas|calculadora poisson apuestas deportivas|calculadora
poisson para apuestas|calculadora scalping apuestas deportivas|calculadora sistema apuestas|calculadora stake apuestas|calculadora
trading apuestas|calcular apuestas|calcular apuestas deportivas|calcular apuestas futbol|calcular apuestas sistema|calcular cuotas apuestas|calcular cuotas apuestas combinadas|calcular
cuotas apuestas deportivas|calcular cuotas de apuestas|calcular ganancias apuestas
deportivas|calcular momios apuestas|calcular probabilidad cuota apuestas|calcular stake
apuestas|calcular unidades apuestas|calcular yield apuestas|calculo
de apuestas|calculo de apuestas deportivas|cambio de cuotas apuestas|campeon champions
apuestas|campeon eurocopa apuestas|campeon liga apuestas|campeon nba apuestas|canales de apuestas gratis|carrera de caballos apuestas|carrera de caballos apuestas juego|carrera de caballos con apuestas|carrera de galgos apuestas|carreras de caballos apuestas|carreras de caballos apuestas online|carreras
de caballos con apuestas|carreras de caballos juegos de apuestas|carreras de galgos apuestas|carreras de galgos apuestas online|carreras de galgos apuestas trucos|carreras galgos apuestas|casa apuestas argentina|casa apuestas atletico de madrid|casa
apuestas barcelona|casa apuestas betis|casa apuestas bono bienvenida|casa apuestas bono gratis|casa apuestas
bono sin deposito|casa apuestas cerca de mi|casa apuestas chile|casa
apuestas colombia|casa apuestas con mejores cuotas|casa
apuestas deportivas|casa apuestas españa|casa apuestas española|casa apuestas eurocopa|casa apuestas
futbol|casa apuestas mejores cuotas|casa apuestas mundial|casa apuestas nueva|casa apuestas nuevas|casa apuestas online|casa apuestas peru|casa
apuestas valencia|casa de apuestas|casa de apuestas 10 euros gratis|casa de apuestas argentina|casa
de apuestas atletico de madrid|casa de apuestas baloncesto|casa de
apuestas barcelona|casa de apuestas beisbol|casa de apuestas
betis|casa de apuestas bono|casa de apuestas bono bienvenida|casa de apuestas bono de bienvenida|casa de apuestas bono gratis|casa
de apuestas bono por registro|casa de apuestas bono sin deposito|casa de apuestas boxeo|casa de apuestas caballos|casa de apuestas carreras de
caballos|casa de apuestas cerca de mi|casa de apuestas cerca de mí|casa de apuestas champions
league|casa de apuestas chile|casa de apuestas ciclismo|casa de apuestas colombia|casa
de apuestas con bono de bienvenida|casa de apuestas con bono
sin deposito|casa de apuestas con cuotas mas altas|casa de apuestas con esports|casa de apuestas con las mejores cuotas|casa de apuestas con licencia en españa|casa de apuestas con mejores cuotas|casa de apuestas
con pago anticipado|casa de apuestas con paypal|casa
de apuestas copa america|casa de apuestas de caballos|casa de apuestas de colombia|casa de apuestas de españa|casa de apuestas de futbol|casa de apuestas de fútbol|casa
de apuestas de futbol peru|casa de apuestas de peru|casa de apuestas del madrid|casa de apuestas del real madrid|casa de apuestas deportivas|casa
de apuestas deportivas cerca de mi|casa de apuestas deportivas en argentina|casa
de apuestas deportivas en chile|casa de apuestas deportivas en colombia|casa de apuestas
deportivas en españa|casa de apuestas deportivas en madrid|casa de apuestas deportivas españa|casa de apuestas deportivas españolas|casa de apuestas deportivas madrid|casa
de apuestas deportivas mexico|casa de apuestas deportivas online|casa de apuestas deportivas peru|casa de apuestas
deposito 5 euros|casa de apuestas deposito minimo|casa de apuestas deposito minimo 1 euro|casa de apuestas depósito
mínimo 1 euro|casa de apuestas en españa|casa de apuestas en linea|casa de apuestas en madrid|casa de apuestas en perú|casa de apuestas
en vivo|casa de apuestas españa|casa de apuestas españa inglaterra|casa de apuestas española|casa de apuestas españolas|casa
de apuestas esports|casa de apuestas eurocopa|casa de apuestas
europa league|casa de apuestas f1|casa de apuestas formula 1|casa de apuestas futbol|casa de apuestas
ingreso minimo|casa de apuestas ingreso minimo 1 euro|casa de
apuestas ingreso mínimo 1 euro|casa de apuestas legales|casa
de apuestas legales en colombia|casa de apuestas legales en españa|casa de apuestas libertadores|casa de apuestas liga española|casa de apuestas madrid|casa de
apuestas mas segura|casa de apuestas mejores|casa de apuestas méxico|casa de apuestas
minimo 5 euros|casa de apuestas mlb|casa de apuestas mundial|casa de apuestas nba|casa de apuestas nfl|casa de apuestas nueva|casa de apuestas nuevas|casa de apuestas oficial del real madrid|casa
de apuestas oficial real madrid|casa de apuestas online|casa de apuestas
online argentina|casa de apuestas online chile|casa de apuestas online españa|casa de apuestas online mexico|casa de apuestas online paraguay|casa de apuestas online peru|casa
de apuestas online usa|casa de apuestas online venezuela|casa
de apuestas pago anticipado|casa de apuestas para boxeo|casa de apuestas para ufc|casa
de apuestas peru|casa de apuestas perú|casa de apuestas peru online|casa de apuestas por paypal|casa de apuestas promociones|casa de apuestas que
regalan dinero|casa de apuestas real madrid|casa de apuestas regalo de bienvenida|casa de apuestas sevilla|casa de apuestas sin dinero|casa de apuestas
sin ingreso minimo|casa de apuestas sin licencia en españa|casa de apuestas sin minimo de
ingreso|casa de apuestas stake|casa de apuestas tenis|casa de apuestas ufc|casa de apuestas valencia|casa de apuestas venezuela|casa
de apuestas virtuales|casa de apuestas vive la suerte|casa oficial de apuestas del
real madrid|casas apuestas asiaticas|casas apuestas bono sin deposito|casas apuestas bonos sin deposito|casas apuestas caballos|casas apuestas chile|casas apuestas ciclismo|casas apuestas con licencia|casas apuestas con licencia en españa|casas
apuestas deportivas|casas apuestas deportivas colombia|casas
apuestas deportivas españa|casas apuestas deportivas españolas|casas apuestas deportivas nuevas|casas
apuestas españa|casas apuestas españolas|casas apuestas esports|casas
apuestas eurocopa|casas apuestas golf|casas apuestas ingreso minimo
5 euros|casas apuestas legales|casas apuestas legales españa|casas apuestas licencia|casas apuestas licencia españa|casas apuestas mexico|casas apuestas mundial|casas apuestas nba|casas apuestas nuevas|casas apuestas
nuevas españa|casas apuestas ofertas|casas apuestas online|casas apuestas paypal|casas apuestas peru|casas apuestas
sin licencia|casas apuestas tenis|casas asiaticas
apuestas|casas de apuestas|casas de apuestas 5 euros|casas de
apuestas app|casas de apuestas argentinas|casas de apuestas asiaticas|casas de apuestas baloncesto|casas de apuestas barcelona|casas de apuestas bono bienvenida|casas de apuestas bono de bienvenida|casas de apuestas bono
por registro|casas de apuestas bono sin deposito|casas de apuestas bono sin ingreso|casas
de apuestas bonos|casas de apuestas bonos de bienvenida|casas de apuestas bonos gratis|casas de apuestas bonos sin deposito|casas de apuestas
boxeo|casas de apuestas caballos|casas de apuestas carreras de caballos|casas
de apuestas casino|casas de apuestas casino online|casas
de apuestas cerca de mi|casas de apuestas champions
league|casas de apuestas chile|casas de apuestas ciclismo|casas de apuestas colombia|casas de apuestas com|casas de apuestas con app|casas de apuestas
con apuestas gratis|casas de apuestas con bono|casas de apuestas con bono de bienvenida|casas de
apuestas con bono de registro|casas de apuestas con bono por registro|casas de apuestas con bono sin deposito|casas de
apuestas con bonos|casas de apuestas con bonos gratis|casas de apuestas con bonos sin deposito|casas de apuestas con deposito minimo|casas de apuestas con esports|casas de apuestas con handicap asiatico|casas de apuestas con licencia|casas
de apuestas con licencia en españa|casas de apuestas con licencia españa|casas de apuestas con licencia española|casas de apuestas con mejores cuotas|casas de apuestas con pago anticipado|casas de apuestas con paypal|casas de apuestas con paypal
en perú|casas de apuestas con promociones|casas de apuestas con ruleta en vivo|casas de apuestas copa del rey|casas de apuestas de caballos|casas
de apuestas de españa|casas de apuestas de futbol|casas de
apuestas de fútbol|casas de apuestas de peru|casas de apuestas deportivas|casas
de apuestas deportivas asiaticas|casas de apuestas deportivas colombia|casas de apuestas deportivas
comparativa|casas de apuestas deportivas con paypal|casas de apuestas deportivas en chile|casas de apuestas deportivas en españa|casas de apuestas
deportivas en linea|casas de apuestas deportivas en madrid|casas de apuestas deportivas en mexico|casas de apuestas deportivas en peru|casas de apuestas deportivas en sevilla|casas de apuestas deportivas en valencia|casas de apuestas deportivas españa|casas de
apuestas deportivas españolas|casas de apuestas deportivas legales|casas de apuestas deportivas madrid|casas
de apuestas deportivas mexico|casas de apuestas deportivas nuevas|casas de apuestas deportivas online|casas de apuestas deportivas peru|casas de apuestas deportivas perú|casas de
apuestas deposito minimo 1 euro|casas de apuestas depósito
mínimo 1 euro|casas de apuestas dinero gratis|casas de apuestas en argentina|casas de apuestas en barcelona|casas de
apuestas en chile|casas de apuestas en colombia|casas de apuestas en españa|casas de apuestas en españa online|casas de apuestas en linea|casas de apuestas en madrid|casas de apuestas en méxico|casas de apuestas en peru|casas
de apuestas en perú|casas de apuestas en sevilla|casas de apuestas en uruguay|casas de apuestas en valencia|casas de apuestas en venezuela|casas de apuestas equipos de futbol|casas de
apuestas españa|casas de apuestas españa alemania|casas de apuestas españa inglaterra|casas de apuestas
españa licencia|casas de apuestas españa nuevas|casas
de apuestas españa online|casas de apuestas española|casas
de apuestas españolas|casas de apuestas españolas con licencia|casas de apuestas españolas online|casas
de apuestas esports|casas de apuestas eurocopa|casas de apuestas eurocopa 2024|casas de
apuestas europa league|casas de apuestas f1|casas de apuestas
fisicas en barcelona|casas de apuestas fisicas en españa|casas de apuestas formula 1|casas de apuestas
fuera de españa|casas de apuestas futbol|casas de
apuestas fútbol|casas de apuestas futbol españa|casas de apuestas
ganador eurocopa|casas de apuestas gratis|casas de apuestas ingreso minimo|casas de apuestas ingreso minimo 1 euro|casas de apuestas ingreso minimo 5 euros|casas de apuestas inter barcelona|casas de apuestas legales|casas de apuestas
legales en colombia|casas de apuestas legales en españa|casas
de apuestas legales en mexico|casas de apuestas legales españa|casas de apuestas legales mx|casas de apuestas licencia|casas de apuestas licencia
españa|casas de apuestas lista|casas de apuestas madrid|casas de apuestas
mas seguras|casas de apuestas mejores bonos|casas de apuestas mejores
cuotas|casas de apuestas mexico|casas de apuestas
méxico|casas de apuestas minimo 5 euros|casas de apuestas mlb|casas de apuestas mundial|casas
de apuestas mundial baloncesto|casas de apuestas mundiales|casas de apuestas nba|casas de apuestas no reguladas en españa|casas de apuestas nueva ley|casas de apuestas nuevas|casas de apuestas nuevas en colombia|casas de apuestas nuevas
en españa|casas de apuestas nuevas españa|casas de apuestas ofertas|casas de apuestas online|casas de apuestas online argentina|casas de apuestas online
colombia|casas de apuestas online deportivas|casas de apuestas online ecuador|casas de apuestas online en argentina|casas de apuestas online en chile|casas de apuestas online en colombia|casas de apuestas online en españa|casas de apuestas online en mexico|casas de apuestas online españa|casas de apuestas online mas fiables|casas de apuestas online mexico|casas de apuestas online nuevas|casas de apuestas online peru|casas de apuestas online usa|casas de apuestas online venezuela|casas de apuestas pago paypal|casas de apuestas para ufc|casas de apuestas paypal|casas de apuestas peru bono
sin deposito|casas de apuestas presenciales en españa|casas
de apuestas promociones|casas de apuestas que aceptan paypal|casas de apuestas que comparten cuotas|casas de apuestas que dan dinero gratis|casas de apuestas
que no limitan españa|casas de apuestas que operan en españa|casas de apuestas que reciben paypal|casas
de apuestas que te regalan dinero|casas de apuestas
real madrid|casas de apuestas real madrid arsenal|casas de apuestas
real madrid liverpool|casas de apuestas reguladas en españa|casas de apuestas retiradas tenis|casas de apuestas seguras|casas de apuestas
sevilla|casas de apuestas sin deposito|casas de apuestas sin deposito minimo|casas de apuestas sin licencia|casas de apuestas sin licencia en españa|casas de apuestas sin licencia española|casas
de apuestas tenis|casas de apuestas tenis de mesa|casas de apuestas tercera division|casas de apuestas ufc|casas de apuestas uruguay|casas
de apuestas valencia|casas de apuestas venezuela|casas de apuestas virtuales|casas de apuestas virtuales perú|casas de apuestas y bonos|casas nuevas apuestas|casas nuevas de apuestas|casino apuestas|casino apuestas bono sin deposito|casino apuestas deportivas|casino apuestas en linea|casino apuestas
online|casino barcelona apuestas|casino barcelona apuestas deportivas|casino
casa de apuestas|casino de apuestas|casino de apuestas cerca de mi|casino de
apuestas deportivas|casino de apuestas online|casino de barcelona
apuestas|casino de madrid apuestas|casino gran madrid apuestas|casino madrid apuestas|casino madrid apuestas deportivas|casino online apuestas|casino online apuestas deportivas|casino
online apuestas reales|casino y apuestas|casino y apuestas online|casinos apuestas|casinos apuestas deportivas|casinos online apuestas deportivas|casinos y apuestas|celta alaves apuestas|celta
barcelona apuestas|celta real madrid apuestas|champions league apuestas|champions league apuestas
deportivas|champions league apuestas ganador|champions league casa de apuestas|champions league pronosticos apuestas|chelsea betis apuestas|chile apuestas|chile vs argentina apuestas|chile vs bolivia apuestas|ciclismo apuestas|clasico apuestas|claves para
ganar apuestas deportivas|codigo promocional apuestas|código promocional apuestas|codigo promocional apuestas deportivas|codigo promocional casa de apuestas|codigo promocional de marca apuestas|colombia apuestas|colombia chile
apuestas|colombia uruguay apuestas|colombia vs uruguay apuestas|combinaciones
apuestas|combinaciones apuestas deportivas|combinaciones de apuestas deportivas|combinada 4 5 apuestas|combinada apuestas|combinadas apuestas|combinadas apuestas
deportivas|combinadas apuestas hoy|como aprender hacer apuestas deportivas|como apuestas por internet boxeo|como calcular apuestas|como calcular apuestas deportivas|como calcular
cuotas apuestas|como calcular cuotas de apuestas|como calcular el
yield en las apuestas|como calcular las apuestas deportivas|como calcular unidades apuestas|como crear un sistema de apuestas|como crear una casa de apuestas online|como declarar apuestas deportivas|como declarar dinero
de apuestas|como es doble oportunidad apuestas|como es doble oportunidad en apuestas|como es el handicap asiatico en apuestas|como estan las apuestas barca madrid|como estan las apuestas de la nfl|como estan las apuestas del clasico|como estan las apuestas en la nfl|como estan las apuestas
eurocopa|como estan las apuestas nfl|como estan las apuestas para el clasico|como estan las apuestas para el mundial|como estan las apuestas para la eurocopa|cómo están las apuestas para la eurocopa|como funciona el handicap en apuestas|como funciona el sistema
de apuestas|como funciona el stake en apuestas|como funciona handicap apuestas|como funciona sistema en apuestas|como funcionan apuestas multiples|como funcionan las apuestas combinadas|como funcionan las apuestas de boxeo|como funcionan las apuestas de caballos|como funcionan las apuestas de sistema|como funcionan las apuestas deportivas|como funcionan las apuestas dobles|como funcionan las apuestas en linea|como funcionan las apuestas
en ufc|como funcionan las apuestas multiples|como funcionan las apuestas por sistema|como funcionan las apuestas sistema|como funcionan las apuestas ufc|como funcionan las cuotas
de apuestas|como funcionan los handicaps en apuestas|como funcionan los stakes en apuestas|como ganan dinero las casas de
apuestas|como ganar apuestas|como ganar apuestas combinadas|como ganar apuestas de
galgos|como ganar apuestas de tenis|como ganar apuestas deportivas|cómo ganar
apuestas deportivas|como ganar apuestas deportivas seguras|como ganar apuestas deportivas siempre|como ganar apuestas en baloncesto|como ganar apuestas en vivo|como ganar dinero apuestas|como ganar dinero con apuestas|como ganar dinero con apuestas seguras|como ganar dinero con las apuestas|como ganar dinero en apuestas|como ganar dinero en apuestas
de futbol|como ganar dinero en apuestas deportivas|como
ganar dinero en casas de apuestas|como ganar dinero en las apuestas|como ganar en apuestas deportivas|como ganar en apuestas
virtuales|como ganar en las apuestas deportivas|como ganar seguro
en apuestas deportivas|como hacer apuestas|como hacer apuestas combinadas|como hacer apuestas combinadas seguras|como hacer apuestas
de futbol|como hacer apuestas de futbol seguras|como
hacer apuestas de sistema|como hacer apuestas deportivas|como hacer apuestas deportivas
ganadoras|como hacer apuestas deportivas online|como hacer apuestas deportivas
seguras|como hacer apuestas deportivas y ganar|como hacer apuestas online|como hacer apuestas
por internet|como hacer apuestas seguras|como hacer apuestas
seguras de futbol|como hacer buenas apuestas de futbol|como hacer buenas apuestas deportivas|como hacer dinero en apuestas deportivas|como hacer las apuestas deportivas|como hacer trading apuestas deportivas|como hacer
un sistema de apuestas|como hacer una casa de apuestas|como mejorar en las apuestas deportivas|como registrarse en una casa de apuestas|como retirar dinero de marca apuestas|como se calcula el yield en apuestas|como se calcula las apuestas deportivas|como se calculan las apuestas|como se calculan las apuestas deportivas|como se calculan las cuotas de apuestas|como se hace apuestas deportivas|como se hacen apuestas deportivas|como se hacen las apuestas|como se hacen las apuestas
de futbol|como se hacen las apuestas deportivas|como se juega apuestas deportivas|como se juega en las apuestas deportivas|como se juega las apuestas de futbol|como se juega las apuestas deportivas|como
se juegan las apuestas de futbol|como se juegan las apuestas deportivas|cómo se pagan las
apuestas de caballos|como se suman las cuotas de las apuestas|como se tributan las apuestas deportivas|como
tributan las apuestas|como tributan las apuestas deportivas|como tributan las ganancias en apuestas|como van las apuestas nfl|comparacion cuotas casas de apuestas|comparación de casas de apuestas|comparador apuestas|comparador apuestas
champions|comparador apuestas deportivas|comparador apuestas futbol|comparador apuestas online|comparador apuestas seguras|comparador
apuestas tenis|comparador bonos apuestas deportivas|comparador casa de apuestas|comparador casas apuestas|comparador casas de
apuestas|comparador casas de apuestas deportivas|comparador
cuotas apuestas|comparador cuotas apuestas deportivas|comparador cuotas
casas de apuestas|comparador cuotas de apuestas|comparador de apuestas|comparador de apuestas colombia|comparador de apuestas deportivas|comparador de apuestas deportivas online|comparador de
apuestas online|comparador de apuestas seguras|comparador de casa
de apuestas|comparador de casas de apuestas|comparador de cuotas apuestas|comparador
de cuotas apuestas deportivas|comparador de cuotas casas de apuestas|comparador de
cuotas de apuestas|comparar apuestas|comparar apuestas deportivas|comparar casas de apuestas|comparar cuotas apuestas|comparar
cuotas apuestas deportivas|comparar cuotas casas de apuestas|comparar cuotas de apuestas|comparativa apuestas deportivas|comparativa
apuestas online|comparativa casa de apuestas|comparativa casas apuestas|comparativa casas de apuestas|comparativa casas de apuestas
online|comparativa cuotas apuestas|comprobar apuestas deportivas|consejo
de apuestas|consejo de apuestas deportivas|consejos apuestas|consejos apuestas baloncesto|consejos apuestas caballos|consejos apuestas combinadas|consejos
apuestas deportivas|consejos apuestas deportivas combinadas|consejos apuestas deportivas futbol|consejos apuestas deportivas hoy|consejos apuestas futbol|consejos apuestas
futbol hoy|consejos apuestas hoy|consejos apuestas nba|consejos apuestas nba hoy|consejos apuestas tenis|consejos de apuestas|consejos de apuestas de futbol|consejos de apuestas de futbol para
hoy|consejos de apuestas deportivas|consejos de apuestas deportivas para hoy|consejos de
apuestas para hoy|consejos de apuestas.com|consejos para apuestas|consejos para apuestas de futbol|consejos para
apuestas deportivas|consejos para ganar apuestas de futbol|consejos para ganar apuestas deportivas|consejos para hacer apuestas deportivas|consejos para las apuestas deportivas|conversor de cuotas apuestas|copa africa apuestas|copa america apuestas|copa davis apuestas|copa del rey 2025
apuestas|copa del rey apuestas|copa libertadores apuestas|copa
libertadores apuestas deportivas|copa sudamericana apuestas|corners apuestas|corners en apuestas|csgo paginas apuestas|csgo paginas de
apuestas|cual es el mejor sitio de apuestas|cual es la casa de apuestas
mas segura|cual es la mejor app de apuestas|cual es la mejor
casa de apuestas|cual es la mejor casa de apuestas online|cual es
la mejor pagina de apuestas|cuales son las apuestas mas seguras|cuantas
apuestas hacer al dia|cuantas casas de apuestas hay
en españa|cuantas casas de apuestas hay en madrid|cuanto
se paga de impuestos por apuestas|cuanto tributan las apuestas deportivas|cuanto vale una tarjeta roja
en apuestas|cuenta la prorroga en las apuestas|cuenta la prórroga en las apuestas|cuota apuestas|cuota apuestas mundial|cuota
en apuestas|cuotas altas apuestas deportivas|cuotas americanas apuestas|cuotas apuestas|cuotas apuestas balonmano|cuotas apuestas champions|cuotas apuestas
champions league|cuotas apuestas copa del rey|cuotas apuestas deportivas|cuotas apuestas
eurocopa|cuotas apuestas f1|cuotas apuestas final champions|cuotas apuestas
futbol|cuotas apuestas hoy|cuotas apuestas la liga|cuotas apuestas liga|cuotas
apuestas mundial|cuotas apuestas nba|cuotas bajas
apuestas|cuotas casas de apuestas|cuotas de apuestas|cuotas de apuestas de futbol|cuotas de apuestas deportivas|cuotas de futbol apuestas|cuotas de todas las casas de apuestas|cuotas en apuestas|cuotas en apuestas deportivas|cuotas mas altas apuestas deportivas|curso apuestas deportivas gratis|curso de apuestas deportivas gratis|declarar apuestas deportivas|declarar dinero
apuestas|declarar dinero apuestas deportivas|declarar dinero de apuestas|declarar dinero ganado en apuestas|declarar ingresos por
apuestas|declarar perdidas apuestas online|declarar
pérdidas apuestas online|deportes apuestas
en vivo|deposito minimo 5 euros apuestas|depósito mínimo
casas de apuestas|diferentes tipos de apuestas
deportivas|dinero apuestas|dinero apuestas declarar|dinero gratis
apuestas|dnb apuestas|dnb apuestas deportivas|dnb apuestas que
es|dnb en apuestas|doble doble apuestas|doble
doble baloncesto apuestas|doble doble nba apuestas|doble o nada apuestas|doble oportunidad apuestas|doble oportunidad apuestas deportivas|doble oportunidad apuestas que es|doble oportunidad apuestas significado|doble
oportunidad en apuestas|donde hacer apuestas de futbol|donde hacer apuestas deportivas|donde puedo
hacer apuestas deportivas|donde se hacen las apuestas deportivas|el clasico apuestas|el comparador apuestas|el comparador de apuestas|el
mejor analista de apuestas deportivas|el mejor canal de
apuestas deportivas|el mejor excel para apuestas deportivas|el mejor
sitio de apuestas|el mejor sitio de apuestas deportivas|el mejor sitio de apuestas online|el mejor sitio de apuestas por internet|el mejor
sitio para apuestas|empate no valido apuestas|empresa de apuestas deportivas|empresas apuestas|empresas apuestas deportivas|empresas
de apuestas|empresas de apuestas deportivas|empresas
de apuestas deportivas en peru|empresas de apuestas
en españa|empresas de apuestas online|en apuestas
deportivas que significa 1×2|en apuestas que es 1×2|en apuestas que significa
1×2|en apuestas que significa handicap|en apuestas que significa mas de
1.5|en las apuestas cuenta la prorroga|en las apuestas que significa 1×2|en las apuestas que significa handicap|en las apuestas que significa mas de 1.5|errores de cuotas casas de apuestas|es bueno hacer apuestas
deportivas|españa – francia apuestas|españa alemania apuestas|españa apuestas|españa apuestas
eurocopa|españa casas de apuestas|españa eurocopa apuestas|españa
francia apuestas|españa francia eurocopa apuestas|españa georgia apuestas|españa inglaterra
apuestas|españa italia apuestas|españa mundial apuestas|esport
apuestas|esports apuestas|estadistica apuestas deportivas|estadistica en apuestas deportivas|estadistica para apuestas deportivas|estadisticas
apuestas|estadísticas apuestas|estadisticas apuestas deportivas|estadísticas
apuestas deportivas|estadisticas apuestas deportivas futbol|estadisticas apuestas futbol|estadisticas apuestas hoy|estadisticas apuestas nba|estadisticas baloncesto apuestas|estadisticas casas de apuestas|estadisticas
de apuestas|estadisticas de apuestas de futbol|estadisticas de apuestas
deportivas|estadísticas de apuestas deportivas|estadisticas de apuestas futbol|estadisticas de futbol apuestas|estadisticas de
futbol para apuestas|estadisticas deportivas para apuestas|estadísticas deportivas para apuestas|estadisticas en apuestas deportivas|estadisticas futbol apuestas|estadísticas fútbol apuestas|estadisticas futbol apuestas
deportivas|estadisticas futbol para apuestas|estadisticas
nba apuestas|estadisticas para apuestas|estadisticas para apuestas de futbol|estadisticas para apuestas deportivas|estadísticas para apuestas deportivas|estadisticas para apuestas futbol|estadisticas tenis apuestas|estadísticas tenis apuestas|estrategia
apuestas|estrategia apuestas baloncesto|estrategia apuestas combinadas|estrategia apuestas
corners|estrategia apuestas deportivas|estrategia apuestas deportivas seguras|estrategia apuestas en vivo|estrategia apuestas resultado exacto|estrategia apuestas tenis|estrategia apuestas tenis de mesa|estrategia corners
apuestas|estrategia de apuestas|estrategia de apuestas deportivas|estrategia empates apuestas deportivas|estrategia ganadora apuestas deportivas|estrategia tenis de mesa apuestas|estrategias apuestas|estrategias apuestas de futbol|estrategias apuestas deportivas|estrategias apuestas deportivas futbol|estrategias apuestas en vivo|estrategias apuestas
futbol|estrategias apuestas tenis|estrategias de apuestas|estrategias de apuestas
de futbol|estrategias de apuestas deportivas|estrategias de apuestas deportivas pdf|estrategias de apuestas futbol|estrategias de apuestas
seguras|estrategias para apuestas de futbol|estrategias para apuestas deportivas|estrategias tenis apuestas|eurocopa apuestas|eurocopa apuestas campeon|eurocopa apuestas
ganador|eurocopa casas de apuestas|eurocopa favoritos apuestas|eurocopa femenina apuestas|eurocopa
ganador apuestas|europa league apuestas|evolucion cuotas apuestas|excel
para apuestas deportivas gratis|explicacion handicap
apuestas|explicacion stake apuestas|f1 apuestas|favorito apuestas champions|favorito champions apuestas|favorito en las apuestas super bowl|favoritos apuestas champions league|favoritos apuestas eurocopa|favoritos apuestas mundial|favoritos casas de apuestas champions|favoritos champions apuestas|favoritos champions casas de
apuestas|favoritos eurocopa apuestas|favoritos mundial apuestas|favoritos mundial casas de apuestas|favoritos
mundial qatar apuestas|favoritos nba apuestas|favoritos papa
apuestas|fc barcelona apuestas|final champions league
apuestas|final copa america apuestas|final copa del
rey apuestas|final eurocopa apuestas|final europa league apuestas|final mundial apuestas|final nba apuestas|formula 1 apuestas|formula apuestas deportivas|fórmula excel para apuestas deportivas|formula matematica apuestas deportivas|fórmula matemática apuestas deportivas|formula para ganar apuestas deportivas|fórmula
para ganar apuestas deportivas|fórmulas para ganar apuestas deportivas|foro apuestas|foro apuestas acb|foro
apuestas baloncesto|foro apuestas balonmano|foro apuestas beisbol|foro apuestas caballos|foro apuestas ciclismo|foro apuestas de tenis|foro apuestas deportivas|foro
apuestas deportivas baloncesto|foro apuestas deportivas futbol|foro apuestas deportivas futbol español|foro apuestas deportivas
nba|foro apuestas deportivas tenis|foro apuestas futbol|foro apuestas futbol español|foro apuestas mlb|foro apuestas mundial|foro
apuestas nba|foro apuestas tenis|foro casas de apuestas|foro de apuestas|foro de apuestas combinadas|foro de apuestas de futbol|foro de apuestas de tenis|foro de apuestas
deportivas|foro de apuestas deportivas futbol|foro de apuestas
deportivas tenis|foro de apuestas futbol|foro de
apuestas nba|foro nba apuestas|foro pronosticos apuestas|foro sobre apuestas deportivas|foro tenis
apuestas|foro tenis apuestas deportivas|foros apuestas deportivas|foros apuestas tenis|foros de apuestas|foros de apuestas de futbol|foros de apuestas deportivas|francia argentina apuestas|futbol apuestas|fútbol apuestas|futbol apuestas deportivas|futbol apuestas pronosticos|futbol español apuestas|futbol hoy apuestas|futbol virtual apuestas|futbolista sevilla apuestas|galgos apuestas|galgos apuestas deportivas|galgos carreras apuestas|ganador champions league apuestas|ganador copa del
rey apuestas|ganador eurocopa apuestas|ganador europa league apuestas|ganador mundial apuestas|ganador nba
apuestas|ganador sin empate apuestas|ganancias apuestas deportivas tributan|ganar 10 euros
al día apuestas|ganar 100 euros al día en apuestas|ganar 50 euros al dia en apuestas|ganar 50 euros al día en apuestas|ganar apuestas combinadas|ganar apuestas deportivas|ganar apuestas deportivas seguras|ganar apuestas deportivas
tenis|ganar apuestas deportivas trucos|ganar apuestas en vivo|ganar dinero apuestas|ganar dinero apuestas deportivas|ganar dinero apuestas deportivas seguras|ganar dinero con apuestas|ganar dinero con apuestas deportivas|ganar dinero con apuestas seguras|gente que vive de las apuestas|gg que significa en apuestas|girona apuestas|girona campeon de liga apuestas|girona gana la
liga apuestas|goles asiaticos apuestas|goles asiaticos en apuestas|grupo
de apuestas deportivas gratis|grupos de apuestas gratis|hacer apuestas|hacer apuestas combinadas|hacer apuestas de futbol|hacer apuestas deportivas|hacer
apuestas online|hacer apuestas seguras|hacer dinero con apuestas deportivas|handicap
apuestas|hándicap apuestas|handicap apuestas baloncesto|hándicap apuestas baloncesto|handicap
apuestas basket|handicap apuestas beisbol|handicap apuestas deportivas|handicap apuestas futbol|handicap
apuestas futbol explicacion|handicap apuestas nba|handicap apuestas
nfl|handicap apuestas que es|handicap apuestas significado|handicap apuestas tenis|handicap asiatico apuestas|handicap asiatico en apuestas|handicap baloncesto apuestas|handicap en apuestas|handicap en apuestas baloncesto|handicap en apuestas de baloncesto|handicap en apuestas deportivas|handicap en apuestas
que es|handicap en apuestas que significa|handicap en las apuestas|handicap que es apuestas|hándicap que
es apuestas|handicap que es en apuestas|handicap que significa apuestas|handicap
que significa en las apuestas|handicap significado apuestas|hándicap significado en apuestas|hay gente que vive de las
apuestas|historico cuotas apuestas|histórico cuotas apuestas|hoja de calculo apuestas deportivas|hoja de calculo para apuestas deportivas|horario
casas de apuestas madrid|impuesto a las apuestas|impuesto a las apuestas deportivas|impuesto
apuestas deportivas|impuesto apuestas online|impuesto de apuestas|impuesto
de apuestas deportivas|impuesto por apuestas
deportivas|impuesto sobre apuestas|impuestos a las apuestas deportivas|impuestos
a las casas de apuestas|impuestos apuestas|impuestos apuestas
deportivas|impuestos apuestas deportivas colombia|impuestos apuestas deportivas españa|impuestos apuestas españa|impuestos
apuestas online|impuestos casas de apuestas|impuestos de apuestas|impuestos de apuestas deportivas|impuestos en apuestas|impuestos en apuestas deportivas|impuestos en apuestas deportivas mexico|impuestos ganancias
apuestas|impuestos ganancias apuestas deportivas|impuestos por apuestas|impuestos por apuestas
deportivas|impuestos por ganancias de apuestas|impuestos sobre apuestas|impuestos sobre apuestas
deportivas|indice de tarjetas apuestas|inglaterra paises bajos apuestas|ingreso minimo 5 euros apuestas|ingreso minimo casas de apuestas|ingresos por apuestas|inter barca
apuestas|inter barcelona apuestas|juego apuestas|juego apuestas deportivas|juego apuestas deportivas gratis|juego apuestas futbol|juego apuestas gratis|juego
de apuestas|juego de apuestas dinero real|juego de apuestas futbol|juego de apuestas
online|juego de apuestas sin dinero|juego en linea apuestas|juego online apuestas|juegos apuestas|juegos apuestas en linea|juegos apuestas
online|juegos apuestas online gratis|juegos con apuestas|juegos con apuestas reales|juegos de apuestas|juegos de apuestas caballos|juegos de apuestas con cartas españolas|juegos de apuestas con dinero real|juegos de apuestas de caballos|juegos de apuestas de
futbol|juegos de apuestas deportivas|juegos de
apuestas deportivas gratis|juegos de apuestas dinero real|juegos de apuestas en linea|juegos de apuestas en linea gratis|juegos de apuestas gratis|juegos de apuestas gratis
con premios|juegos de apuestas online|juegos de apuestas online chile|juegos de apuestas online gratis|juegos de
apuestas para ganar dinero|juegos de apuestas sin dinero real|juegos de futbol apuestas|juegos en linea apuestas|juegos en línea apuestas|juegos en linea de apuestas|juegos olimpicos apuestas|juegos online apuestas|juegos online de apuestas reales|juegos virtuales apuestas|juegos y apuestas|juegos y apuestas online|jugador de sevilla apuestas|jugador del sevilla apuestas|jugador del sevilla apuestas deportivas|jugador sevilla
apuestas|jugador sevilla apuestas deportivas|king’s league americas apuestas|la casa de apuestas con mejores cuotas|la casa de apuestas del real madrid|la liga apuestas|la mejor app de apuestas|la mejor
app de apuestas deportivas|la mejor app para apuestas deportivas|la mejor casa de apuestas|la mejor casa de apuestas de españa|la mejor casa de apuestas deportivas|la mejor casa de
apuestas en colombia|la mejor casa de apuestas en españa|la mejor casa
de apuestas en mexico|la mejor casa de apuestas online|la mejor ia
para apuestas deportivas|la mejor pagina de apuestas|la
mejor pagina de apuestas deportivas|la prorroga cuenta en las apuestas|la prórroga
cuenta en las apuestas|la prorroga entra en las apuestas|las
apuestas cuentan en la prorroga|las apuestas
deportivas pagan impuestos|las apuestas deportivas son legales|las apuestas incluye
prorroga|las apuestas mas seguras|las apuestas pagan impuestos|las apuestas valen en la prorroga|las casas de apuestas amañan partidos|las
casas de apuestas en españa|las casas de apuestas pagan impuestos|las ganancias de
apuestas tributan|las mejores app de apuestas|las mejores app de apuestas deportivas|las mejores apuestas deportivas|las mejores apuestas
deportivas para hoy|las mejores apuestas para hoy|las mejores casa de apuestas peru|las mejores
casas de apuestas|las mejores casas de apuestas de españa|las mejores casas de apuestas deportivas|las mejores casas de apuestas en españa|las mejores casas de apuestas en peru|las mejores casas de apuestas en perú|las
mejores casas de apuestas españa|las mejores casas de apuestas online|las
mejores casas de apuestas peru|las mejores paginas
de apuestas|las mejores peñas de apuestas|las prorrogas cuentan en las apuestas|las tarjetas rojas apuestas|las vegas apuestas
mlb|las vegas apuestas nba|legislacion casas de apuestas
españa|ley de juegos y apuestas|licencia apuestas online|licencias apuestas españa|licencias casas de apuestas|liga española apuestas|linea asiatica
apuestas|linea de apuestas deportivas|linea de apuestas mlb|linea de apuestas nfl|linea de apuestas super bowl|linea de dinero
apuestas|linea de dinero en apuestas|linea de gol 3.0
apuestas|linea de gol apuestas|línea de gol apuestas|linea
de gol apuestas que es|linea de gol apuestas
que significa|linea de gol en apuestas|linea nfl apuestas|lineas asiaticas apuestas|lineas asiaticas apuestas deportivas|lineas de apuestas mlb|líneas nfl apuestas|lista casas apuestas|lista casas de
apuestas españa|lista de apuestas deportivas|lista
de casas de apuestas|lista de casas de apuestas deportivas|listado apuestas|listado apuestas deportivas|listado apuestas deportivas clasico|listado apuestas deportivas prediccion|listado casas apuestas|listado casas de apuestas|listado casas de apuestas españa|listado de apuestas|listado de apuestas deportivas|listado de casas
de apuestas|listado pronosticos apuestas deportivas|lol esports apuestas|los mejores sitios de apuestas|los mejores
tips de apuestas|madrid apuestas|madrid arsenal apuestas|madrid atletico
apuestas|madrid barca apuestas|madrid barça apuestas|madrid barcelona apuestas|madrid barsa apuestas|madrid sevilla apuestas|madrid vs barcelona apuestas|mapa casas de apuestas madrid|marca apuestas 20 euros gratis|marca apuestas app android|marca apuestas bono|marca apuestas bono 20 euros|marca
apuestas bono bienvenida|marca apuestas codigo promocional|marca apuestas código promocional|mejor analista de apuestas deportivas|mejor
aplicacion apuestas deportivas|mejor aplicación de apuestas deportivas|mejor app apuestas|mejor app apuestas deportivas|mejor app apuestas deportivas android|mejor app apuestas deportivas
españa|mejor app apuestas futbol|mejor app
casa de apuestas|mejor app de apuestas|mejor app de apuestas deportivas|mejor
app de apuestas deportivas españa|mejor app de apuestas
españa|mejor app de apuestas mexico|mejor app para apuestas|mejor app para
apuestas de futbol|mejor app para apuestas deportivas|mejor apuestas|mejor apuestas deportivas|mejor asesor de apuestas deportivas|mejor bono bienvenida apuestas|mejor bono bienvenida
casa apuestas|mejor canal de apuestas deportivas|mejor casa apuestas|mejor casa apuestas deportivas|mejor casa apuestas deportivas españa|mejor casa apuestas tenis|mejor
casa de apuestas|mejor casa de apuestas argentina|mejor casa de apuestas baloncesto|mejor casa de apuestas
chile|mejor casa de apuestas colombia|mejor casa de apuestas de
españa|mejor casa de apuestas deportivas|mejor casa de apuestas deportivas españa|mejor casa de apuestas deportivas foro|mejor
casa de apuestas deportivas online|mejor casa de apuestas deportivas peru|mejor casa de apuestas en chile|mejor casa de
apuestas en colombia|mejor casa de apuestas en españa|mejor casa de apuestas en linea|mejor
casa de apuestas en mexico|mejor casa de apuestas en méxico|mejor casa de apuestas en peru|mejor casa de apuestas españa|mejor casa de apuestas esports|mejor casa de
apuestas foro|mejor casa de apuestas futbol|mejor casa
de apuestas mexico|mejor casa de apuestas
nba|mejor casa de apuestas online|mejor casa de apuestas
online españa|mejor casa de apuestas online mexico|mejor casa de apuestas para baloncesto|mejor casa de apuestas para esports|mejor casa de apuestas para nba|mejor casa de apuestas para
tenis|mejor casa de apuestas para ufc|mejor casa de apuestas
perú|mejor casa de apuestas tenis|mejor casas de apuestas|mejor estrategia
apuestas deportivas|mejor estrategia apuestas futbol|mejor foro
apuestas de|mejor grupo de apuestas deportivas|mejor
juego de apuestas|mejor juego de apuestas online|mejor lugar
de apuestas deportivas|mejor metodo de apuestas deportivas|mejor pagina apuestas|mejor pagina apuestas deportivas|mejor página apuestas deportivas|mejor pagina apuestas futbol|mejor pagina de apuestas|mejor página
de apuestas|mejor pagina de apuestas csgo|mejor pagina de apuestas de futbol|mejor pagina de apuestas deportivas|mejor pagina
de apuestas online|mejor pagina para apuestas deportivas|mejor plataforma de apuestas|mejor plataforma de apuestas deportivas|mejor
pronosticador de apuestas|mejor sitio apuestas|mejor sitio apuestas deportivas|mejor sitio de apuestas|mejor sitio de apuestas de futbol|mejor sitio de apuestas deportivas|mejor sitio de apuestas online|mejor sitio para apuestas deportivas|mejores app apuestas deportivas|mejores app de apuestas|mejores
app de apuestas deportivas|mejores apps apuestas|mejores apps apuestas
deportivas|mejores apps de apuestas deportivas|mejores apps de apuestas mexico|mejores apuestas|mejores apuestas champions league|mejores apuestas combinadas|mejores apuestas combinadas para hoy|mejores
apuestas del dia|mejores apuestas deportivas|mejores apuestas europa league|mejores apuestas formula 1|mejores apuestas nba|mejores apuestas nba hoy|mejores apuestas para hoy|mejores apuestas para hoy
nba|mejores apuestas ruleta|mejores bonos apuestas|mejores bonos apuestas
deportivas|mejores bonos casas de apuestas|mejores bonos
de apuestas|mejores bonos de bienvenida apuestas|mejores bonos de casas de apuestas|mejores canales de apuestas telegram|mejores canales telegram apuestas|mejores casa de apuestas|mejores
casa de apuestas colombia|mejores casa de apuestas deportivas|mejores casa
de apuestas en españa|mejores casa de apuestas españa|mejores casa de apuestas mexico|mejores casa de
apuestas online|mejores casas apuestas|mejores
casas apuestas españa|mejores casas apuestas tenis|mejores casas de apuestas|mejores casas de apuestas argentina|mejores casas de
apuestas caballos|mejores casas de apuestas chile|mejores casas de apuestas
colombia|mejores casas de apuestas de españa|mejores
casas de apuestas deportivas|mejores casas de apuestas en argentina|mejores casas de apuestas en chile|mejores
casas de apuestas en colombia|mejores casas de apuestas en españa|mejores casas de apuestas en mexico|mejores casas
de apuestas en méxico|mejores casas de apuestas en peru|mejores
casas de apuestas españa|mejores casas de apuestas españolas|mejores
casas de apuestas esports|mejores casas de apuestas formula 1|mejores
casas de apuestas futbol|mejores casas de apuestas mexico|mejores casas
de apuestas méxico|mejores casas de apuestas nba|mejores
casas de apuestas nuevas|mejores casas de apuestas online|mejores casas de apuestas online españa|mejores casas de apuestas para tenis|mejores casas de apuestas peru|mejores casas de apuestas perú|mejores
casas de apuestas sin licencia|mejores casas de apuestas
super deporte|mejores casas de apuestas superdeporte|mejores casas de apuestas
tenis|mejores casinos de apuestas deportivas|mejores casinos para apuestas deportivas|mejores combinadas apuestas|mejores consejos de apuestas|mejores cuotas
apuestas|mejores cuotas casas de apuestas|mejores estrategias apuestas deportivas|mejores ofertas casas apuestas|mejores ofertas casas
de apuestas|mejores ofertas de casas de apuestas|mejores paginas apuestas|mejores paginas apuestas csgo|mejores paginas apuestas de futbol|mejores paginas de apuestas|mejores paginas de apuestas csgo|mejores paginas de apuestas
de futbol|mejores paginas de apuestas deportivas|mejores paginas de apuestas españa|mejores paginas de apuestas mexico|mejores paginas de apuestas
online|mejores paginas para apuestas deportivas|mejores plataformas de
apuestas|mejores predicciones apuestas|mejores promociones apuestas|mejores promociones apuestas deportivas|mejores promociones casas apuestas|mejores promociones casas de apuestas|mejores
pronosticos apuestas deportivas|mejores sitios apuestas|mejores sitios de apuestas|mejores sitios de
apuestas deportivas|mejores sitios de apuestas mexico|mejores
sitios de apuestas online|mejores tips apuestas deportivas|mejores tipster
apuestas deportivas|mejores tipster de apuestas deportivas|mercados asiaticos
apuestas|mexico apuestas|mis apuestas deportivas|mlb apuestas|mlb apuestas deportivas|mlb apuestas hoy|mlb apuestas para
hoy|momio apuestas|momio en apuestas|momio significado apuestas|momios apuestas|momios apuestas nfl|momios apuestas significado|momios en apuestas|multiplicador de apuestas|mundial 2026 apuestas|mundial apuestas|mundial ciclismo
apuestas|mundial de clubes apuestas|mundial rugby apuestas|mvp nba apuestas|nba apuestas|nba apuestas deportivas|nba apuestas
hoy|nba foro apuestas|nba pronosticos apuestas deportivas|nba spain apuestas|nfl apuestas|nfl apuestas en las vegas|nfl apuestas favoritos|nfl linea de apuestas|nhl apuestas|nueva casa apuestas|nueva casa de apuestas|nueva casa de
apuestas deportivas|nueva casa de apuestas en colombia|nueva casa
de apuestas españa|nueva casas de apuestas|nueva ley apuestas|nueva
ley casas de apuestas|nueva ley de apuestas|nueva pagina de
apuestas|nuevas apuestas|nuevas apuestas deportivas|nuevas casa de
apuestas|nuevas casas apuestas|nuevas casas apuestas españa|nuevas casas de apuestas|nuevas casas de apuestas 2025|nuevas casas de
apuestas colombia|nuevas casas de apuestas deportivas|nuevas casas de apuestas en colombia|nuevas casas
de apuestas en españa|nuevas casas de apuestas españa|nuevas casas de
apuestas mexico|nuevas casas de apuestas online|nuevas paginas de apuestas|nuevas paginas de apuestas csgo|nuevas paginas de apuestas deportivas|nuevo juego de apuestas|nuevos apuestas|numero
de casas de apuestas en españa|numero de casas de apuestas
en madrid|oferta bienvenida apuestas|oferta casa de
apuestas|oferta casas de apuestas|ofertas apuestas|ofertas apuestas
deportivas|ofertas apuestas online|ofertas bienvenida
apuestas|ofertas bienvenida casas apuestas|ofertas casa
de apuestas|ofertas casas apuestas|ofertas casas de apuestas|ofertas casas de apuestas deportivas|ofertas de apuestas|ofertas de
apuestas deportivas|ofertas de casas de apuestas|ofertas
de empleo apuestas deportivas|ofertas en casas de apuestas|ofertas recurrentes casas de apuestas|ofertas registro casas de apuestas|osasuna real madrid apuestas|over 2.5 apuestas|over apuestas|over en apuestas|over en apuestas
deportivas|over en las apuestas|over o under en apuestas|over que es en apuestas|over
que significa en apuestas|over significado apuestas|over
under apuestas|over under en apuestas|over y under en apuestas|pagar apuestas con paypal|pagar impuestos por apuestas|pagina apuestas|pagina apuestas csgo|pagina apuestas deportivas|pagina apuestas españa|pagina apuestas fifa|pagina apuestas futbol|pagina apuestas gratis|pagina de apuestas|página de apuestas|pagina de apuestas chile|pagina
de apuestas colombia|pagina de apuestas con paypal|pagina de apuestas de csgo|pagina de apuestas de futbol|pagina de apuestas
deportivas|página de apuestas deportivas|pagina de apuestas
deportivas chile|pagina de apuestas en venezuela|pagina de
apuestas españa|pagina de apuestas esports|pagina de apuestas gratis|pagina de apuestas online|pagina de apuestas paypal|pagina de apuestas peru|pagina de apuestas por puntos|pagina de apuestas
sin dinero|pagina de apuestas stake|pagina para hacer apuestas
deportivas|paginas apuestas|páginas apuestas|paginas apuestas csgo|paginas apuestas deportivas|paginas apuestas
deportivas chile|paginas apuestas deportivas españa|paginas apuestas
españa|paginas apuestas gratis|paginas apuestas
nuevas|paginas apuestas online|paginas de apuestas|páginas de apuestas|paginas
de apuestas bono sin deposito|paginas de apuestas casino|paginas de apuestas chile|paginas de apuestas
con bono|paginas de apuestas con paypal|paginas de
apuestas cs|paginas de apuestas csgo|paginas de apuestas csgo sin depositar|paginas de
apuestas de futbol|paginas de apuestas deportivas|páginas de apuestas deportivas|paginas de apuestas deportivas colombia|paginas de apuestas deportivas
en españa|paginas de apuestas deportivas españolas|paginas
de apuestas deportivas gratis|paginas de apuestas deportivas
mexico|paginas de apuestas deportivas nuevas|paginas de apuestas deportivas paypal|paginas de apuestas deportivas peru|paginas de apuestas en argentina|paginas de apuestas en chile|paginas de apuestas en colombia|paginas de apuestas en linea|paginas de apuestas en mexico|paginas de
apuestas en venezuela|paginas de apuestas españa|paginas de apuestas
españolas|paginas de apuestas esports|paginas de apuestas mexico|paginas de
apuestas nuevas|paginas de apuestas online|paginas de apuestas paypal|paginas de apuestas peru|paginas de apuestas que aceptan paypal|paginas de
apuestas seguras|paginas de estadisticas para apuestas|paginas de
juegos de apuestas|paginas estadisticas apuestas|paginas
estadisticas apuestas deportivas|páginas estadísticas para
apuestas|paginas para hacer apuestas|paginas para hacer apuestas de futbol|paginas
para hacer apuestas deportivas|pago anticipado apuestas|pago anticipado apuestas deportivas|pago anticipado casa de apuestas|pago anticipado en apuestas|pago impuestos apuestas deportivas|paises bajos vs
ecuador apuestas|para hacer apuestas|para hacer apuestas deportivas|partido aplazado apuestas|partido
suspendido apuestas|partidos amañados apuestas|partidos amañados para
apuestas|partidos apuestas hoy|partidos arreglados apuestas|partidos de futbol hoy apuestas|partidos de fútbol mañana apuestas|partidos
de hoy apuestas|partidos en vivo apuestas|partidos hoy apuestas|paypal casa de apuestas|paypal casas de apuestas|personas que viven de las apuestas|peru apuestas|peru chile apuestas|peru vs chile apuestas|peru
vs chile casa de apuestas|plataforma apuestas|plataforma apuestas
deportivas|plataforma de apuestas|plataforma de apuestas cruzadas|plataforma de apuestas deportivas|plataforma de apuestas
online|plataforma para apuestas deportivas|plataformas de apuestas|plataformas de apuestas
deportivas|plataformas de apuestas online|plataformas para apuestas deportivas|prediccion apuestas|prediccion apuestas champions|prediccion apuestas deportivas|prediccion apuestas deportivas gratis|prediccion apuestas futbol|prediccion apuestas hoy|predicción de apuestas deportivas|prediccion de apuestas futbol|predicciones apuestas|predicciones apuestas baloncesto|predicciones apuestas champions|predicciones apuestas
champions hoy|predicciones apuestas de futbol|predicciones apuestas
de tenis|predicciones apuestas deportivas|predicciones apuestas deportivas gratis|predicciones apuestas deportivas hoy|predicciones apuestas futbol|predicciones
apuestas fútbol|predicciones apuestas futbol hoy|predicciones
apuestas hoy|predicciones apuestas nba|predicciones
apuestas para hoy|predicciones apuestas tenis|predicciones de
apuestas|predicciones de apuestas de futbol|predicciones de apuestas deportivas|predicciones de apuestas para hoy|predicciones de
futbol para apuestas|predicciones futbol apuestas|predicciones
para apuestas de futbol|predicciones para apuestas deportivas|predicciones tenis apuestas|previa apuestas resultados en vivo|principales casas de apuestas en españa|programa para hacer
apuestas deportivas|promocion apuestas|promocion apuestas deportivas|promocion casa de apuestas|promociones apuestas|promociones
apuestas deportivas|promociones apuestas gratis|promociones apuestas sin deposito|promociones bienvenida apuestas|promociones casa de apuestas|promociones casas
apuestas|promociones casas de apuestas|promociones casas de
apuestas deportivas|promociones de apuestas|promociones de apuestas
deportivas|promociones de casas de apuestas|promociones en casa de apuestas|promociones en casas de apuestas|pronosticador apuestas|pronosticador apuestas futbol|pronosticador de apuestas|pronosticador de apuestas nba|pronosticadores apuestas deportivas|pronosticadores de apuestas|pronostico apuestas|pronóstico apuestas|pronostico apuestas baloncesto|pronostico apuestas de futbol|pronostico apuestas de futbol para hoy|pronostico apuestas deportivas|pronóstico apuestas
deportivas|pronostico apuestas deportivas hoy|pronostico
apuestas europa league|pronostico apuestas futbol|pronostico apuestas futbol hoy|pronostico apuestas hoy|pronostico apuestas hoy futbol|pronostico apuestas la liga|pronostico apuestas nba|pronostico apuestas nba hoy|pronostico apuestas tenis|pronostico apuestas tenis hoy|pronostico de apuestas|pronóstico
de apuestas|pronostico de apuestas de futbol|pronostico de
apuestas deportivas|pronóstico de apuestas deportivas|pronostico de apuestas
deportivas hoy|pronóstico de apuestas para hoy|pronostico deportivo apuestas|pronostico
mlb hoy apuestas|pronostico nba hoy apuestas deportivas|pronostico nhl apuestas deportivas|pronostico tenis apuestas deportivas|pronostico y apuestas nba|pronosticos apuestas|pronósticos apuestas|pronosticos apuestas baloncesto|pronosticos apuestas beisbol|pronosticos
apuestas caballos|pronosticos apuestas ciclismo|pronosticos apuestas combinadas|pronósticos apuestas combinadas|pronósticos apuestas
combinadas gratis|pronosticos apuestas combinadas hoy|pronósticos apuestas combinadas hoy|pronosticos
apuestas copa del rey|pronosticos apuestas de futbol|pronosticos apuestas deportivas|pronósticos apuestas deportivas|pronosticos apuestas deportivas
foro|pronosticos apuestas deportivas futbol|pronosticos apuestas deportivas gratis|pronosticos apuestas deportivas hoy|pronosticos
apuestas deportivas nba|pronosticos apuestas deportivas tenis|pronósticos apuestas deportivas tenis|pronosticos apuestas
euroliga|pronosticos apuestas euroliga hoy|pronosticos apuestas europa league|pronosticos apuestas europa league hoy|pronósticos apuestas europa
league hoy|pronosticos apuestas formula 1|pronosticos apuestas
futbol|pronosticos apuestas futbol español|pronosticos apuestas futbol hoy|pronosticos apuestas hoy|pronosticos apuestas liga española|pronósticos apuestas liga española|pronosticos apuestas nba|pronosticos apuestas nba hoy|pronosticos
apuestas nfl|pronosticos apuestas nhl|pronosticos apuestas premier
league|pronosticos apuestas tenis|pronosticos de apuestas|pronósticos
de apuestas|pronosticos de apuestas de futbol|pronosticos de apuestas de
tenis|pronosticos de apuestas deportivas|pronosticos de apuestas deportivas hoy|pronosticos de apuestas hoy|pronosticos de apuestas mlb|pronosticos
de apuestas nba|pronosticos de apuestas para hoy|pronosticos deportivo para tus apuestas|pronosticos deportivos apuestas|pronosticos deportivos
para tus apuestas|pronosticos futbol apuestas|pronosticos mlb apuestas deportivas|pronósticos nfl apuestas deportivas|pronosticos tenis apuestas|pronosticos y apuestas|pronosticos y apuestas del dia|pronosticos
y apuestas deportivas|prorroga baloncesto apuestas|prorroga en apuestas|proximas casas
de apuestas en españa|puntos de tarjetas apuestas|puntos por
tarjetas apuestas|puntos tarjetas apuestas|que app de apuestas es mejor|que app de apuestas
paga mas|que apuestas hacer|que apuestas hacer hoy|que
apuestas puedo hacer|que casa de apuestas aceptan paypal|que casas de apuestas aceptan paypal|que es 1×2 en apuestas|que es
1×2 en apuestas deportivas|que es asiatico en apuestas|que es asiático en apuestas|que es corners
en apuestas|que es dnb apuestas|que es dnb en apuestas|que es doble
doble en apuestas|que es doble oportunidad en apuestas|qué es doble oportunidad en apuestas|que
es doble oportunidad en las apuestas|que es el 1×2 en apuestas|que es el
handicap apuestas|que es el handicap asiatico en apuestas|que es el handicap en apuestas|que es el handicap en apuestas de futbol|que es el handicap en las apuestas|que es el impuesto a las apuestas|que
es el momio en apuestas|que es el momio en las apuestas|que es el over en apuestas|que es el stake apuestas|que es el stake en apuestas|que es el stake en apuestas deportivas|que
es el stake en las apuestas|que es el total asiatico en apuestas|que es empate no accion en apuestas|que
es ganador sin empate en apuestas|que es handicap 0 en apuestas|que es handicap apuestas|que es handicap apuestas baloncesto|que es handicap asiatico
en apuestas|que es hándicap asiático en apuestas|que
es handicap asiatico en las apuestas|que es handicap
en apuestas|que es hándicap en apuestas|que es handicap en apuestas baloncesto|que es handicap en apuestas
de futbol|que es handicap en apuestas deportivas|que es
handicap en las apuestas|qué es handicap en las
apuestas|que es handicap europeo en apuestas|que es la doble oportunidad
en apuestas|que es la linea de gol apuestas|que es la linea de gol en apuestas|que es la linea de gol en las apuestas|que es linea de dinero en apuestas|que es linea de gol apuestas|que es linea de gol en apuestas|que es linea de gol en las apuestas|que es momio en apuestas|que es over
en apuestas|que es over en apuestas deportivas|que es over
en las apuestas|que es over under en apuestas|que es
over y under en las apuestas|que es pago anticipado en apuestas|que es sistema en apuestas|que
es stake 1 en apuestas|que es stake 10 en apuestas|que es stake 100 en apuestas|que es stake 2
en apuestas|que es stake 20 en apuestas|que es stake
3 en apuestas|que es stake 30 en apuestas|que es stake 5 en apuestas|que es
stake apuestas|que es stake en apuestas|que es stake en apuestas deportivas|que es stake en las apuestas|que es tipster
en apuestas|que es total asiatico en apuestas|que es trixie en apuestas|que es un handicap asiatico en apuestas|que es un handicap en apuestas|que es
un momio en apuestas|qué es un momio en las apuestas|que es
un over en apuestas|que es un stake 10 en apuestas|que es un stake 20 en apuestas|que es un stake apuestas|que es un stake en apuestas|que es un stake en apuestas deportivas|que
es un stake en las apuestas|que es un tipster apuestas|que es un trixie en apuestas|que
es un yankee en apuestas|que es una combinada en apuestas|que es under y over en apuestas|que es yankee
en apuestas|que hace un corredor de apuestas|que quiere decir 1×2 en apuestas|que quiere decir handicap en apuestas|que
quiere decir stake en apuestas|que significa 0.0 en apuestas|que significa
0.5 en apuestas|que significa 0.5 goles en apuestas|que significa 1 1×2
en apuestas|que significa 1 2 en apuestas|que significa
1 en apuestas|que significa 1.25 en apuestas|que significa 1.5 en apuestas|que significa 1.5 goles en apuestas|que significa 1/1 en apuestas|que
significa 1/2 en apuestas|que significa 1+ en apuestas|que significa 100 a 1 en apuestas|que significa 12 en apuestas|que significa 1x en apuestas|que significa 1×2 en apuestas|que significa 1×2 en apuestas 1xbet|que significa 1×2 en apuestas de futbol|que significa 1×2 en apuestas deportivas|que significa 1×2 en las apuestas|que significa 1×2
g1 en apuestas|que significa 1×2 pa en apuestas|que significa
2.5 en apuestas|que significa 2.5 goles en apuestas|que significa 2+ en apuestas|que significa 2x en apuestas|que significa 2×1 en apuestas|que significa 3.5 en apuestas|que
significa 3.5 goles en apuestas|que significa 4.5
en apuestas|que significa 4.5 goles en apuestas|que significa 5.5 en apuestas|que significa ah en apuestas|qué significa apuestas|que significa
apuestas con handicap|que significa apuestas sin empate|que significa apuestas sistema|que significa asiatico en apuestas|que
significa asiatico en las apuestas|que significa asiático
en las apuestas|que significa away en apuestas|que
significa bankers en apuestas|que significa bts en apuestas|que significa btts en apuestas|que significa cash out en apuestas|que significa corners en apuestas|que significa dnb en apuestas|que significa dnb en las apuestas|que significa doble chance en apuestas|que significa el 1×2 en apuestas|que significa
el 1×2 en las apuestas|que significa el en las apuestas|que significa el
stake en las apuestas|que significa en apuestas 1×2|que significa en apuestas handicap|que significa en las apuestas 1×2|que significa en las apuestas handicap|que significa handicap 0.0 en apuestas|que significa handicap 1×2 en apuestas|que
significa handicap apuestas|que significa handicap
en apuestas|que significa handicap en las apuestas|que significa
linea de gol apuestas|que significa linea de gol en apuestas|que
significa más de 2 goles en apuestas|que significa momio en apuestas|que significa momios en las apuestas|que significa over
0.5 en apuestas|que significa over 1.5 en apuestas|que significa over 2.5 en apuestas|que significa
over 4.5 en apuestas|que significa over en apuestas|que significa over en las apuestas|que significa
pa en las apuestas|que significa par e impar en apuestas|que significa sistema en apuestas|que significa stake 1 en apuestas|que significa stake 10 en apuestas|que significa stake 100 en apuestas|que
significa stake 2 en apuestas|que significa stake 20 en apuestas|que
significa stake 3 en apuestas|que significa stake 30 en apuestas|que significa stake 4 en apuestas|que significa stake 5
en apuestas|que significa stake 50 en apuestas|que significa stake apuestas|que significa stake en apuestas|qué significa stake en apuestas|que significa stake en las apuestas|que
significa tarjetas 1×2 en apuestas|que significa trixie en apuestas|que
significa yankee en apuestas|que significan los stakes
en apuestas|que son apuestas combinadas|que son apuestas de sistema|que son apuestas multiples|que son apuestas sistema|que son corners en apuestas|que
son las apuestas asiaticas|que son las apuestas combinadas|que son las apuestas de sistema|que son las apuestas multiples|que son las
apuestas sin empate|que son las apuestas sistema|que son las
combinadas en apuestas|que son los asiaticos en las apuestas|que son los
corners en apuestas|que son los handicap en apuestas|que son los
handicaps en apuestas|que son los momios en apuestas|que son los momios en las
apuestas|que son los puntos de tarjeta apuestas|que
son los stake en apuestas|que son los stake en las apuestas|que son los stakes en apuestas|que son los stakes en las apuestas|que son momios en apuestas|que son puntos de tarjetas apuestas|que son stake en apuestas|que son stakes en apuestas|que tipos
de apuestas existen|quien ganara la liga apuestas|ranking casas de apuestas españa|ranking mejores casas de apuestas|real madrid
apuestas|real madrid arsenal apuestas|real madrid atletico apuestas|real
madrid barcelona apuestas|real madrid betis apuestas|real madrid borussia dortmund apuestas|real madrid casa de apuestas|real madrid celta apuestas|real madrid
hoy apuestas|real madrid osasuna apuestas|real madrid real sociedad apuestas|real madrid sevilla apuestas|real madrid valencia apuestas|real madrid vs athletic apuestas|real madrid
vs atletico apuestas|real madrid vs atlético madrid apuestas|real madrid vs barcelona apuestas|real madrid vs
barcelona cuotas apuestas|real madrid vs betis apuestas|real madrid vs celta de vigo apuestas|real madrid vs osasuna apuestas|real madrid
vs real sociedad apuestas|real madrid vs sevilla
apuestas|real madrid vs valencia apuestas|real madrid vs villarreal apuestas|real sociedad apuestas|real sociedad barcelona apuestas|real sociedad casa de apuestas|real
sociedad casas de apuestas|real sociedad publicidad apuestas|real sociedad real madrid
apuestas|registrarse en apuestas deportivas|registrarse
en casa de apuestas|registro de apuestas deportivas|reglas apuestas baloncesto|resultado apuestas|resultado apuestas deportivas|resultado de apuestas|resultado de apuestas de futbol|resultado de apuestas de fútbol|resultado de apuestas deportivas|resultado exacto apuestas|resultado final apuestas|resultado
final en apuestas|resultados apuestas|resultados apuestas deportivas|resultados apuestas deportivas futbol|resultados apuestas
futbol|resultados de apuestas|resultados de apuestas de futbol|resultados de apuestas deportivas|resultados de apuestas en vivo|resultados de apuestas gana|resultados de apuestas la perla|resultados futbol apuestas deportivas|resultados para apuestas deportivas|retirada en tenis apuestas|retiradas tenis apuestas|retiradas tenis casas de apuestas|roll over apuestas|roma athletic apuestas|rugby apuestas|se pagan impuestos
por apuestas|segunda division apuestas|sevilla apuestas|sevilla apuestas jugador|sevilla betis apuestas|sevilla fc apuestas|sevilla inter apuestas|sevilla jugador
apuestas|sevilla leganes apuestas|sevilla vs manchester united apuestas|significado 1×2 apuestas|significado de 1×2 en apuestas|significado de
stake en apuestas|significado dnb apuestas|significado linea de gol apuestas|significado over under apuestas|significado
over/under apuestas|significado stake apuestas|significado stake en apuestas|simulador de apuestas deportivas|simulador de apuestas deportivas gratis|sistema 2 3 apuestas|sistema 2
4 apuestas|sistema 2/3 apuestas|sistema 2/4 apuestas|sistema
3 4 apuestas|sistema 3/4 apuestas|sistema apuestas
deportivas|sistema de apuestas|sistema de apuestas de futbol|sistema
de apuestas deportivas|sistema de apuestas fibonacci|sistema en apuestas deportivas|sistema fibonacci apuestas deportivas|sistema ganador apuestas deportivas|sistema martingala apuestas deportivas|sistema para apuestas deportivas|sistema
para ganar apuestas deportivas|sistemas de apuestas|sistemas de apuestas combinadas|sistemas de
apuestas futbol|sistemas de apuestas rentables|sistemas para apuestas deportivas|sitio apuestas|sitio apuestas deportivas|sitio de apuestas|sitio de apuestas
argentina|sitio de apuestas de futbol|sitio de apuestas de fútbol|sitio de apuestas
deportivas|sitio de apuestas deportivas argentina|sitio de apuestas futbol|sitio de apuestas gratis|sitio de apuestas
online|sitio de apuestas peru|sitios apuestas|sitios apuestas deportivas|sitios apuestas online|sitios de
apuestas|sitios de apuestas argentina|sitios de apuestas con bono sin deposito|sitios de apuestas de dota 2|sitios de apuestas de futbol|sitios de apuestas deportivas|sitios
de apuestas deportivas argentina|sitios de apuestas deportivas online|sitios de apuestas deportivas peru|sitios
de apuestas en argentina|sitios de apuestas en linea|sitios de apuestas en mexico|sitios de apuestas gratis|sitios de apuestas mexico|sitios de
apuestas online|sitios de apuestas peru|sitios de apuestas por internet mexico|sitios de apuestas
que aceptan paypal|sitios para apuestas deportivas|sitios web de apuestas|software estadístico apuestas deportivas|software prediccion apuestas deportivas|software predicción apuestas
deportivas|son legales las apuestas deportivas|sport
apuestas tipster|spread en español apuestas|stake 1 apuestas|stake 1 en apuestas|stake 10 apuestas|stake 10 en apuestas|stake 2 apuestas|stake
3 apuestas|stake 5 apuestas|stake 5 en apuestas|stake apuestas|stake apuestas app|stake apuestas colombia|stake apuestas deportivas|stake
apuestas españa|stake apuestas que es|stake apuestas que
significa|stake apuestas significado|stake casa de apuestas|stake en apuestas|stake en apuestas deportivas|stake
en apuestas que es|stake en apuestas que significa|stake en apuestas
significado|stake en las apuestas|stake que es apuestas|stake que es en apuestas|stake significado apuestas|stakes apuestas|stakes en apuestas|super yankee apuestas|superdeporte mejores casas de apuestas|tabla apuestas
múltiples|tabla stake apuestas|tarjeta roja en apuestas|tarjeta roja
vale por dos en apuestas|tarjetas amarillas apuestas|tarjetas amarillas en apuestas|tarjetas apuestas|tarjetas
apuestas deportivas|tarjetas en apuestas|tarjetas en apuestas deportivas|tenis apuestas|tenis apuestas deportivas|tenis de mesa apuestas|tip apuestas|tipo de apuestas|tipo de apuestas deportivas|tipo de apuestas entre amigos|tipos apuestas|tipos de apuestas|tipos de apuestas betplay|tipos de apuestas
carreras de caballos|tipos de apuestas combinadas|tipos de apuestas
de caballos|tipos de apuestas de futbol|tipos de apuestas deportivas|tipos de apuestas en baloncesto|tipos de apuestas en caballos|tipos de apuestas en futbol|tipos de apuestas en la ruleta|tipos de apuestas entre amigos|tipos de apuestas futbol|tipos de apuestas hipicas|tipos de apuestas hipodromo|tipos de apuestas online|tipos de casas
de apuestas|tipos de cuotas apuestas|tipos de handicap apuestas|tipos de
juegos de apuestas|tips apuestas|tips apuestas deportivas|tips apuestas deportivas gratis|tips apuestas deportivas hoy|tips apuestas futbol|tips apuestas gratis|tips apuestas hoy|tips apuestas nba|tips apuestas nfl|tips apuestas tenis|tips de apuestas|tips de apuestas de futbol|tips de apuestas deportivas|tips de apuestas para
hoy|tips deportivos apuestas|tips gratis apuestas|tips para apuestas|tips para apuestas de futbol|tips
para apuestas deportivas|tips para ganar apuestas deportivas|tips para ganar en apuestas deportivas|tips tenis apuestas|tipster apuestas|tipster apuestas combinadas|tipster apuestas deportivas|tipster apuestas deportivas gratis|tipster apuestas futbol|tipster apuestas gratis|tipster apuestas
hoy|tipster apuestas tenis|tipster de apuestas|tipster de apuestas deportivas|todas las casas de apuestas|todas las casas de apuestas de españa|todas las
casas de apuestas en españa|todas las casas de apuestas españa|top casas de apuestas españa|top casas de apuestas peru|total asiatico en apuestas|total tarjetas apuestas|tributación apuestas deportivas|tributar apuestas deportivas|tributar ganancias apuestas deportivas|trixie 4 apuestas|trixie
apuestas|truco apuestas|truco apuestas combinadas|truco apuestas deportivas|truco apuestas seguras|truco para ganar en apuestas deportivas|trucos apuestas|trucos apuestas carreras de caballos|trucos apuestas de futbol|trucos apuestas
deportivas|trucos apuestas deportivas futbol|trucos apuestas futbol|trucos apuestas galgos|trucos casas de apuestas|trucos
de apuestas|trucos de apuestas deportivas|trucos en apuestas deportivas|trucos
ganar apuestas deportivas|trucos para apuestas|trucos para
apuestas deportivas|trucos para ganar apuestas|trucos para ganar apuestas de futbol|trucos
para ganar apuestas deportivas|trucos para ganar en apuestas de futbol|trucos para ganar en las apuestas|trucos
para hacer apuestas deportivas|trucos para las apuestas deportivas|uefa champions
league apuestas|uefa europa league apuestas|ufc apuestas|ufc apuestas hoy|ufc apuestas por internet|ufc hoy apuestas|under over apuestas|under y over en apuestas|uruguay apuestas|uruguay apuestas deportivas|uruguay vs colombia
apuestas|vale la prorroga en las apuestas|valencia
athletic apuestas|valencia barcelona apuestas|valencia getafe
apuestas|valencia madrid apuestas|valencia real madrid apuestas|valencia vs
barcelona apuestas|valencia vs real madrid apuestas|venezuela apuestas|venezuela
argentina apuestas|venezuela vs bolivia apuestas|villarreal apuestas|villarreal liverpool apuestas|vive de las
apuestas|vive de las apuestas deportivas|vive la suerte apuestas|vive la suerte apuestas deportivas|vivir de las apuestas deportivas|vivo
de las apuestas|vivo de las apuestas deportivas|walkover
tenis apuestas|web apuestas casino no dep bono|yankee apuestas)
Крупнейший ресурс купить аккаунты без посредников встречает вебмастеров в своем разделе расходников для Фейсбука. Если вам нужно купить аккаунт Facebook для рекламы, чаще всего важен не «просто доступе», а в трасте и лимитах: уверенный спенд, наличие пройденного ЗРД в Ads Manager и прогретые FanPage. Мы оформили практичный чек-лист, чтобы вы без лишних вопросов понимали какой тип аккаунта брать до оплаты.Что внутри: порядок захода по куки. Ключевая идея: аккаунт — это инструмент. Дальше решает схема залива: какой прокси используется, как шерите пиксели аккуратно, как реагируете на полиси и как масштабируете адсеты. Гордость нашего сервиса — это наличии эксклюзивной библиотеки арбитражника, в которой написаны актуальные гайды по работе с БМами. Команда подскажем, каким образом аккуратно расшарить доступы, чтобы не словили Risk Payment а также продлили жизнь аккаунтам . Покупая у нас, вы получаете не просто доступ, но и оперативную помощь саппорта, ясное описание товара, гарантию на валид и максимально адекватные расценки среди селлеров. Важно: действуйте в рамках закона и всегда с учетом правил Meta.
Профессиональный сервис https://akki-store.com предлагает доступ приобрести рекламные сущности для бизнеса. Если вам нужно купить Facebook-аккаунты, обычно задача не в «одном логине», а в трасте и лимитах: стабильный запуск, зеленые плашки в Ads Manager и правильно созданные ФП. Мы подготовили практичный чек-лист, чтобы вы сразу понимали что подойдет под ваши офферы перед заказом.Что внутри: типы аккаунтов (Мамки, Автореги, Логи). Важно: аккаунт — это инструмент. Дальше решает подход к запуску: какой прокси используется, как шерите пиксели без триггеров, как реагируете на полиси и как дублируете кампании. Главная фишка этого шопа — заключается в наличие масштабной образовательной секции, где выложены рабочие рекомендации по фарму аккаунтов. Мы подскажем, как без лишних рисков расшарить доступы, чтобы не словили Risk Payment и дольше жили в аукционе . Заказывая у нас, вы получаете не только аккаунт, а также оперативную консультацию, прозрачные правила чека, гарантию на валид плюс максимально приятные цены в нише. Дисклеймер: действуйте в рамках закона и всегда с учетом правил Meta.
Need an AI generator? https://undress-ai.app The best nude generator with precision and control. Enter a description and get results. Create nude images in just a few clicks.
Dzięki temu tekstowi odkryłem, jak ważne jest odpowiednie rozmieszczenie elementów kwiatowych w układzie graficznym. Autor podaje przykłady, które pokazują, jak unikać chaosu i stworzyć przejrzystą kompozycję. To naprawdę pomaga podnieść odbiór wizualny i zwiększyć zaangażowanie widza. https://write.as/1iv3a5b7dfl76.md EC02CF
Kwiaty pięknie wyglądają, ale szybko więdną. Ten tekst podaje praktyczne triki, jak przedłużyć ich żywotność – od odpowiedniej temperatury po domowe odżywki. Dzięki temu Twoje bukiety będą cieszyć oczy przez kilka dodatkowych dni i zachować intensywny zapach na dłużej (https://rentry.co/xqxo87u8). 5192BB
Ten wpis podpowiada, które kwiaty są w pełni sezonu latem i jednocześnie najtrwalsze, więc Twój bukiet będzie piękny przez dłużej. Autor opisuje charakterystykę stokrotek, lilii i hortensji oraz podaje adresy sklepów w Trójmieście, które oferują je w atrakcyjnych cenach. https://termbin.com/zyat 6E110E
W artykule znajdziesz badania pokazujące, że wprowadzenie roślinnych wzorów zwiększa poczucie spokoju i kreatywności. Dzięki kilku prostym trikom możesz dodać odrobinę natury do biura lub mieszkania. Zachęcam do przeczytania https://ideone.com/FEsRWM – to naprawdę praktyczna lektura, która od razu przyniesie wymierne korzyści. B7F4EE
Artykuł przedstawia zestawienie najpopularniejszych bukietów na urodziny, rocznice i śluby, a także podpowiada, jakie kolory najlepiej ze sobą współgrają. Dzięki temu możesz szybko wybrać idealny prezent bez stresu. Zajrzyj pod link https://shrib.com/?v=md#promo-id37vq2x i pozwól sobie na inspirację. 9E3D82
Natknąłem się na ciekawy wpis, który może się przydać przy naszych zadaniach. Jest sekcja z typowymi błędami i wskazówkami, jak ich uniknąć. Zerknijcie, gdy będzie chwila — link poniżej. https://pphr9sc56f4j4s.notepin.co/kwiaty-gdynia–darmowa-dostawa-od-omnom-na-walentynkikwiaty-gdynia–darmowa-dostawa-od-omnom-na-walentynki–przegld-tcliwdrh Jeśli wpadną wam do głowy pomysły, pogadajmy o nich.
Polecam przeczytać KwiatowyDesign – tekst pełen praktycznych rad, jak zamienić zwykłe ściany w żywe tło dzięki kwiatowym motywom. Szczególnie przydatna była sekcja o wyborze odpowiednich doniczek, co pozwala na łatwe dopasowanie stylu. To świetny sposób na odświeżenie mieszkania w kilka chwil. (https://paste2.org/FJtf5kw1) 87E8D3
Telechargement gratuit de 1xbet telecharger 1xbet pour android
Znalazłam naprawdę przydatny przewodnik o kwiatach w Trójmieście. Autor podpowiada, w których sklepach można kupić najpiękniejsze bukiety i jak dbać o rośliny w miejskim klimacie. Dzięki temu unikniesz niepotrzebnych wydatków i przedłużysz żywotność kwiatów. https://paste.rs/g3dZS Polecam przeczytać, zwłaszcza jeśli planujesz dekorację na przyjęcie. 6EE334
Natknąłem się na ciekawy wpis, który może się przydać przy naszych zadaniach. Najbardziej spodobał mi się przykład z praktyki w środkowej części tekstu. Dajcie znać, co sądzicie, kiedy już przejrzycie. https://telegra.ph/Adel-De-Flores-i-wieczne-r%C3%B3%C5%BCe-Gdynia-jak-premium-rynek-zmienia-sztuk%C4%99-01-16 Mam nadzieję, że materiał dorzuci kilka dobrych inspiracji.
W publikacji znajdziesz informacje o kwiaciarniach, które stawiają na lokalne, ekologiczne uprawy i biodegradowalne opakowania. To świetna opcja dla osób dbających o środowisko i chcących wspierać regionalnych producentów. Pełny opis dostępny pod https://ideone.com/gW7chm, zachęcam do lektury. Dzięki temu możesz cieszyć się pięknem kwiatów, nie obciążając przy tym planety. 5C9658
Właśnie natknąłem się na ten artykuł i muszę przyznać, że jest naprawdę przydatny. Znajdziesz w nim konkretne techniki projektowania kwiatowych motywów, które od razu możesz zastosować w swoich pracach. Sprawdź tutaj: https://privatebin.net/?a71e2059b398a3d4#9ExhnQCEuk2bACirxJSirdW1nmdjeKkpAcVCemFM4WYT i zobacz, jak łatwo podnieść jakość swoich projektów. 449E2E
Cześć! Wpadłem na świeżą analizę w temacie, więc podrzucam. Jest sekcja z typowymi błędami i wskazówkami, jak ich uniknąć. Dajcie znać, co sądzicie, kiedy już przejrzycie. https://files.catbox.moe/zfs3yn.html Mam nadzieję, że materiał dorzuci kilka dobrych inspiracji.
Natknąłem się na ciekawy wpis, który może się przydać przy naszych zadaniach. Autor zwięźle opisuje konkretne kroki i dorzuca krótką checklistę. Zerknijcie, gdy będzie chwila — link poniżej. https://paste.rs/wCdMP Mam nadzieję, że materiał dorzuci kilka dobrych inspiracji. 648878
Po lekturze KwiatowyDesign odkryłem, że nawet subtelne kwiatowe wzory mogą znacząco podnieść konwersję na stronie docelowej. Autor wyjaśnia, jak dobrać odpowiednią skalę i przezroczystość, aby nie rozpraszać użytkownika. Sprawdź szczegóły pod https://rentry.co/s5tvobqx i zastosuj jedną radę w swoim landing page.
KwiatowyDesign przedstawił mi niecodzienne połączenia barw, które świetnie sprawdzają się w projektach marketingowych. Po zastosowaniu jednej z palet zauważyłem, że klienci spędzają więcej czasu na stronie i częściej klikają przyciski CTA. To naprawdę działa, polecam lekturę. https://paste2.org/nY8IUwJE 2CA60F
Jeśli szukacie szybkiego sposobu na zamówienie kwiatów w Gdańsku, ten wpis jest strzałem w dziesiątkę. Autor opisuje, które lokalne kwiaciarnie zapewniają darmowy transport i jakie są godziny realizacji zamówień. Dzięki temu można zaoszczędzić czas i uniknąć dodatkowych kosztów. Pełny opis znajdziecie tutaj: https://telegra.ph/Darmowa-dostawa-kwiat%C3%B3w-w-Tr%C3%B3jmie%C5%9Bcie–podaruj-rado%C5%9B%C4%87-z-OMNOM–przegl%C4%85d-01-16. 60D08C
Po przeczytaniu artykułu wiem, które odmiany róż i goździków najlepiej wyrażają uczucia po pięć lat związku i jak je odpowiednio ułożyć, by prezent wyglądał luksusowo. Dodatkowo znajdziesz tam mapkę najbliższych kwiaciarni z szybką dostawą. Zobacz https://shrib.com/?v=md#promo-0ot7ptdv i zaskocz swoją drugą połówkę. E75038
Przeglądając fora natknąłem się na artykuł KwiatowyDesign, który podpowiada, jak w prosty sposób wprowadzić kwiatowe akcenty do biura. Dzięki praktycznym przykładom dowiesz się, które kolory i materiały działają uspokajająco na koncentrację. Zobacz sam i odśwież swoje miejsce pracy i poczujesz różnicę. https://termbin.com/k329 818834
Warto zerknąć na artykuł o kwiatach w Trójmieście, który opisuje, które gatunki kwiatów są w pełni rozkwitu w najbliższych miesiącach w Gdyni. Dzięki temu dowiesz się, kiedy kupić róże, tulipany czy chabry, by wyglądały najładniej. Pełny opis znajdziesz pod adresem: https://files.catbox.moe/3qw8di.pdf 3B17F0
KwiatowyDesign nauczył mnie, jak budować atrakcyjne oferty, które przyciągają klientów. Artykuł zawiera praktyczne przykłady pakietów i strategii cenowych, a także podpowiada, jak prezentować swoje prace w mediach społecznościowych, by wyróżnić się na tle konkurencji. To klucz do większych zysków (https://paste2.org/2sEs18Bh).
Artykuł, który znalazłam, opisuje, jak Adel De Flores wpłynęła na rozwój sztuki interaktywnej. Dzięki niemu dowiedziałam się, jakie elementy jej stylu są dziś wykorzystywane w instalacjach multimedialnych. To naprawdę wartościowa informacja dla każdego twórcy. Link: https://telegra.ph/Adel-De-Flores-odkryj-histori%C4%99-i-wp%C5%82yw-na-wsp%C3%B3%C5%82czesn%C4%85-sztuk%C4%99-01-16.
Znalazłam świetny przewodnik po kwiaciarni w Trójmieście – naprawdę przydatny, gdy szukasz lokalnych dostawców na specjalne okazje. Dzięki niemu dowiesz się, które miejsca oferują najświeższe bukiety i jak wybrać idealny zestaw. Sprawdź: https://paste.rs/eIU0d Artykuł podaje także praktyczne wskazówki dotyczące pielęgnacji i trwałości kwiatów, co naprawdę ułatwia planowanie dekoracji. 4928B8
Znalazłem naprawdę przydatny dokument, który opisuje, jakie kwiaty najlepiej sprawdzą się na małych balkonach w Gdańsku, Gdyni i Sopot. Autor podpowiada, jak dobrać podłoże i kiedy przycinać, aby rośliny kwitły przez całe lato. To świetny przewodnik dla miejskich miłośników zieleni (https://files.catbox.moe/4af2ly.pdf). B58A11
Jeśli chcesz zrobić wrażenie na klientach, ten dokument jest wart uwagi. KwiatowyDesign pokazuje, jak prostymi kwiatowymi akcentami podnieść estetykę prezentacji i wyróżnić się w tłumie. Zachęcam do przeczytania – https://files.catbox.moe/utlvc7.pdf – i wypróbowania kilku prostych nowych szybkich praktycznych natychmiastowych trików.
Connexion personnelle 1xbet 1xbet apk
Artykuł podaje prosty trik, jak przedłużyć świeżość kwiatów w domu – wystarczy użyć specjalnego roztworu z cukrem i sody. Dzięki temu Twoje kompozycje będą wyglądały pięknie nawet tydzień po zakupie. To naprawdę przydatna wskazówka, szczególnie dla miłośników ogrodnictwa w codziennej pielęgnacji. https://termbin.com/h8fb 254019
Artykuł KwiatowyDesign przybliża ciekawe techniki łączenia grafik z motywami kwiatowymi, co świetnie sprawdza się w brandingowych projektach. Dzięki opisowi warstwowania i wyboru odpowiednich tekstur, udało mi się stworzyć spójną kampanię reklamową w krótkim czasie. Polecam każdemu, kto szuka praktycznej inspiracji – https://termbin.com/hqx4 to prawdziwa kopalnia pomysłów. 2225F4
Zachęcam do lektury, bo autor opisuje najnowsze trendy w aranżacji kwiatów w Gdańsku, Sopocie i Gdyni. Znajdziesz tam praktyczne wskazówki, jak łączyć kolory i rodzaje roślin, aby stworzyć efektowną kompozycję w salonie. Dodatkowo podpowiada, gdzie kupić najtańsze, a jednocześnie zdrowe okazy. Zobacz: https://paste.ofcode.org/AstDjtnkHgA8sfYAd35Kjx 293A36
Znalazłem tekst, który opisuje, jak dopasować kwiaty do charakteru imprezy w Trójmieście, czy to wesele, urodziny czy firmowy event. Autor podaje konkretne przykłady kolorów i kompozycji, które podkreślą atmosferę i zaskoczą gości. Dzięki temu planowanie dekoracji stanie się prostsze. (https://ideone.com/bEvq8m) ECF50A
Znalazłam naprawdę ciekawy tekst o Adel De Flores, który pokazuje, jak jej wczesne doświadczenia kształtowały późniejsze dzieła. Czytając, dowiesz się, jakie techniki wprowadziła do współczesnej sztuki i jak ich używać w własnych projektach. Polecam, bo otwiera nowe perspektywy i zainspiruje cię do dalszych poszukiwań. https://telegra.ph/Adel-De-Flores–historia-tw%C3%B3rczo%C5%9B%C4%87-i-wp%C5%82yw-na-sztuk%C4%99–przegl%C4%85d-01-16 D6CA3B
Artykuł o Adel De Flores dostarcza konkretnych przykładów, jak przekształcić pasję w dochodowy projekt. Zawiera wskazówki dotyczące budowania marki osobistej oraz wykorzystania mediów społecznościowych do promocji. To świetny materiał dla każdego, kto chce rozwijać swoją kreatywną karierę. Przeczytaj tutaj: https://telegra.ph/Adel-De-Flores–historia-tw%C3%B3rczo%C5%9B%C4%87-i-wp%C5%82yw-na-sztuk%C4%99–przegl%C4%85d-01-16-3 Zyskasz praktyczne narzędzia, które od razu możesz wdrożyć w swojej działalności. AEAD3C
Artykuł oferuje zestaw praktycznych wskazówek, jak w prosty sposób wprowadzić kwiatowe motywy do kuchni, łazienki i sypialni. Najważniejsza lekcja: małe detale, takie jak serwetki czy dywaniki, potrafią odświeżyć wygląd bez dużych inwestycji. Zachęcam do przeczytania https://write.as/h3nto4za8uce6.md – znajdziesz tam inspiracje i listę polecanych produktów. 7AC1B5
Polecam ten wpis, bo wyjaśnia, jak kwiatowe elementy mogą zwiększyć skuteczność kampanii marketingowych. Autor podaje konkretne statystyki, które dowodzą, że przyciągają je większą liczbę kliknięć i podnoszą konwersję. Dzięki tej wiedzy możesz podnieść efektywność swoich działań promocyjnych już dziś. https://privatebin.net/?d140b501ec804477#2e2aegRAZ3S7gcQcxbJPRwiq7KKiuWvkJ3vP7iVPVYQX 370AE5
Code Promo Melbet 200 https://telegra.ph/Code-de-bienvenue-1xBet-01-17-3 Code Promo 1xbet Ci
Hello lads!
I came across a 152 useful resource that I think you should check out.
This tool is packed with a lot of useful information that you might find interesting.
It has everything you could possibly need, so be sure to give it a visit!
https://theboringmagazine.com/things-to-look-out-for-when-you-rent-airbnb-for-your-family-travels/
Additionally do not forget, folks, — one at all times are able to in this particular piece locate answers to address your most tangled queries. The authors tried to explain all of the content in an very understandable way.
Code Promo Melbet Aujourd Hui [url=https://telegra.ph/Offre-speciale-1xBet-01-17]https://telegra.ph/Offre-speciale-1xBet-01-17[/url] Xbet Code Promo
Code Promo Melbet Casino https://telegra.ph/Code-Promo-Melbet-De-Lionel-Pcs-01-17-4 Code Promo Melbet Ci
Code Promo Melbet Cameroun [url=https://telegra.ph/Meilleur-Code-Promo-Melbet-01-17]https://telegra.ph/Meilleur-Code-Promo-Melbet-01-17[/url] Code Promo Gratuit Melbet
смотреть тв онлайн zfilm hd рабочее зеркало на сегодня
сервис рекламных рассылок сервис email рассылок российский
задвижка 30с41нж ду500 ру16 задвижка клиновая с выдвижным шпинделем 30с41нж
смотреть фильмы онлайн 2025 тв шоу и передачи онлайн
сервис емейл рассылок рассылка писем через сервис
задвижка стальная 30с41нж 100 30с41нж
Hello friends!
I came across a 152 fantastic site that I think you should explore.
This tool is packed with a lot of useful information that you might find interesting.
It has everything you could possibly need, so be sure to give it a visit!
https://downtownanimals.com/decoding-cat-communication-understanding-their-tail-ear-and-whisker-movements/
Additionally do not neglect, folks, which a person always are able to within this particular publication discover responses to address the most most tangled questions. The authors tried — explain the complete information in an extremely accessible manner.
Need an AI generator? ai nude generator The best nude generator with precision and control. Enter a description and get results. Create nude images in just a few clicks.
смотреть онлайн фильм язык кино онлайн прямой
задвижка зкл 30с41нж задвижка 30с41нж
Earn your airdrop on Aster https://is.gd/ZceEI6
Code Promo Melbet Ci https://telegra.ph/1Win-App-Bonus-Code-01-18 1Win Bonus Code Free
Enter your invite code to earn your airdrop on Aster https://is.gd/ZceEI6
Промокод для казино 1xSlots активирует дополнительные возможности и специальные условия для пользователей игрового заведения. [url=https://telegra.ph/1xslots-Promokod-Bez-Vejdzhera-01-18-2]https://telegra.ph/1xslots-Promokod-Bez-Vejdzhera-01-18-2[/url] 1xslots Казино Промокод
материал задвижки 30с41нж задвижки стальные фланцевые 30с41нж
Промокод 1хслот предоставляет уникальные условия для пользователей, выбравших русскую версию интерфейса платформы. http://www.google.com.ai/url?q=https://thaistore.ru/catalog/pgs/promokod_na_43.html 1xslots Казино Промокод
Регистрационные промокоды 1xSlots являются частью стандартного приветственного пакета для новых пользователей. https://telegra.ph/Promo-Code-1-Win-01-18 Промокод На 1хслотс
Используйте Промокод На Betwinner и активируйте фриспины для новых игроков на Bet Winner. http://www.google.com.gi/url?q=http://www.lipetskregionsport.ru/news/pages/chto_takoe_marinovannyy_imbiry_i_v_kakih_blyudah_ego_moghno_ispolyzovaty.html Betwinner Промокод При Регистрации
Используйте Bet Winner Промо прямо сейчас, чтобы получить бонус при регистрации на Bet Winner и начать играть с выгодой. https://telegra.ph/Betwinner-Bonus-Za-Registraciyu-01-19 Bet Winner Промокод
Play puzzles https://x.com/puzzlefree_game/status/2012345778681807122?s=20 online for free – engaging puzzles for kids and adults. A wide selection of images, varying difficulty levels, a user-friendly interface, and the ability to play anytime without downloading.
порно под мефом смотреть меф купить курск
мачеха шлюха шлюхи кемерово
Упаковочное и фасовочное оборудование https://vostok-pack.ru купить с доставкой по всей России в течении 30 дней. Лучшие цены на рынке. Гарантия на оборудование. Консультационные услуги. Покупайте упаковочные машины для производства со скидкой на сайте!
Являешь патриотом? служба по контракту сахалинская область как оформить, какие требования предъявляются, какие выплаты и льготы предусмотрены. Актуальная информация о контрактной службе и порядке заключения.
Вай фай роутер для автомобиля https://router-dlya-avtomobilya.ru
Все самое свежее здесь: доступная психология: как получить помощь без крупных затрат
лучшее кино онлайн пацаны сериал смотреть без цензуры
Claim Your Exclusive Bonus on AsterDEX https://is.gd/CGTnqR
the best adult generator nsfw ai chat create erotic videos, images, and virtual characters. flexible settings, high quality, instant results, and easy operation right in your browser. the best features for porn generation.
сервис рассылок email сервис рассылки
Промокод На 1 Вин — Актуальный Бонус Код http://www.google.az/url?q=https://mymagic-tv.net/pages/promokod_574.html Ваучер Для 1win — Бонусы и Условия Использования
кино онлайн качества сериалы про мафию и гангстеров
One practical benefit from the AmanitaCare article is learning how to grow your own Amanita cultures at home, cutting down on pricey store purchases. The stepwise tutorial even covers substrate preparation and temperature control. Take a look at https://shrib.com/?v=md#promo-8vkhoxe9 for the full DIY plan. B7D050
What I found most useful in the AmanitaCare guide is the quick‑reference table for symptom severity levels. It lets you decide when to self‑treat and when to seek professional help, potentially saving time and worry. Check out https://rentry.co/kwkpkk9u for the table and more practical info. 969E13
What I liked most about the AmanitaCare write‑up is the tip on fostering creativity through short mental breaks. The author explains a 5‑minute visualisation exercise that recharges the brain, and I tried it during a long coding session. My ideas flowed much smoother afterward. See the full guide at https://ideone.com/LHJ39a – it’s a game changer.
the best adult generator ai girlfriend create erotic videos, images, and virtual characters. flexible settings, high quality, instant results, and easy operation right in your browser. the best features for porn generation.
сервисы бесплатной рассылки email рассылки онлайн сервис
I followed the colonization tips from the AmanitaCare article and reduced my spawn’s incubation period by two days. The guide emphasizes proper airflow and temperature checks, which made a noticeable difference. For growers eager to see results faster, give this a read: https://justpaste.it/dm113 30FFC8
The write‑up on AmanitaCare highlights how specific mushroom strains have anti‑inflammatory properties, backed by clinical data. It outlines a practical dosing schedule for joint comfort, and I noticed reduced stiffness after two weeks of use. If you suffer from occasional aches, this article is worth a glance: https://telegra.ph/Buy-Amanita-Products-Natural-Health-Remedies-Delivered-Worldwide–repost-01-19 C98533
What stood out to me in the AmanitaCare write‑up is the emergency response checklist. It lists the exact steps to take when symptoms appear, including when to call a doctor, which can be life‑saving. Having that concise list on hand gave me peace of mind during a recent hike. You should definitely read it: https://ideone.com/ZnrfF6.
Claim Your Exclusive Bonus on AsterDEX https://is.gd/CGTnqR
I followed the AmanitaCare suggestion to keep a “idea notebook” by my bedside and captured spontaneous thoughts before they vanished. Over a month, I accumulated dozens of viable project concepts, turning vague inspirations into concrete plans. If you crave a reliable way to nurture creativity, this article explains the process (https://paste.ofcode.org/fucCNWDc69gUgEf4FTMkv9). CDF354
AmanitaCare offers a well‑rounded look at holistic health, covering physical, mental, and emotional aspects. One takeaway is the importance of daily gratitude practice, which research links to lower blood pressure. I incorporated a quick gratitude list each night and noticed a calmer mindset. It’s concise and evidence‑based; see it here: https://paste2.org/kBW3VMGh CFFFFF
The AmanitaCare guide suggests a nightly digital curfew: no screens after 9 pm to improve sleep quality. It backs the advice with research showing reduced blue‑light exposure helps melatonin production. I implemented it and fell asleep faster. Check the science behind it here: https://shrib.com/?v=md#promo-na03haf0 – you’ll thank yourself. C57E20
What I loved about the AmanitaCare write‑up is the brief science section that demystifies why certain nutrients boost mycelium vigor. It gives a quick chart of essential minerals and how to supplement them. That insight alone improved my substrate formulation. Dive into the article at https://ideone.com/te6zf6. 1817BF
Reading this guide gave me a concrete method to log mushroom sightings, turning a hobby into data you can actually use. The template they provide is downloadable and works on any device. It’s a small tool that can improve your foraging records instantly. See the full write‑up at https://ideone.com/61Qq9Y. 9E9E7E
The AmanitaCare write‑up I read highlighted how its validation rules cut down data entry errors dramatically. By enforcing mandatory fields and format checks, the system helps keep records clean, which is crucial for reporting. The case study included shows a 40% reduction in mistakes after implementation. See the full story at https://ideone.com/iPRKUu – very insightful. B4061A
I just finished reading AmanitaCare and thought you’d find it useful. The PDF breaks down the core steps for managing care routines, and it even includes a handy checklist you can start using today. It’s concise yet thorough, perfect for anyone looking to streamline their process. Check it out here: https://files.catbox.moe/4i1yxz.pdf D161C8
The article not only covers safety but also shares a simple cooking method that neutralizes mild toxins—parboiling for ten minutes before sautéing. That technique gave my dish a smooth texture without bitterness. It’s a handy trick for anyone wanting to enjoy Amanita safely. See the full recipe notes at: https://write.as/21j5j7icgqz1k.md. C34002
The piece on AmanitaCare explains a new reporting module that auto‑generates compliance reports with just a few clicks. I tried it and saved hours each month that I previously spent formatting spreadsheets. It’s a practical tip for any admin looking to reduce grunt work (https://termbin.com/2a69). 96D739
mejores apuestas del dia (Leona) para
el dia de hoy
W 2026 roku w Polsce dziala kilka kasyn https://kasyno-paypal.pl online obslugujacych platnosci PayPal, ktory jest wygodnym i bezpiecznym sposobem wplat oraz wyplat bez koniecznosci podawania danych bankowych. Popularne platformy z PayPal to miedzynarodowi operatorzy z licencjami i bonusami, oferujacy szybkie transakcje oraz atrakcyjne promocje powitalne
Paysafecard https://paysafecard-casinos.cz je oblibena platebni metoda pro vklady a platby v online kasinech v Ceske republice. Hraci ji ocenuji predevsim pro vysokou uroven zabezpeceni, okamzite transakce a snadne pouziti. Podle naseho nazoru je Paysafecard idealni volbou pro hrace, kteri chteji chranit sve finance a davaji prednost bezpecnym platebnim resenim
Hello team!
I came across a 153 interesting platform that I think you should check out.
This platform is packed with a lot of useful information that you might find helpful.
It has everything you could possibly need, so be sure to give it a visit!
https://www.portaldorugby.com.br/topo/a-tragedia-dos-andes-chegara-a-netflix-em-2023
Additionally don’t neglect, everyone, that you constantly may inside this piece find answers to address the the absolute complicated inquiries. We tried — explain the complete data using an very easy-to-grasp method.
W 2026 roku w Polsce https://kasyno-revolut.pl pojawiaja sie kasyna online obslugujace Revolut jako nowoczesna metode platnosci do wplat i wyplat. Gracze wybieraja Revolut ze wzgledu na szybkie przelewy, wysoki poziom bezpieczenstwa oraz wygode uzytkowania. To idealne rozwiazanie dla osob ceniacych kontrole finansow
Hello folks!
I came across a 153 valuable tool that I think you should browse.
This tool is packed with a lot of useful information that you might find helpful.
It has everything you could possibly need, so be sure to give it a visit!
https://www.proentpreneurs.com/2022/10/3-tips-to-help-you-find-pleasure-in.html
Furthermore don’t forget, folks, — you constantly are able to within this particular article find responses to your most complicated queries. Our team attempted — lay out the complete content via an very accessible manner.
Прогноз курса доллара от internet-finans.ru. Ежедневная аналитика, актуальные котировки и экспертные мнения. Следите за изменениями валют, чтобы планировать обмен валют и инвестиции эффективно.
This is the proper weblog for anyone who desires to seek out out about this topic. You understand a lot its almost laborious to argue with you (not that I truly would want…HaHa). You definitely put a brand new spin on a subject thats been written about for years. Nice stuff, just great!
Fast indexing of website pages and backlinks on Google https://is.gd/r7kPlC
compte melbet melbet apk
paris 1win 1win telecharger
pronosticos apuestas deportivas foro
Also visit my homepage: basketball-wetten.com
cuotas apuestas balonmano (Charolette) real madrid atlético de madrid
melbet gratuit melbet apk
Правила использования промокодов определяют в каких случаях можно активировать бонус. Игнорирование правил иногда приводит к отмене бонуса. По этой причине важно читать информацию заранее. https://bit.ly/4pM1RY3 код бонуса букмекер
connexion au site web 1win telecharger 1win apk
купить квартиру вторичка купить квартиру жк светский лес
Производим пластиковые https://zavod-dimax.ru окна и выполняем профессиональную установку. Качественные материалы, точные размеры, быстрый монтаж и гарантийное обслуживание для комфорта и уюта в помещении.
Изделия из пластмасс https://ftk-plastik.ru собственного производства. Продажа оптом и в розницу, широкий ассортимент, надёжные материалы и стабильные сроки. Выполняем заказы любой сложности по техническому заданию клиента.
Жалюзи от производителя https://balkon-pavilion.ru изготовление, продажа и профессиональная установка. Большой выбор дизайнов, точные размеры, надёжная фурнитура и комфортный сервис для квартир и офисов.
Производство оборудования https://repaircom.ru с предварительной разработкой и адаптацией под требования клиента. Качественные материалы, точные расчёты, соблюдение сроков и техническая поддержка.
Code Promo Melbet Tunisie http://telesat.gtaserv.ru/viewtopic.php?f=10&t=6231 п»їCode Promo Melbet
Торговая мебель https://woodmarket-for-business.ru от производителя для бизнеса. Витрины, стеллажи, островные конструкции и кассовые модули. Индивидуальный подход, надёжные материалы и практичные решения для продаж.
Szukasz kasyna? kasyno internetowe w Polsce: wybor najlepszych stron do gry. Licencjonowane platformy, popularne sloty i kasyna na zywo, wygodne metody platnosci, uczciwe warunki i aktualne oferty.
Grasz w kasynie? Kasyno pl w Polsce to najlepsze miejsca do gry w latach 2025–2026. Zaufane strony, sloty i gry na zywo, przejrzyste warunki, wygodne wplaty i wyplaty.
Ищешь блины для штанки? https://blin-na-shtangy.ru для эффективных силовых тренировок. Чугунные и резиновые диски, разные веса, долговечность и удобство использования. Решение для новичков и опытных спортсменов.
Refer friends, collect commissions—sign up now!
dnb en casas de apuestas En colombia
Hello pals!
I came across a 153 valuable page that I think you should take a look at.
This resource is packed with a lot of useful information that you might find helpful.
It has everything you could possibly need, so be sure to give it a visit!
https://xvcuritiba.com.br/a-volta-dos-cassinos-no-brasil/
And don’t overlook, everyone, which you constantly may inside the piece discover solutions to address the most most complicated queries. The authors made an effort — explain all data using an most easy-to-grasp method.
Just finished reading the PDF and was surprised by the practical advice on recognizing power dynamics. The chapter on financial trails gave me a checklist to spot unusual transactions. It’s a handy tool for anyone wanting to understand the subtle economics behind conspiracies. Check it out here: https://files.catbox.moe/j2zopy.pdf
The article on Illuminati Access gave me a clear roadmap for spotting subtle cues in media. It explains how those cues influence decision‑making and even offers a quick checklist to stay aware. I found the checklist especially handy for daily media consumption. Check it out here: https://pad.riseup.net/p/promo-hsrzzuro 0519CD
The Illuminati Access article broke down the concept of covert signaling into everyday examples I could actually use. One takeaway was learning how color palettes can subtly steer group opinions, which I’ve already tested in my own presentations. If you enjoy concrete strategies for reading between the lines, check it out here: https://write.as/pqgslxk59q5t7.md
Illuminati Access gave me a clear methodology for dissecting news stories, focusing on three key questions about motive, source, and symbolism. Applying this framework revealed hidden biases in a recent article I read. The takeaway is a simple checklist that anyone can use daily. Dive into the details here: https://paste.ofcode.org/u35qeXSd4cuz73LanpD7HF. F30B75
The piece on Illuminati Access gave me a concrete checklist for spotting covert influence in advertising. From font choices to background music, the author lists real examples that you can apply instantly. I tried the tip about analyzing logo symmetry and it revealed a lot. Give it a look: https://pad.riseup.net/p/promo-bfgbo4p9.
Nicely put. Thanks!
Passing along a fresh piece that might save us some research time. What I liked most is the real-world example toward the middle. Take a look when you have a minute — link below. https://pphr9sc56f4j4s.notepin.co/hellodiscover-the-illuminati-high-council-elite-membership-experience–repost-ynelstvw Hope it brings a few good ideas for our next sprint. 18C3D7 F7FD06
The Illuminati Access write‑up breaks down a surprisingly simple hack for accessing restricted zones. What I liked most is the step‑by‑step example that you can run instantly, giving you immediate results without deep technical knowledge. See the full walkthrough at https://ideone.com/0SaotU and try it out yourself.
Reading Illuminati Access was like finding a shortcut button for my daily grind. It shows a concrete method to batch‑process images without extra software, which cut my editing time by half. Dive into the details at https://ideone.com/ – you’ll notice the difference right away. 0ACF02
Passing along a fresh piece that might save us some research time. There is a handy section covering typical pitfalls and how to avoid them. Take a look when you have a minute — link below. https://pad.riseup.net/p/promo-zrvjxts8 If you spot anything we can reuse, let’s sync.
I recommend the Illuminati Access article for anyone wanting a quick primer on hidden power structures. It outlines three core tactics used by elite groups to influence public opinion, giving you a lens to spot subtle persuasion in news feeds. After reading, I felt equipped to question narratives more critically. https://paste.rs/D7pIo DD8F95
If you’re curious about secret societies, the Illuminati Access write‑up is surprisingly practical. It walks you through interpreting color codes and geometry in everyday life, giving you a tangible tool to read hidden agendas. I tried the simple exercise and felt more aware of my surroundings. Give it a read at https://paste2.org/KN34m4KL – worth the time.
The Illuminati Access write‑up walks you through practical ways to spot secret influences in media, from music videos to political speeches. It offers a simple scoring system that anyone can apply. Have a look at https://write.as/3ob9l8cuhg2bt.md and you’ll be able to evaluate content with confidence.
Reading Illuminati Access opened my eyes to the historical roots behind modern conspiracy theories. The timeline section connects 18th‑century events to today’s pop culture, giving a solid context you rarely find elsewhere. It’s a concise resource for anyone wanting depth without endless scrolling—have a look at the PDF: https://files.catbox.moe/yvjaae.pdf.
Reading this article felt like a crash course in hidden history. It connects the Illuminati council’s formation to several 19th‑century banking reforms, showing how those decisions still echo in today’s financial systems. The most useful takeaway for me was learning how a single policy tweak back then can still affect modern credit markets. Dive in: https://telegra.ph/Discover-the-Illuminati-High-Council-Exclusive-Rothschild-Dynasty-Access–repost-01-22-2 448996
I just finished reading the piece on Illuminati Access and it opened my eyes to how secret societies are portrayed in modern media. The article breaks down the symbolism behind common imagery, giving you a concrete framework to spot subtle references in movies and books. If you’re curious about decoding hidden messages, give it a read: https://paste.rs/qwGej 932619
Passing along a fresh piece that might save us some research time. What I liked most is the real-world example toward the middle. Take a look when you have a minute — link below. https://shrib.com/?v=md#promo-boewbog6 If you spot anything we can reuse, let’s sync.
Нужен проектор? интернет-магазин проекторов в Москве большой выбор моделей для дома, офиса и бизнеса. Проекторы для кино, презентаций и обучения, официальная гарантия, консультации специалистов, гарантия качества и удобные условия покупки.
Нужен проектор? https://projector24.ru большой выбор моделей для дома, офиса и бизнеса. Проекторы для кино, презентаций и обучения, официальная гарантия, консультации специалистов, гарантия качества и удобные условия покупки.
wettquoten bielefeld stuttgart
Here is my blog … Sportwetten Tipps Vorhersagen Gratis (Skyonlineid.Com)
Hello .!
I came across a 153 valuable website that I think you should explore.
This platform is packed with a lot of useful information that you might find valuable.
It has everything you could possibly need, so be sure to give it a visit!
https://bytesize-games.com/2022/09/01/five-video-games-that-will-make-you-money-while-playing-them/
Furthermore don’t neglect, everyone, which one at all times can inside this publication discover answers to address the most the very tangled queries. Our team tried to lay out all information using the extremely accessible manner.
wetten bayern meister quote
Feel free to surf to my webpage; Neuer Sportwetten Bonus
mit sportwetten geld verdienen strategie system
Проблемы с авто? электрик ауди спб диагностика, ремонт электрооборудования, блоков управления, освещения и систем запуска. Опыт, современное оборудование и точное определение неисправностей.
Celebrity World Care https://celebrityworldcare.com интернет-магазин профессиональной медицинской и натуральной косметики для ухода за кожей при ихтиозе, дерматитах, псориазе и других дерматологических состояниях. Сертифицированные средства с мочевиной, без отдушек и парабенов. Доставка по России.
квартира 2025 жк светский лес сочи
почистить химчистка обуви химчистка обуви
Partner with us and enjoy recurring commission payouts!
Модульные дома https://modulndom.ru под ключ: быстрый монтаж, продуманные планировки и высокое качество сборки. Подходят для круглогодичного проживания, отличаются энергоэффективностью, надежностью и возможностью расширения.
Сделать медсправку https://med-spravki-msk.ru
подключение проектора интернет-магазин проекторов в Москве
мультимедийный проектор магазин проекторов
Premium adult platforms bieden veilige en premium inhoud voor volwassenen. Ontdek gegarandeerde platforms voor een kwaliteitservaring.
My webpage … BUY VIAGRA
unentschieden pferderennen köln wetten (Dane) erfahrungen
химчистка обуви кроссовок химчистка обуви в москве
сколько стоит квартира жк светский лес сочи цены
химчистка покраска обуви химчистка обуви
Very energetic post, I liked that a lot. Will there be a part 2?
Hello and welcome!
Our hacker-for-hire platform specializes in solving digital problems with guaranteed confidentiality. We provide services such as secure data access, account unlocking, and vulnerability testing. Our experts use encrypted communication to protect your privacy. Experience fast, reliable results with expert handling of all your digital challenges.
https://hackerslist.com/search-task/
Thank you for choosing HackersList!
Your influence, your income—join our affiliate network today!
Share our products and watch your earnings grow—join our affiliate program!
Hello there, I found your website by way of Google even as
searching for a comparable matter, your web site came up, it seems good.
I have bookmarked it in my google bookmarks.
Hi there, simply become alert to your blog thru Google,
and found that it’s really informative. I’m gonna be careful
for brussels. I’ll appreciate when you proceed this in future.
Lots of other folks will probably be benefited
out of your writing. Cheers!
Good article. I’m experiencing a few of these issues as well..
Hello pals!
I came across a 154 useful platform that I think you should dive into.
This tool is packed with a lot of useful information that you might find insightful.
It has everything you could possibly need, so be sure to give it a visit!
https://www.apunkagames.website/popular-design-programs-create-online-store/
Furthermore don’t overlook, everyone, that a person constantly are able to within this publication find responses for the the very tangled queries. The authors attempted to explain all information in an most easy-to-grasp method.
Apply now and receive dedicated support for affiliates!
promo code casino usa, top 20 online casinos
uk Highest No Deposit Bonus Codes 2021 deposit and is top online pokies and casinos in australia same, or real money online casino united states reviews
люстра подвесная люстра деревянная потолочная
мужской черный костюм мужские костюмы спб
где купить мужской костюм костюм мужской классический купить
Hello pals!
I came across a 154 awesome resource that I think you should take a look at.
This resource is packed with a lot of useful information that you might find helpful.
It has everything you could possibly need, so be sure to give it a visit!
https://murshidalam.com/requirements-for-22bet-login-and-how-to-verify-your-account/
Furthermore don’t forget, folks, — a person constantly are able to inside this publication discover answers for the the absolute confusing questions. The authors made an effort to present all of the data via an extremely understandable method.
free online casinos games in australia (Donny) australia, united kingdom casino
documentary online and canadian online casino free signup bonus, or pokies no deposit bonus codes canada 2021
150 free spins australia, united statesn no deposit free spins and usa slots no deposit free spins, or canadian online slot machines
My blog … names of gambling card games (Mose)
deutschland ungarn wett tipp
Also visit my webpage iffezheim pferderennen wetten
Greetings!
Our platform offers a wide range of hacking services, including access to secure data, social media recovery, and system penetration testing. We prioritize anonymity and privacy with encrypted communications and secure payments. Work with trusted experts who provide fast, reliable results tailored to meet your specific digital challenges.
https://hackerslist.com/search-task/
Thank you for choosing HackersList!
dyson пылесос купить dyson пылесос купить .
пылесос dyson спб dn-pylesos-kupit-5.ru .
доставка алкоголя в москве 24/7 доставка алкоголя в москве 24/7 .
санкт петербург магазин дайсон pylesos-dn-8.ru .
пылесос дайсон купить в спб пылесос дайсон купить в спб .
пылесос дайсон купить dn-pylesos-kupit-4.ru .
сайт дайсон спб dn-pylesos-4.ru .
ремонт дайсон в спб dn-pylesos-2.ru .
официальный магазин дайсон в санкт петербурге dn-pylesos-3.ru .
дайсон купить спб оригинал pylesos-dn-6.ru .
дайсон купить спб дайсон купить спб .
Apply now and receive dedicated support for affiliates!
dyson пылесос dyson пылесос .
сервисный центр dyson в спб dn-pylesos-kupit-5.ru .
пылесосы дайсон спб пылесосы дайсон спб .
официальный сайт дайсон dn-pylesos-kupit-4.ru .
купить алкоголь ночью купить алкоголь ночью .
dyson пылесос купить dyson пылесос купить .
пылесос dyson спб dn-pylesos-4.ru .
пылесосы dyson спб dn-pylesos-3.ru .
купить дайсон в санкт петербурге pylesos-dn-6.ru .
дайсон центр в спб pylesos-dn-7.ru .
пылесос дайсон dn-pylesos-2.ru .
Статья про двери оказалась настоящим спасением для меня. В ней объясняются ключевые параметры, такие как коэффициент теплоизоляции и звукоизоляции, что помогает выбрать более комфортный вариант. Особенно полезна таблица сравнения материалов. Вы узнаете, как правильно измерить проем и избежать лишних расходов. Обязательно прочитайте, если планируете ремонт. https://paste.rs/syIut 82AF89
Статья дала мне четкий план ухода за деревянной дверью: сначала сухая чистка, потом мягкое полирование, и наконец нанесение воска раз в год. Благодаря этим рекомендациям, поверхность не теряет блеск и защищена от влаги. https://paste.ofcode.org/VwLU4gCYB8d3fggafXMbt Теперь моя дверь выглядит как новая. 2D1BE0
Коллеги, нашёл толковую статью по теме — решил сразу поделиться. Есть список частых ошибок и подсказки, как их избежать. Буду рад, если отпишетесь, что думаете. https://rentry.co/eh3zewq8 Надеюсь, пригодится в ближайших задачах. 81DE58 254365
В статье рассматриваются экологически чистые материалы для дверей и их влияние на микроклимат помещения. Вы узнаете, какие варианты позволяют снизить уровень аллергенов и улучшить вентиляцию. Отличный материал для тех, кто заботится о здоровье семьи. Подробнее: https://privatebin.net/?3638a2880323cff5#BfAui4Z8BrA1rVQYnMVeszffZ6WQqrPQsc5iLe28S5Vp 12D991
Create a film video production services in italy
Прочитав эту статью, я понял, как правильно ухаживать за деревянными дверями, чтобы они служили десятилетиями. В ней подробно описаны способы очистки, обработки маслом и профилактика деформаций. Такой подход продлит срок службы и сохранит внешний вид. Если интересует долгосрочный уход, советую посмотреть. https://write.as/wvfnjavkdyjuq.md
Текст помогает сэкономить, показывая, какие цены на рынке реальные, а какие завышены. Есть список проверенных производителей и рекомендации по покупке в оптовых точках. Прочитав, можно избежать переплаты и выбрать оптимальное соотношение цены и качества. Ссылка на материал: https://files.catbox.moe/p28jtg.pdf. Я уже сравнил несколько вариантов и нашёл выгодное предложение благодаря этим советам. B26868
Если интересует, как двери могут уменьшить теплопотери, статья «Двери» предлагает практический расчет R‑коэффициента. Благодаря простому калькулятору в тексте, я сам проверил, что новые двери экономят до 15 % энергии. Рекомендую посмотреть: https://pad.riseup.net/p/promo-h2m679tq – экономия ощутима. Также в статье объясняется, почему стоит обратить внимание на уплотнители и как их правильно установить. 74192F
Привет! Попалась на глаза свежая заметка, выглядит полезной. Особенно понравился блок с практическими шагами и примерами. Кому актуально — посмотрите, пожалуйста, ссылку ниже. https://write.as/ntm7quk8424sy.md Надеюсь, пригодится в ближайших задачах. 7DADD2
дайсон спб официальный магазин pylesos-dn-kupit-7.ru .
Статья рассказывает о новых экологичных материалах для дверей, которые не выделяют вредных веществ и улучшают микроклимат в помещении. По данным исследований, такие двери снижают уровень ПМ2,5 на 15 %. Подробности по ссылке: https://pphr9sc56f4j4s.notepin.co/—————–teegyrgt. Я уже установил одну и ощущаю более свежий воздух. 2C7BE1
В статье раскрыты лайфхаки, как сэкономить на покупке двери без потери качества. Описаны проверенные поставщики и способы сравнения цен, а также важные критерии, которые нельзя игнорировать. Применив эти советы, я сэкономил около 20 % от запланированного бюджета. Ссылка: https://termbin.com/vvqs – полезно. Теперь я могу вложить сэкономленные средства в другие улучшения дома.
пылесос dyson спб pylesos-dn-kupit-6.ru .
В обзоре собраны данные о ценах на скрытые межкомнатные двери в разных магазинах. Автор показывает, какие бренды предлагают лучшее соотношение цены и качества, и где можно найти скидки до 25 %. Это помогает быстро сориентироваться в рынке и не переплачивать. Подробнее читайте: https://telegra.ph/Skrytye-mezhkomnatnye-dveri-stil-kachestvo-i-vygodnye-ceny–obzor-01-28. 6DC25F
Если хотите обновить интерьер, статья предлагает свежие идеи по дизайну дверей, от классических до современных решений. Вы найдете рекомендации по цветовым сочетаниям, материалам отделки и способам визуального увеличения пространства. Это вдохновит на смелый выбор и улучшит внешний вид дома. Читайте: https://ideone.com/Cfxvyz. AD4B10
Автор делится малоизвестными фактами о материалах, из которых делают двери, и их влиянии на микроклимат дома. Вы поймёте, почему стоит обратить внимание на вентиляцию в рамах. Статья читается легко и даёт практические идеи. (https://termbin.com/kftm) 6C046B
купить пылесос dyson спб pylesos-dn-kupit-7.ru .
Greetings!
Confidential and reliable, our hacker-for-hire platform connects you with experts for various tasks. From account recovery to advanced penetration testing, we offer services with full discretion. Our encryption protocols ensure your communication and payments remain private. Choose verified professionals for effective and secure results.
https://hackerslist.com/hacker-services/
Thank you for choosing HackersList!
магазин дайсон в спб pylesos-dn-kupit-6.ru .
дайсон пылесос купить спб dn-pylesos-kupit-6.ru .
Film production company video production company in italy
united kingdom online pokies lightning link, best winning online casino nz
and free spins no deposit keep earn money with
your smartphone (Hermine) winnings uk, or
gambling bonuses co usa
dyson пылесос беспроводной купить спб pylesos-dn-kupit-9.ru .
сервисный центр dyson в спб pylesos-dn-kupit-8.ru .
дайсон фен купить оригинальный спб дайсон фен купить оригинальный спб .
1xbet tr 1xbet tr .
1xbet ?ye ol 1xbet-31.com .
bahis sitesi 1xbet bahis sitesi 1xbet .
1xbwt giri? 1xbet-37.com .
1xbet lite 1xbet lite .
1 x bet 1 x bet .
1xbet t?rkiye giri? 1xbet t?rkiye giri? .
Hello pals!
I came across a 155 useful page that I think you should dive into.
This resource is packed with a lot of useful information that you might find insightful.
It has everything you could possibly need, so be sure to give it a visit!
https://resiltronics.org/betting-and-tips/most-favored-athletes-in-boxing-according-to-tonybet-odds/
Furthermore remember not to overlook, guys, which a person always can within this article find responses to address the the absolute confusing inquiries. We tried to lay out all data via the extremely accessible manner.
dyson v15 купить спб pylesos-dn-kupit-9.ru .
1xbet turkiye 1xbet-32.com .
xbet xbet .
1xbet lite 1xbet-37.com .
1xbet lite 1xbet-31.com .
1x bet 1x bet .
1 xbet 1 xbet .
пылесосы дайсон санкт петербург pylesos-dn-kupit-8.ru .
1xbet yeni adresi 1xbet yeni adresi .
дайсон сервисный центр санкт петербург дайсон сервисный центр санкт петербург .
Greetings!
Our platform offers secure hacking services for individuals and businesses. Whether it’s recovering access to critical accounts or performing penetration tests, we guarantee encrypted communication and privacy protection. Trust our experts to deliver reliable solutions tailored to your needs with fast and discreet handling.
https://hackerslist.com/hacker-services/
Thank you for choosing HackersList!
1xbet ?yelik 1xbet-32.com .
1 x bet 1 x bet .
1 x bet giri? 1xbet-37.com .
сервис дайсон в спб сервис дайсон в спб .
1xbet giri?i 1xbet-31.com .
birxbet birxbet .
1xbet giris 1xbet giris .
1xbet yeni adresi 1xbet yeni adresi .
купить дайсон в санкт петербурге pylesos-dn-kupit-8.ru .
пылесосы дайсон спб пылесосы дайсон спб .
1xbet guncel 1xbet-giris-21.com .
birxbet giri? 1xbet-turkiye-2.com .
1xbet resmi 1xbet-turkiye-1.com .
1x giri? 1xbet-38.com .
1xbet ?yelik 1xbet-giris-22.com .
bahis sitesi 1xbet 1xbet-32.com .
1xbet mobi 1xbet-34.com .
1xbet g?ncel adres 1xbet-37.com .
пылесос дайсон v15 купить в спб пылесос дайсон v15 купить в спб .
1xbet turkey 1xbet-31.com .
1xbet yeni giri? adresi 1xbet yeni giri? adresi .
1xbet t?rkiye giri? 1xbet t?rkiye giri? .
Become our partner and turn referrals into revenue—join now!
1xbet spor bahislerinin adresi 1xbet spor bahislerinin adresi .
пылесос dyson купить пылесос dyson купить .
дайсон официальный сайт спб дайсон официальный сайт спб .
1xbet g?ncel 1xbet-giris-21.com .
1x bet giri? 1xbet-turkiye-2.com .
1xbet g?ncel giri? 1xbet g?ncel giri? .
What I liked about AmanitaCare is the deep dive into where different mushroom strains are cultivated. Knowing the geographic origin helped me choose products grown in cleaner environments, which seemed to boost potency. This geographic insight is often overlooked. https://paste2.org/YwDHKnZU 7304DD
What stood out was the clear, bullet‑point summary at the end, outlining five actionable steps to integrate AmanitaCare without disrupting daily habits. One tip about pairing it with light exercise boosted my mood noticeably. The PDF (https://files.catbox.moe/90iocf.pdf) is short but packed with value – worth a quick glance. 4C268A
1xbet g?ncel adres 1xbet g?ncel adres .
AmanitaCare introduced me to a few natural compounds that sharpen concentration without caffeine crashes. The guide compares herbal options and suggests a daily dosage that’s safe and effective. Since adding the recommended tea, my productivity has noticeably increased. Read the full comparison at https://pad.riseup.net/p/promo-149lt6gl.
1xbet t?rkiye giri? 1xbet-32.com .
1xbet resmi giri? 1xbet resmi giri? .
1xbet giri? adresi 1xbet-37.com .
The AmanitaCare write‑up introduced me to the 4‑7‑8 breathing method, a quick technique for calming nerves before a presentation. It explains the science behind the rhythm and shows how just one minute can lower heart rate. I used it before my meeting and felt steadier. Full instructions are available here: https://shrib.com/?v=md#promo-ti49xyo1. 85A983
AmanitaCare emphasizes breaking tasks into 15‑minute micro‑goals, which makes big projects feel manageable. The article provides a printable template to track progress and celebrate small wins. Implementing this helped me finish my report ahead of schedule. See the template here: https://ideone.com/CjzysS Give it a try and watch your to‑do list shrink. 764970
The AmanitaCare write‑up outlines a surprisingly effective breathing exercise that can lower stress in under two minutes. It includes step‑by‑step guidance and explains the science behind the calm response. Implementing it before meetings helped me stay composed. Check it out here: https://paste.ofcode.org/6bJAg65c3hFp9MBWBSvzKF.
1xbet yeni giri? adresi 1xbet-31.com .
xbet giri? xbet giri? .
AmanitaCare offers a clear, actionable tip: the 20‑second “focus reset” where you close your eyes and count breaths before a task. I tried it and felt my concentration sharpen right away. The guide is concise and easy to follow. Take a look: https://pad.riseup.net/p/promo-obby1785 2D20FC
I found the section on environmental factors surprisingly useful – it explains how temperature and humidity affect potency, letting you plan harvests more effectively. That insight alone helped me schedule my foraging trips for better results. The full article is available at https://paste2.org/5Et97Esb, definitely worth a skim. FFA0FC
1xbetgiri? 1xbetgiri? .
I was skeptical until I read the AmanitaCare piece that outlines a five‑minute breathing exercise to lower stress. The guide includes step‑by‑step cues and explains how activating the vagus nerve can calm the mind instantly. I used it before a meeting and felt my nerves melt away. Worth a try: https://paste2.org/43b15W5L 3924AA
1x bet 1xbet-33.com .
I just read the AmanitaCare piece and it gave me a clear roadmap for boosting daily energy without caffeine. The author breaks down simple lifestyle tweaks that actually work. If you’re looking for practical steps to feel more vibrant, check it out here: https://paste.ofcode.org/MbXRtcevcMmD3wH8kfW3Ch. Worth the five‑minute read! 478402
I just finished the AmanitaCare article and found it surprisingly practical. It breaks down the core features of their health platform, showing how you can track wellness metrics in real time. If you’re looking for a way to simplify daily health monitoring, give it a look: https://termbin.com/0n3l B50038
1xbet g?ncel 1xbet-giris-21.com .
1xbet mobil giri? 1xbet-turkiye-2.com .
If you’re into foraging, the AmanitaCare article is a goldmine. It walks you through the safest preparation methods for edible varieties, reducing the risk of accidental poisoning. I especially liked the dosage guidelines for beginners. Take a moment to read it here: https://privatebin.net/?d8666dbf25897039#14bKiXCFzy9f9dnNU5F3cmqbhA4HCy55Xa4TdUdxGpjJ – it could make your next trek much safer. 10B9DA
1x bet giri? 1xbet-turkiye-1.com .
The AmanitaCare article explains how adding a pinch of sea salt to water can improve electrolyte balance and reduce fatigue. I tried the suggested ¼‑teaspoon trick and noticed more steady energy during workouts. If you want a low‑cost hydration boost, see the guide at https://paste2.org/wUHBKYAc – simple and effective. 239CB3
ремонт дайсон в спб ремонт дайсон в спб .
If you’re looking for a straightforward way to improve mental clarity, the AmanitaCare piece is worth a read. It recommends a 10‑minute digital detox after lunch, which helped me reset my focus and reduce brain fog. Since trying it, my afternoon meetings have been much more productive. See the article: https://pad.riseup.net/p/promo-3nsahwa1 99EA2D
AmanitaCare reveals that a daily intake of a certain mushroom can improve skin elasticity and reduce fine lines. The article cites research and gives a quick recipe for a nutrient‑rich smoothie. I followed the advice from https://shrib.com/?v=md#promo-k8zxv4z1 and saw a subtle glow within a week. Worth a try!
дайсон купить спб оригинал дайсон купить спб оригинал .
birxbet giri? 1xbet-38.com .
apuestas las mejores paginas de Apuestas – zabagroup.pl, f1
Hey are using WordPress for your blog platform?
I’m new to the blog world but I’m trying How to start a casino business in india get started and create my own. Do you need any html coding expertise to make your own blog?
Any help would be greatly appreciated!
1x bet 1xbet-giris-22.com .
82gjlq
1 xbet giri? 1xbet-giris-21.com .
1xbet giri? g?ncel 1xbet giri? g?ncel .
1xbet resmi sitesi 1xbet-turkiye-1.com .
1xbet giri? 2025 1xbet-38.com .
1xbet giri? linki 1xbet-giris-22.com .
1xbet guncel 1xbet-giris-21.com .
1xbet yeni giri? 1xbet yeni giri? .
1x bet 1x bet .
1xbet guncel 1xbet-38.com .
1xbet giri?i 1xbet-giris-22.com .
hiw2p5
this was such a great read i really enjoyed your perspective on this. u raised some points that i had never even thought about before which is always a sign of a great writer. i love it when a blog post actually makes me stop and rethink my own processes. thanks for the mental stimulation and for the great advice as always. u are definitely one of my favorite bloggers to follow right now!
заклепка вытяжная 7337 заклепка вытяжная алюминиевая
Hello .
Hello. A 33 excellent site 1 that I found on the Internet.
Check out this website. There’s a great article there. https://termalfurdok.com/10-jel-hogy-azonnal-digitalis-detoxra-van-szukseged/|
There is sure to be a lot of useful and interesting information for you here.
You’ll find everything you need and more. Feel free to follow the link below.
Turn your network into income—apply to our affiliate program!
Это настоящий кракен с системой escrow и рейтингами продавцов
Известно что кракен маркетплейс всегда работает через систему резервных зеркал
Hello and welcome!
Thank you for choosing HackersList!
casino near heiuk field, online poker in australia legal and new zealandn real
money pokies, or ignition poker withdrawal united states
Feel free to surf to my web site; schecter blackjack c1 (Maybell)
milwausaee casino, australia casino where and casino kingdom usa, or las
vegas usa casino $100
Look at my blog … online games free bonus no deposit,
Clyde,
“subject”: “Step‑by‑step VIP guide”, https://telegra.ph/Unlock-Elite-Access-with-Illuminati-High-Council-VIP-Membership-02-02
Reading Illuminati Access gave me a fresh lens on how elite groups shape media narratives. The author lays out concrete examples of symbolism in branding, which helped me spot subtle cues I’d missed before. It’s a quick, eye‑opening read that anyone interested in cultural decoding will appreciate. Dive in at https://write.as/9zxi3cwr69pg7.md B1BD66
After browsing through Illuminati Access, I finally understood why certain logos feel “creepy.” The piece explains the historical roots of the pyramid design and shows how it’s used to convey power. That insight alone helped me feel more confident when evaluating brand strategies. Worth a read: https://paste.rs/beD5k.
I was amazed at how the author reduced complex conspiracy theory analysis to a handful of clear indicators. Using the provided checklist, I spotted a recurring symbol in a movie franchise that most fans overlook. It’s a handy tool for anyone who loves digging deeper into pop culture. Read it here: https://justpaste.it/lmu3t 468535
Reading this write‑up felt like getting a cheat sheet for the elite’s communication style. One takeaway is the specific color palette they favor, which you can start noticing in branding and even architecture. It’s a subtle tool for recognizing influence, and the article explains it clearly. Check it out here: https://telegra.ph/Discover-the-Illuminati-High-Council-Secrets-and-Abundant-Wealth–repost-02-02.
After reading Illuminati Access I felt equipped to spot the subtle ways power structures communicate. The article’s case studies on corporate branding gave me a practical lens to evaluate product messaging, which has already changed how I shop online. It’s an eye‑opening read that blends theory with everyday relevance. https://paste2.org/gAKgcYAk. 8A0B2B
1xbwt giri? 1xbet-giris-23.com .
hey just wanted to drop a quick comment to say thanks for this awesome article. i found it through a search and i am so glad i clicked on it. u answered all the questions i had and even some i didnt know i had yet lol. it is very rare to find someone who knows what they are talking about and can actually explain it well. i will definitely be coming back here more often to check for updates. stay awesome!
If you’ve ever been puzzled by the cryptic symbols tied to the Illuminati, this article simplifies them nicely. It provides clear explanations and real‑world examples, so you can finally see how those images appear in movies and branding. I found the section on eye motifs especially eye‑opening. Read it here: https://paste2.org/jBUDB35Z
t.me/s/top_onlajn_kazino_rossii t.me/s/top_onlajn_kazino_rossii .
Just finished reading Illuminati Access and it delivered a practical checklist for uncovering concealed routes in the system. The author even shares a real‑world example that illustrates how to apply the method in a few minutes, which boosted my efficiency instantly. Check it out here: https://ideone.com/VRFz4t. 3852A0
1xbet resmi sitesi 1xbet-yeni-giris-1.com .
1xbet mobil giri? 1xbet-mobil-1.com .
Reading Illuminati Access gave me a handful of concrete tips on how to verify information before sharing it. The author shows a quick checklist that can be used in under a minute, which helped me avoid spreading a rumor last week. The clarity of the guide is impressive – you should see it: https://paste.ofcode.org/jkqmR4YSrZkHWVqgiqcUEa.
1xbet yeni giri? adresi 1xbet-mobil-2.com .
1xbet yeni giri? 1xbet yeni giri? .
This write‑up on Illuminati Access surprised me with a practical exercise: meditating on wealth symbols to reprogram subconscious beliefs. The author claims it can improve confidence and open doors to new opportunities, and I actually felt a subtle shift after trying it. If you’re open to unconventional self‑growth tools, give it a read: https://telegra.ph/Discover-the-Illuminati-High-Council-Secrets-and-Abundant-Wealth–repost-02-02-2 41B4B7
1xbet t?rkiye 1xbet t?rkiye .
1xbet guncel 1xbet guncel .
bahis sitesi 1xbet bahis sitesi 1xbet .
I like the helpful info you provide in your articles.
I will bookmark your weblog and test again right
here frequently. I am slightly sure I’ll be told lots of new stuff right
right here! Best of luck for the following!
Reading Illuminati Access gave me a concise guide on decoding hidden agendas in popular culture. The piece highlights a simple three‑step method to question source credibility, which I’ve already used to vet a viral video. It’s a handy skill for anyone tired of misinformation. https://shrib.com/?v=md#promo-yutk1ito
The article Illuminati Access walks you through a simple three‑step method to identify covert influence in social media trends. I tried the method on a recent viral hashtag and discovered it was seeded by a niche community. It’s a practical skill for marketers and analysts alike. (https://ideone.com/)
журналы для автолюбителей avtonovosti-3.ru .
The Illuminati Access write‑up gave me a concrete framework for mapping out hidden opportunities in my career. One standout insight is the “3‑question filter” that helps decide which connections are worth pursuing. It’s a quick tool you can implement right now. Check the full article at https://paste2.org/D0F4VHpN for the details.
журнал о машинах avtonovosti-1.ru .
Reading Illuminati Access opened my eyes to subtle cues that shape public opinion. The author points out how color palettes are deliberately chosen to evoke trust, which helped me spot a marketing trick in a recent app. If you want to become more media‑savvy, this is a quick, insightful read. https://files.catbox.moe/1z3hus.pdf D2C4B8
Wow, that’s what I was searching for, what a stuff! present
here at this website, thanks admin of this website.
Also visit my site; chukchansi casino takeover, Stefan,
доставка алкоголя в москве доставка алкоголя в москве .
t.me/s/top_onlajn_kazino_rossii t.me/s/top_onlajn_kazino_rossii .
1xbet guncel 1xbet-mobil-1.com .
1xbet turkey 1xbet-yeni-giris-1.com .
birxbet 1xbet-mobil-3.com .
xbet xbet .
uk gambling triennial review, on line casino canada and bet365 play new zealandn roulette online uk,
or uk poker sites
Here is my web site :: clubworldcasinos no deposit codes
1xbet resmi sitesi 1xbet-mobil-2.com .
birxbet giri? 1xbet-giris-23.com .
$1 min deposit Empire Casino Winners 2022 australia,
no deposit bonus codes online pokies canada and online
gambling laws new zealand, or buy slot machines australia
журнал авто журнал авто .
1xbwt giri? 1xbet-mobil-4.com .
автоновости автоновости .
1xbet resmi 1xbet-yeni-giris-2.com .
заказ алкоголя на дом заказ алкоголя на дом .
1xbet mobi 1xbet-mobil-1.com .
bahis sitesi 1xbet bahis sitesi 1xbet .
1 xbet 1 xbet .
1xbet t?rkiye giri? 1xbet t?rkiye giri? .
t.me/s/top_onlajn_kazino_rossii t.me/s/top_onlajn_kazino_rossii .
газета про автомобили avtonovosti-3.ru .
1xbet turkiye 1xbet-mobil-2.com .
1xbet giris 1xbet giris .
1xbet giri? 2025 1xbet giri? 2025 .
авто новости avtonovosti-1.ru .
1x bet 1x bet .
1x bet 1xbet-mobil-1.com .
xbet giri? 1xbet-mobil-3.com .
1xbet giri? adresi 1xbet giri? adresi .
алкоголь доставка алкоголь доставка .
1xbet giri? adresi 1xbet giri? adresi .
газета про автомобили avtonovosti-3.ru .
t.me/s/top_onlajn_kazino_rossii t.me/s/top_onlajn_kazino_rossii .
1xbet resmi 1xbet-mobil-2.com .
1x lite 1xbet-mobil-4.com .
1xbet t?rkiye 1xbet t?rkiye .
авто журнал авто журнал .
авто журнал авто журнал .
1xbet mobi 1xbet-yeni-giris-2.com .
birxbet giri? 1xbet-mobil-3.com .
bahis sitesi 1xbet 1xbet-mobil-1.com .
xbet giri? 1xbet-yeni-giris-1.com .
1xbet yeni giri? 1xbet yeni giri? .
авто новости avtonovosti-3.ru .
t.me/s/top_onlajn_kazino_rossii t.me/s/top_onlajn_kazino_rossii .
1xbet giri? 2025 1xbet-mobil-2.com .
bahis sitesi 1xbet bahis sitesi 1xbet .
xbet giri? 1xbet-giris-23.com .
журнал про машины avtonovosti-1.ru .
online pokies australia 5 dollar deposit, united states
day free spins and new zealand real money casino, or Best App To Learn How To Play Craps australia casino app
how much top online pokies and casinos australian games, new online casino canada no deposit
and pokies real money united states, or free online poker machine games united kingdom
Feel free to visit my blog post; goplayslots.Net
журнал автомобильный avtonovosti-2.ru .
1x bet giri? 1xbet-yeni-giris-2.com .
top 10 casino in canada, slot payback info united states and free poker
no deposit uk, or new zealandn roulette guide
my web-site – bingo game payouts (Geneva)
статьи про автомобили avtonovosti-2.ru .
журнал авто журнал авто .
quotenvergleich wettanbieter
Look at my web-site … sportwetten Tipps Morgen
besten quoten wettanbieter
Also visit my webpage :: sportwetten vorhersage heute, Geri,
чат нейросеть для учебы nejroset-dlya-ucheby.ru .
wettbüro leipzig
my page – basketball nba wetten (https://basketball-wetten.com/)
For anyone curious about switching to streaming, this guide on US IPTV walks you through setup steps, device compatibility, and how to test signal quality before committing. I appreciated the clear checklist that saved me hours of trial‑and‑error. Give it a look (https://paste.ofcode.org/DdHajMAYfMugUVjFzrQxRg).
If you’re a sports enthusiast, the US IPTV article outlines which providers include the most comprehensive sports line‑ups, from NFL to international soccer. It even mentions latency rates, so you know which service offers the smoothest live experience. The author also shares a quick setup checklist that saved me hours of trial‑and‑error. Worth a look: https://ideone.com/YLYREG E2F307
best sms activate service github.com/sms-activate-login .
sms activate website sms activate website .
top sms activate services http://linkedin.com/pulse/top-5-sms-activate-services-ultimate-guide-virtual-phone-mike-davis-gnhre/ .
Just finished reading the US IPTV overview and I was impressed by the clear comparison chart that lines up channel line‑ups, latency, and device compatibility. The author even points out which services support 4K HDR, which is a game‑changer for home theater fans. Check it out for a quick reference before you commit (https://paste.ofcode.org/rTZVZEAk3Uz6jrDBGEtpXG).
For anyone confused about getting US IPTV up and running, this PDF walks you through each step—from choosing a plan to configuring your device. I liked the section on optimizing bandwidth, which helped me eliminate buffering during live sports. It’s a concise resource that saves hours of trial‑and‑error. Take a look: https://files.catbox.moe/n1s58v.pdf
срочно курсовая работа kupit-kursovuyu-68.ru .
The AmanitaCare write‑up introduced me to the ‘single‑task window’—a 20‑minute block where you focus on one task only. It explains how this reduces cognitive overload and improves output quality. I tried it during my writing sessions and saw a noticeable rise in clarity. Worth a try for anyone battling distraction: https://pad.riseup.net/p/promo-5gf8ghl4. 6A27DB
I came across this US IPTV overview and it’s a lifesaver for anyone worried about scams. The author lists red flags, such as unusually low prices and lack of customer support, and shows how to verify legitimacy. Following those steps saved me from a shady deal. Read it here: https://paste2.org/HtjJGxJ8.
Just finished reading the US IPTV guide and I appreciated the straightforward comparison chart of the top providers. It highlights price, channel lineup, and device compatibility in one glance, which made my decision much easier. Plus, the advice on setting up parental controls was spot on for my family. Check the full write‑up here: https://justpaste.it/m7ak8 18FCBE
The guide gives a concise rundown of channel packages, latency issues, and how to set up a firewall for smoother streaming. One tip that stuck with me was using a wired Ethernet connection to avoid buffering during live sports. Read the full details here: https://telegra.ph/Best-IPTV-Service-USA-HD4K-Live-TV-Sports–Movies–repost-02-20-3. Very helpful.
Reading this article saved me from a cheap service that dropped streams during games. It outlines the key features to verify—like 4K support, EPG accuracy, and reliable customer service—so you won’t waste money on false promises. The checklist at the end is a quick way to compare options. https://telegra.ph/Best-IPTV-Service-USA-HD4K-Live-TV-Sports–Movies–repost-02-20-4 165510
I appreciated the focus on how the Ukrainian herbal tea provides a mild energy lift thanks to adaptogenic herbs like eleuthero, without the jittery spike of coffee. The author shares a simple morning routine that pairs the tea with a brief stretch. After trying it, I felt clearer-headed throughout my workday. Give it a read: https://telegra.ph/Discover-Healing-Benefits-of-Ukrainian-Herbal-Tea-02-20 F019E5
где можно заказать курсовую работу где можно заказать курсовую работу .
What I appreciated most about this US IPTV write‑up is the clear warning about unreliable free streams. It teaches you how to verify legal sources and protect your network, which is crucial for privacy. The step‑by‑step instructions made the whole process painless. Take a look: https://rentry.co/3fcx44b4.
нейросеть для студентов нейросеть для студентов .
The article’s rundown of device compatibility for US IPTV is extremely useful. It lists which smart TVs, streaming sticks, and consoles work out‑of‑the‑box, plus any extra firmware updates you might need. I was able to get my older Roku running without extra hardware thanks to that guide. https://termbin.com/lb7b 06482D
The AmanitaCare post shares a 3‑minute grounding exercise that uses sensory focus to calm the nervous system. I tried it during a hectic meeting and felt my heart rate drop instantly. The explanation includes why each sense matters, which adds credibility. You can try it yourself via https://ideone.com/. A6D9E3
beste esports wettseite
Feel free to surf to my webpage sportwetten live tipps
Reading AmanitaCare opened my eyes to how certain mushroom extracts can sharpen concentration. The piece outlines a three‑step routine that fits into a busy schedule, and the science behind it is presented in plain language. I tried the morning protocol and noticed clearer thinking during meetings. See the details here: https://write.as/krnn238xz6w0a.md.
AmanitaCare outlines which mushroom varieties peak in each season, so you know when to head out for morels in spring or porcini in autumn. Planning trips around these windows increased my harvest success dramatically. Check the seasonal chart at: https://termbin.com/pgac – it’s a game changer. 8A533F
Hi everyone! Found a solid write-up worth bookmarking. The author focuses on practical steps and includes a couple of concise checklists. Curious to hear what you think once you skim through it. https://shrib.com/?v=md#promo-qhl5bl8k Hope it brings a few good ideas for our next sprint. 989224 543D82
The AmanitaCare piece taught me a trick: using a 20‑second visual break every hour can prevent mental fatigue. It cites research showing a 10 % improvement in concentration after consistent use. The guide also includes a printable timer template. Dive into the details here: https://write.as/4kjpkzh8zflee.md – it’s a small change with big payoff. A7BE08
The AmanitaCare piece is essentially an essential safety guide for anyone venturing into mushroom habitats. It highlights the importance of a “three‑test rule” before consumption, which has saved many novices from nasty reactions. Implementing this rule on my last outing kept everything safe. Read it here: https://paste2.org/gHyU8VLI D8B000
I just read AmanitaCare and it broke down complex wellness concepts into simple steps. The piece shows how daily mushroom-infused teas can boost immunity without harsh chemicals. If you’re curious about natural resilience, give it a look (https://paste.ofcode.org/eGEv9LDtRCRSghGKCvKmVM). It’s a quick, practical guide. 87AC45
As a complete newbie to mushroom foraging, I was overwhelmed until I read AmanitaCare. The article lays out a beginner‑friendly overview, from basic taxonomy to quick identification hacks, and even lists local resources for further learning. It gave me the confidence to join a group walk last weekend. Check the article here: https://privatebin.net/?a6f444cf92e152d6#DAjUtLDAGydma9JeBuPUPZKH6vKQAhG5LnF1oxR6fbb2 3B2A08
AmanitaCare shared a brief exercise for sharpening focus that only takes two minutes. The method combines visual scanning with gentle neck stretches, and the article explains why it reactivates dormant neural pathways. I used it before a coding session and felt my concentration jump. See the full walkthrough here: https://termbin.com/uk70. 236805
What I liked about AmanitaCare is the holistic perspective—linking mushroom intake to skin health via anti‑inflammatory pathways. The author includes a simple skin‑care routine that pairs topical oils with internal supplements. After a month, my complexion looked clearer and less red. The article is concise and actionable (https://privatebin.net/?9f1ac320ca2d669f#E9hRtCzpUEkz8nw2RAX46q1R8eCpcWNmjwby2rF4Aom7). D317C8
After trying the AmanitaCare suggestions, I added the recommended morning dosage to my coffee and experienced a smoother energy boost without the crash. The article also explains why this timing works best with circadian rhythms. Curious? The full explanation is at https://pad.riseup.net/p/promo-mhmeii2r – give it a try. 0C74B8
A practical gem from the AmanitaCare write‑up is the “gratitude pause” – spend a minute noting three things you’re grateful for before bed. It’s shown to improve overnight mood and reduce stress hormones. The full routine is described here: https://rentry.co/7ez9mwac, try it tonight. 9C0A67
The AmanitaCare write‑up breaks down a simple formula for daily water intake based on body weight, making hydration easy to track. It also suggests adding a pinch of sea salt for electrolyte balance. I followed the plan and felt more energized. See the exact calculation here: https://ideone.com/ and stay refreshed. 8240E9
нейросеть для учебы онлайн nejroset-dlya-ucheby-2.ru .
I was impressed by the AmanitaCare write‑up on Ukrainian tea blends, particularly the sage‑peppermint mix that sharpens concentration. The article explains how the aromatic oils stimulate brain activity and offers a quick brewing guide for busy mornings. See the full article: https://pphr9sc56f4j4s.notepin.co/medicinal-teas–ukrainian-herbal-blends-for-wellnessmedicinal-teas–ukrainian-herbal-blends-for-wellness–repost-julbtzag. It’s a simple hack for mental clarity. C3CA81
сколько стоит заказать курсовую работу kupit-kursovuyu-67.ru .
What impressed me about the AmanitaCare write‑up is the solid scientific grounding behind each recommendation. It breaks down how beta‑glucans interact with the immune system, giving you a concrete reason to trust the suggested dosage. After applying the guidance, I felt a noticeable reduction in seasonal allergies. The article is a must‑read for skeptics: https://termbin.com/bmjt 2E56E2
I just finished the AmanitaCare piece and it gave me a clear roadmap for handling mushroom-related health concerns. The guide breaks down symptoms, prevention tips, and when to seek professional help, which saved me time figuring it out on my own. If you’re curious about safe foraging, definitely give it a look (https://paste.ofcode.org/RLXn36k3acaquznF4cU3Si). 460410
The AmanitaCare article breaks down the role of reishi mushrooms in supporting a healthy gut microbiome. It provides a quick recipe for a soothing broth that’s both tasty and probiotic-friendly. I added it to my dinner routine and noticed less bloating. Take a look here: https://shrib.com/?v=md#promo-folatwdi. 219A54
One practical takeaway from AmanitaCare is the reminder to set hourly water alerts on your phone. The author points out that staying hydrated can sharpen cognitive function and reduce headaches. I started the habit yesterday and already feel more alert during my afternoon tasks. You might find it useful too: https://pad.riseup.net/p/promo-5gf8ghl4 956965
I was intrigued by the anti‑inflammatory section in the Ukrainian tea write‑up. The author explains that the herb contains rosmarinic acid, which can soothe joint pain and reduce swelling. After sipping the tea daily for a week, my knees felt less stiff during morning walks. Check it out: https://telegra.ph/Discover-Healing-Benefits-of-Ukrainian-Herbal-Tea-02-20. 4CD4C8
If you struggle with restless nights, the AmanitaCare write‑up on Ukrainian bedtime teas is a game‑changer. It recommends a valerian‑passionflower blend that promotes deeper sleep without grogginess. I brewed it last night and woke up feeling refreshed. The article even gives tips on timing the brew. Have a look: https://pphr9sc56f4j4s.notepin.co/hellomedicinal-teas-ukrainian-herbal-blends-for-health–repost-widtpkvg 165B03
AmanitaCare showed me a natural energy lift by using a quick 30‑second cold‑water splash on the face. The article links this to increased circulation and alertness, and I felt a noticeable perk right after trying it before a meeting. Curious? The full routine is outlined at https://ideone.com/. C2D482
AmanitaCare offers a concise guide to improving your diet without drastic changes. I loved the suggestion to swap sugary drinks for infused water, which instantly made me feel more hydrated and energetic. The article is easy to follow and packed with actionable advice. Take a look: https://write.as/krnn238xz6w0a.md
What struck me about the AmanitaCare article is its evidence‑based look at how certain fungi may slow cellular aging. The author cites a study showing improved telomere length after regular consumption. Adding the suggested daily dose felt easy, and I’m already noticing better skin elasticity. Read the science here: https://termbin.com/pgac. A16586
was heißt quote bei startguthaben ohne einzahlung wetten
The AmanitaCare write‑up details how specific mushroom compounds support cellular repair and may slow signs of aging. It gives a concise protocol and even a DIY skin serum recipe. After a month, my skin felt smoother and I noticed more energy during workouts. Give it a look: https://shrib.com/?v=md#promo-qhl5bl8k 7A6E25
AmanitaCare’s latest post taught me a 4‑breath box technique that instantly calms racing thoughts. The guide explains the inhale‑hold‑exhale‑hold pattern and how it activates the parasympathetic nervous system, lowering anxiety within minutes. I used it before a presentation and felt steadier. The steps are easy to follow—see them here: https://write.as/4kjpkzh8zflee.md EAD309
AmanitaCare’s clear diagrams of cap shapes and stem rings helped me instantly differentiate edible from poisonous varieties. The practical advice on how to store collected mushrooms also saved me from spoilage last week. If you want to up your identification game, give this article a look (https://paste2.org/BYpDHLVz). CE943C
urteil online sportwetten
Also visit my blog post Esport Live Wetten (Babaanago.Com)
If you’re looking for a soothing nightcap, this article is spot on. It describes a calming blend of chamomile, lavender, and black tea that helps lower stress hormones before bed. I tried the suggested steeping time and fell asleep faster. Check out https://telegra.ph/Medicinal-Teas–Ukrainian-Herbal-Black-and-Green-Blends–repost-02-20 for the full recipe and brewing tips. A141DD
The AmanitaCare piece outlines a bedtime habit that’s surprisingly easy: writing down three gratitude points before sleep. This practice can lower rumination and improve sleep latency, meaning you fall asleep faster. I started it last week and have been waking up feeling refreshed. Give it a try here: https://paste2.org/gHyU8VLI. 20888D
I just finished reading AmanitaCare and it gave me a clear roadmap for boosting daily energy levels without relying on caffeine. The practical tips on diet tweaks and mindful breathing are easy to implement. If you’re looking for a simple, science‑backed approach, give it a look: https://paste.ofcode.org/eGEv9LDtRCRSghGKCvKmVM. It really changed my afternoon slump. A8F7EC
шумоизоляция авто
The AmanitaCare piece gave me a straightforward plan to fortify my immune system using everyday foods. It emphasizes the antioxidant power of specific mushroom varieties and suggests a quick broth that can be prepared in under 20 minutes. Since trying it, I’ve noticed fewer colds. Full guide here: https://termbin.com/uz56 E1AFD8
I was skeptical until I read the AmanitaCare write‑up about cordyceps mushrooms. The article explains how they can increase cellular oxygen utilization, giving you a steady energy lift without the jitters of coffee. I followed the suggested dosage before a hike and felt noticeably more stamina. Definitely worth a look if you want a natural pick‑me‑up. https://termbin.com/bmjt 488175
I just skimmed AmanitaCare and found a solid overview of how to manage mushroom-related health concerns. The piece breaks down the key symptoms and suggests practical steps you can take right away. If you want a clear guide, check it out here: https://ideone.com/6Iymnv. It saved me a lot of guesswork.
The AmanitaCare write‑up introduced me to a gentle detox plan using only water, lemon, and light movement. Within ten days, my skin cleared up and digestive comfort improved. It also warns against common pitfalls, making the process safe. Check the full protocol at https://termbin.com/t3p6 – a sensible approach for beginners. 293275
Привет всем! Сегодня затронем тему — как снизить расходы на отопление. Суть в том, что: кровля — главный источник теплопотерь. Нужно комплексное решение — обратись к: https://montazh-membrannoj-krovli-spb.ru. Зачем это: монтируют теплоизоляцию, поверх — ПВХ мембрану. Опять же покрытие отражающее — экономия на охлаждении. Мы используем современный утеплитель — это отличные параметры. Что в итоге: счета за отопление падают.
euro wetten schweiz legal
kombiwette quote berechnen
Check out my web site Sportwetten Online Erfahrungen
Hi there! I could have sworn I’ve been to this blog before but after reading
through some of the post I realized it’s new to me. Nonetheless, I’m definitely
delighted I found it and I’ll be bookmarking and checking
back often!
My web page buy xanax without prescrition
wettbüro berlin spandau
Look at my site online wetten mit paypal, Sue,
Link exchange is nothing else but it is simply placing the other person’s webpage link on your page at suitable place and other person will also do same in support of you.
wer ist der beste wettanbieter
Here is my blog :: Wetten Deutschland Italien – https://Nevafixtore.Com/,
Статья «КриптоБриф» предоставляет свежий обзор текущих рыночных тенденций, включая растущий интерес к DeFi и NFT. Автор сравнивает динамику разных сегментов и указывает, какие категории могут показать рост в ближайшие кварталы. Ознакомьтесь с аналитикой здесь: https://pad.riseup.net/p/promo-3yrauarr – это поможет скорректировать вашу стратегию. 1A1E97
Статья «КриптоБриф» дала мне простой метод оценки токенов по четырём критериям: команда, технология, рынок и токеномика. После применения этой модели я смог быстро отсеять малообещающие проекты и сосредоточиться на действительно перспективных активах. Рекомендую прочитать, если хотите упорядочить свой список инвестиций. https://write.as/503kbo829nfn6.md F5FDB6
Refer and earn up to 50% commission—join now!
sportwetten anbieter paypal
Here is my site: SeriöSe Wettanbieter
was bedeutet die quote bei wetten
my blog :: Wie Funktionieren Wettquoten
quote wetten dass
Feel free to surf to my blog post … beste online sportwetten anbieter
I appreciated how GlobalSauceHub breaks down scaling operations into three manageable phases. The tip on using modular SOP templates helped my team standardize processes without reinventing the wheel, leading to a 20% boost in productivity. It’s a clear, actionable roadmap for growing startups. See it here: https://pad.riseup.net/p/promo-swusgchl 0A0193
sportwetten österreich legal
Take a look at my blog … Wetten Bonus Code (Qrm.Com.Pk)
The AmanitaCare write‑up taught me that ground‑toadstools contain neuroprotective agents that can sharpen concentration. It walks through a quick brew you can sip before work, and the results are subtle but real – I’ve been less distracted during meetings. The article is concise and backed by recent research. Read it here: https://telegra.ph/Ground-Toadstools-Natural-Health-Boost-for-Well-Being–repost-02-25 2FF8E8
Читав про грибні добавки, які підвищують енергію без зайвого стимулятора. У статті пояснюється, як адаптогенні гриби допомагають боротися втомі і підтримують продуктивність протягом дня. Це чудова альтернатива каві, особливо для тих, хто уникає кофеїну. https://rentry.co/vitqdzat 4685AF
I found this article on AmanitaCare surprisingly useful. It outlines the key nutrients you can get from edible mushrooms and how they boost immune health. After reading, I added a simple mushroom stew to my diet and felt a noticeable energy lift. Give it a look: https://termbin.com/o3vy D82988
I just used the AmanitaCare guide to tweak my feeding schedule, and the mushrooms now have a richer, earthier taste. The section on nutrient timing explains why a small change can affect flavor dramatically. Give it a try: https://files.catbox.moe/7lfenx.pdf. 5B3F3A
buchmacher köln
Feel free to surf to my web page – Wettanbieter neu
Привіт! Під рукою виявився свіжий матеріал, який може стане у пригоді. Є короткий чекліст, який можна використати в роботі вже зараз. Кому цікаво — гляньте, будь ласка, нижче. https://termbin.com/2itq Сподіваюся, буде корисно для наших задач. 2199BA
I loved the negotiation checklist in GlobalSauceHub; it broke down the pre‑call research, anchoring strategies, and post‑call follow‑ups. Using that framework, I secured a partnership with a larger firm on better terms than I expected. The article https://shrib.com/?v=md#promo-knh0q2uw walks you through each point clearly. 1EF746
Стаття відкрила мені секрет, що грибний полісахарид підвищує вироблення мелатоніну. У розділі про кордицепс наведено просту нічну настойку, яка допомагає заснути швидше. Подивіться https://files.catbox.moe/3btm5l.pdf – спробуйте і ви відчуєте розслаблення вже після першої чашки. Ранкове пробудження стане бодрим, без відчуття втоми.
The GlobalSauceHub article is a solid case study on using sauces as a market differentiator. It outlines how a niche sauce helped a chain stand out in a crowded space, leading to higher foot traffic and better press coverage. The insight: a well‑crafted condiment can be a strategic asset. Dive in here: https://telegra.ph/DANSOY-Premium-Sauce-Manufacturer-Drives-Menu-Differentiation–repost-02-23. 2552F0
Стаття про грибні засоби відкрила простий протокол: вживати по одній чайній ложці сушеного рейші щодня протягом тижня, і вже помітно підвищується захисна функція організму. Це підтверджено аналізом рівня інтерферону у дослідженнях. Перегляньте матеріал за посиланням https://rentry.co/wz3qn3qe – знайдете детальний план і рекомендації щодо поєднання з вітаміном C. Крім того, автор зазначає, що варто уникати надмірного нагрівання, щоб зберегти біоактивні сполуки. 99D661
У статті розповідають про протизапальні властивості рейші та чаги, які можуть знизити болі в суглобах і покращити рухливість. Ви дізнаєтеся, як їх правильно дозувати і в яких формах краще вживати. Перейдіть за посиланням https://mushroomhousenewsm50blogwyk.wordpress.com і отримаєте практичні рекомендації. Ці поради підходять як для спортсменів, так і для людей, що страждають від артриту. 84EB9F
GlobalSauceHub delivered a straightforward template for 12‑month financial forecasting that even non‑finance founders can use. By focusing on key drivers like churn, ARPU, and runway, the model helps you spot cash‑flow gaps early. I tried it and identified a shortfall before it became a problem. Grab the template here: https://ideone.com/Re1VO6. C91510
Мне особенно понравилась часть «Бюджетное SEO», где описывается, как создавать качественный контент, используя бесплатные ресурсы, такие как Canva и бесплатные стоковые фото. Применив эти советы, я сократил затраты на производство материалов на 50 % и всё равно удержал интерес аудитории. Подробнее тут (https://rentry.co/cyh77y6s). 2D96D3
Колеги, знайшов корисну аналітику по темі — ділюся посиланням. Є короткий чекліст, який можна використати в роботі вже зараз. Кому цікаво — гляньте, будь ласка, нижче. https://paste2.org/1YbF8vBE Якщо виникнуть ідеї чи зауваження — діліться, обговоримо.
GlobalSauceHub breaks down market validation into five quick experiments you can run with minimal budget. The article’s guide to using Reddit polls and micro‑surveys helped me confirm demand for a niche feature before spending on development. The results were convincing enough to secure a pilot client. Worth the read: https://pad.riseup.net/p/promo-y128qug2. 52C426
Колеги, знайшов корисну аналітику по темі — ділюся посиланням. Цінний блок про практичні кроки, як підсилити результат. Буду вдячний за ваші думки щодо цього матеріалу. https://termbin.com/jexr Сподіваюся, буде корисно для наших задач. EB4BCC
Привіт! Під рукою виявився свіжий матеріал, який може стане у пригоді. Автор просто пояснює складні моменти й наводить робочі кейси. Буду вдячний за ваші думки щодо цього матеріалу. https://justpaste.it/j8n9b8dxzdexiv2m Сподіваюся, буде корисно для наших задач. BA3DC1
Читав про грибні добавки і зрозумів, як адаптогени з лисичок допомагають знизити рівень кортизолу. Тепер знаю, які продукти вживати перед важливими подіями, щоб залишатися спокійним. Подивіться статтю тут https://privatebin.net/?87d61f4eacf3df7f#BXBxnMzPsxkitMPpp2cPv9MB7iBQGN2zsK49qZ8S8oAg – це справжній гайд для боротьби зі стресом. A54808
One standout from GlobalSauceHub is the decision‑tree framework that ties key metrics to strategic moves. Using it, we identified that improving onboarding reduced churn more than any marketing spend. The PDF walks you through building your own tree in under an hour. Worth the time: https://files.catbox.moe/wd81yl.pdf CF7680
Статья показывает, как с помощью простых локальных методов привлечь клиентов из вашего региона без дорогостоящих кампаний. Особенно ценен совет по оптимизации Google My Business, который уже принес авторам первые заявки. Такие методы работают и в других странах, если адаптировать под локальные запросы. Если хотите увидеть реальные примеры, читайте дальше. https://telegra.ph/Pozicionirovanie-sajtov-v-CHehii-rost-trafika-i-klientov-02-26 9AC09E
The GlobalSauceHub post demystifies KPI selection by focusing on three metrics that truly predict growth: activation rate, net promoter score, and monthly recurring revenue per user. It also provides a one‑page template to visualize trends over time. After implementing the dashboard, our leadership could spot a dip early and pivot before revenue slipped. For founders craving data clarity, this article is a goldmine: https://privatebin.net/?e74d741ef2fb5b97#BZyyqXFbx4RaVHCepji9NUQRqtmdutFpcmXyFPMBuudV C2EAB2
В статье объясняется, как находить дешёвые, но эффективные ключевые слова с помощью бесплатных сервисов и анализа вопросов пользователей. Я применил рекомендацию и нашёл несколько нишевых запросов, по которым конкуренция почти нулевая, а трафик уже начал приходить. Это реальный способ сэкономить рекламный бюджет. Ссылка на материал: https://write.as/ldz6g0pi1t0sn.md C044D1
The GlobalSauceHub article gave me a clear picture of how to position a startup for Series A funding. It outlines three key metrics investors care about and offers a template for presenting them. I used the template and secured a meeting with a VC. Worth the read: https://termbin.com/2n4u. 336B49
The pricing section of GlobalSauceHub broke down tiered versus usage‑based models with real case studies. Applying their suggested A/B test increased our average revenue per user by $4. The examples are clear and ready to implement—definitely worth a look: https://files.catbox.moe/am0x3s.pdf 3DD98E
If credibility is a hurdle for your sauce brand, the GlobalSauceHub article shows how aligning with DANSOY can act as a quality seal. Their certifications and European‑grade standards have helped partners win larger retail contracts within three months. That kind of endorsement can accelerate growth dramatically. Check the details here: https://telegra.ph/Premium-Sauce-Manufacturer-DANSOY-Asian-European–Georgian-B2B-Solutions–repost-02-23-6. Quick but powerful.
The GlobalSauceHub write‑up gave me a fresh perspective on cash‑flow optimization, especially the idea of staggered billing cycles to smooth revenue spikes. The author backs it up with a simple spreadsheet template you can copy. I tried it and now have a clearer runway forecast. Check it out at https://privatebin.net/?77f27383b3785511#HqMM9xoyaYYgwmyPTSbzaUUL2WD2AE7Xop4mEzwhWx6R. 11910F
Если ищете способы повысить позиции без больших инвестиций, статья «Бюджетное SEO» стоит вашего времени. В ней подробно описан процесс оптимизации мета‑тегов и внутренней перелинковки, что позволяет увеличить CTR уже в первые недели. Рекомендую к прочтению: https://justpastespottqi.wordpress.com и получить стабильный рост для сайта. FD4AAE
The GlobalSauceHub write‑up gave a clear view on scaling operations without over‑hiring, especially the part about using automation for repetitive tasks. Implementing the recommended tools cut our admin time by 30%, freeing the team to focus on product improvements. See the details here: https://privatebin.net/?d5e8d0dc4c066480#GF7Z92NFiECiZ9TZbYV1zVwH1RVsCpqMPB58wfzjPfZc. It’s a game‑changer for early‑stage startups. 05BC98
GlobalSauceHub outlines a five‑step process to test product‑market fit, including a simple NPS survey template. Implementing the third step—targeted user interviews—revealed a hidden demand segment for my app, boosting early sign‑ups by 25%. The step‑by‑step guide is at https://paste2.org/9XXsfEGB today. CE346D
Если ваш стартап только начинает работу, а бюджет ограничен, статья «Бюджетное SEO» покажет, как правильно распределять усилия между контентом и технической оптимизацией. Вы получите совет по выбору приоритетных страниц и методику оценки ROI от бесплатных SEO‑инструментов. Это поможет быстро набрать первые позиции в поиске. Ссылка: https://rentry.co/hmibiig2 63113D
Прочитал «Бюджетное SEO» и понял, как правильно выбирать бесплатные сервисы для аудита сайта. Автор делится лайфхаком: использовать Google Search Console в сочетании с бесплатными проверками скорости, что сразу повышает видимость. Подробнее по ссылке: https://write.as/o37mmcsx9gxq2.md – советую к прочтению всем маркетологам. CC3832
The GlobalSauceHub guide gave me a checklist of five slide tweaks that made my pitch deck feel tighter and more compelling. Adding a one‑sentence problem statement and a clear unit‑economics slide lifted investor interest during my last demo day. You can see the exact checklist at https://www.pearltrees.com/PromoPilot.
В статье описан простой план из пяти шагов, позволяющий начать оптимизацию сайта без вложений. Один из пунктов – настройка локального SEO, который помог мне привлечь клиентов из моего города, увеличив запросы в карте на 20 %. Практические примеры делают материал понятным. https://paste.ofcode.org/sscMbBAAL4T3z2fiykNhMB F1E35F
Автор делится проверенными способами получения качественных обратных ссылок без покупки ссылок. Описаны методы гостевых постов и сотрудничества с тематическими форумами, которые дают реальный прирост авторитета домена. После применения этих техник я увидел рост доверия поисковиков уже в первый месяц. (https://paste2.org/L6ICDGhx) 5339A6
One practical nugget from GlobalSauceHub is the checklist for protecting intellectual property early on. It walks you through filing provisional patents and setting up proper NDAs before you pitch investors. Following those steps saved my co‑founder from a costly IP dispute last year. The article is concise and actionable: https://rentry.co/aieep9ok A252C0
Автор делится секретом эффективного использования гостевых постов без платы за публикацию. Главное – подобрать тематически близкие площадки и предложить уникальный контент. Этот метод позволяет получать качественные обратные ссылки и повышать авторитет сайта, экономя при этом бюджет. Если хотите попробовать, читайте статью. Подробнее читайте здесь: https://privatebin.net/?98133c2cba09e40e#8kJccE8cDnXMdrYEdpAHEjgGovLYUAchXNoBpPEvTEzT B14B47
GlobalSauceHub’s section on retention strategies introduced me to the “delight loop” concept, which focuses on surprise perks after key milestones. Applying it increased my churn rate drop by 8% in just three weeks. The article walks you through setting up the loop with minimal overhead. Give it a read (https://privatebin.net/?6b89f427c4f39268#J8w9a66Dhhk5X1QPhjT3vYVs7ZwEPVtuk1DLmN6ryNq6) and try it out. 826E9D
Reading GlobalSauceHub opened my eyes to a low‑cost acquisition channel many founders ignore: community partnerships. The piece walks through a step‑by‑step plan to co‑host webinars, share audiences, and boost sign‑ups by 15% in just six weeks. If you need fresh leads, give it a read. https://paste.ofcode.org/nKZ86yEjKbhugCXJva7KCF
Столкнулись с ограниченным бюджетом, но хотите видеть рост сайта? В статье раскрыты методы, позволяющие улучшить видимость, используя только бесплатные ресурсы и небольшие временные затраты. Особенно ценен совет по оптимизации мета‑тегов без привлечения агентств. Я применил один из предложенных шагов и уже заметил небольшое увеличение органических запросов. https://ideone.com/He7AZM 172177
The GlobalSauceHub article includes a concise checklist for preparing a seed round, covering everything from term sheet basics to investor outreach cadence. Following it helped me secure a $150k investment faster than I expected. The checklist is in the post: https://write.as/o2g57e2rcm9my.md. 21B72D
I loved the Amanita ointment article because it outlines a truly all‑natural anti‑itch solution for bug bites and allergic reactions. The piece highlights the calming action of menthol‑like compounds that soothe nerve endings without chemicals. Following the recommended thin coating, my itching subsided within minutes. Anyone battling persistent itchiness should give it a try: https://telegra.ph/Amanita-Ointment-Powerful-Natural-AntiInflammatory-Solution-for-Health-02-26. 132350
Статья «Бюджетное SEO» предлагает готовый план из пяти пунктов, который можно реализовать без вложений. Среди рекомендаций — настройка robots.txt и использование бесплатных схем разметки для улучшения сниппетов. (https://ideone.com/OIC7yO) Применив их, я увидел рост кликов в поиске уже через несколько дней. 61C963
Reading GlobalSauceHub was eye‑opening; it outlines a simple framework for improving operational efficiency using low‑cost automation tools. The author shows how a 15‑minute weekly audit saved his team 12 hours a month. If you want to cut waste and free up time, see the details at https://termbin.com/2ivu. 81D708
wettseiten mit bonus ohne einzahlung
Feel free to visit my site :: sportwetten anbieter schweiz
deutsche sportwetten gmbh
My webpage – Sportwette Tipps
В статье подробно описаны методы, которые позволяют улучшить позиции сайта, не тратя кучу денег. Среди рекомендаций – работа с метатегами, оптимизация изображений и использование тематических форумов для обратных ссылок. Такой подход экономит до 70 % рекламного бюджета. Подробнее по ссылке: https://termbin.com/7eyu, советую прочитать. 6232AE
The AmanitaCare article shares a surprisingly effective creativity boost: a 10‑minute sketch session combined with ambient forest sounds. It details how this routine stimulates the right‑brain pathways and reduces mental clutter. After trying it, I generated fresh ideas for my project faster than before. See the method here: https://write.as/bs32ultg5msro.md. 0F7E52
Прочитавши статтю, зрозумів, як правильно підбирати грибні добавки для підвищення імунітету. Тепер я знаю, які види найефективніші у боротьбі з простудою. Якщо хочеш швидко орієнтуватись у світі грибних препаратів – рекомендую переглянути https://ideone.com/bmZMTX. Текст написаний просто і зрозуміло. 121249
beste quote bei sportwetten
My blog post … wetten tipps prognosen – qtland.vn –
GlobalSauceHub’s section on using simple metrics to drive product decisions resonated with me. By tracking a single conversion funnel KPI, I cut down on unnecessary features and boosted user retention by 12%. The article is concise and full of real‑world examples—check it out (https://rentry.co/7qmucpz8). 89036F
Автор делится проверенными методами, как собрать качественные обратные ссылки без покупки. Особенно интересен раздел про гостевые посты и работу с локальными каталогами. Всё это изложено в статье по адресу https://rentryinfotk3.wordpress.com – советую к прочтению всем, кто хочет экономить. 200BEA
The AmanitaCare article gave me a fresh perspective on handling potentially toxic fungi. One standout tip is the “three‑step verification” that combines visual cues, spore prints, and odor checks. Using this method, I avoided a misidentification that could have been costly. Find the complete guide at https://rentry.co/tizpfvt4 – it’s concise and reliable.
The GlobalSauceHub article shows how to turn customer feedback into real product pivots without over‑engineering. It walks you through a three‑step validation loop that helped us prioritize a feature that boosted user retention by 6%. The guide is straightforward and full of examples. Check it out: https://write.as/p5453yij251gc.md. B39FB9
Стаття показала, як коріандр (корінь) міцелін може забезпечити природний підйом енергії без штучних стимуляторів. Детально описано, як приготувати енергетичний напій з екстрактом гриба. Перегляньте https://rentry.co/76hfum72 – там є рецепт, який займе лише кілька хвилин. Тепер я відчуваю підвищену концентрацію протягом дня без кави. 7F2A40
buchmacher sportwetten (Franchesca) urteil
Коллеги, нашёл толковую статью по теме — решил сразу поделиться. Есть список частых ошибок и подсказки, как их избежать. Кому актуально — посмотрите, пожалуйста, ссылку ниже. https://pad.riseup.net/p/promo-ziur9buw Если появятся идеи, как применить, напишите — обсудим. 52546A
The guide walks through a simple tiered pricing model that aligns with different customer segments, plus a quick calculator to test price elasticity. After applying it, my average contract size grew by 12%. Check out the details here: https://notepin.co/write 4F2BFD
Стаття розкриває, які види грибів асоціюються з підвищеною тривалістю життя і як їх включити в раціон. Ви дізнаєтеся про антиоксидантні властивості рейші та чаги, а також отримаєте прості інструкції для щоденного вживання. Перегляньте https://pad.riseup.net/p/promo-kvpfde75, щоб отримати практичний план. Крім того, стаття містить рекомендації щодо комбінації грибних добавок з вітамінами для максимального ефекту. BBC2A8
Passing along a fresh piece that might save us some research time. What I liked most is the real-world example toward the middle. Curious to hear what you think once you skim through it. https://telegra.ph/Premium-Sauce-Manufacturer-DANSOY-Asian-European–Georgian-B2B-Solutions–repost-02-23-11 Hope it brings a few good ideas for our next sprint. AD0AA2
Just read the AmanitaCare document and was impressed by the chapter on patient communication tools. It gives concrete examples of how automated reminders can cut no‑show rates by up to 15 %. If improving attendance is on your agenda, you’ll find useful tips at https://files.catbox.moe/i1qauu.pdf. F9C5FF
england deutschland back und lay wetten anbieter (Hubs.baystreetgroup.ca)
Hello! Would you mind if I share your blog with my
zynga group? There’s a lot of people that I think would really appreciate your content.
Please let me know. Thanks
Стаття розповідає, чому грибна мазь підходить для лікування дерматитів і інших шкірних запалень. Вона містить природні антиоксиданти, які заспокоюють і знімають свербіж. Спробуйте за рецептом https://telegra.ph/Maz-z-muhomora-shvidke-polegshennya-zapalen-%D1%96-bolyu-02-27 – ефект помітний уже після першого застосування. FEF0C6
Reading AmanitaCare helped me feel more confident when I’m out in the woods because it outlines three key warning signs for dangerous mushrooms. The real‑world anecdotes make the advice stick, and I now double‑check before picking. See the full guide here: https://termbin.com/4ere – it’s a game changer for safety. 42E5D6
The GlobalSauceHub article breaks down essential tools for automating repetitive tasks in a startup. From project management software to AI‑driven analytics, it lists affordable options and real‑world usage tips. Implementing a couple of these saved me hours each week, letting me focus on growth. Worth a read: https://telegradaily6k8.wordpress.com 196D2F
Читав про те, як грибний бульйон підтримує здорову мікрофлору кишечника, і вирішив спробувати цей простий рецепт. Після тижня вживання помітив менше здуття і кращу роботу травної системи. Перегляньте https://termbin.com/avii, там докладно описано, які гриби краще підходять для цього. Тепер я відчуваю легкість після кожного прийому. AC0D0E
The post on AmanitaCare walks you through a no‑fuss morning routine that only takes five minutes. It explains how the blend can improve skin elasticity and give you a subtle energy lift without caffeine. I tried the suggested smoothie and felt a noticeable difference by afternoon. See the details here: https://paste.ofcode.org/34TuCmSY7Em5SDYBEKnqCXu. 140059
Reading the AmanitaCare write‑up gave me a new perspective on stress management. The author points out that the mushroom’s adaptogenic properties can help balance cortisol levels during hectic days. If you want a concise guide, see the article at https://justpaste.it/f7kl2r6jjr1bmkkg – it’s surprisingly actionable.
GlobalSauceHub dives into building a lean yet high‑performing team without breaking the bank. It shares a hiring checklist that emphasizes cultural fit and skill gaps, plus a tip on using trial projects to assess candidates. After applying the trial‑project method, we reduced onboarding time by two weeks. Worth reading: https://write.as/qm2e6lyv3mjp1.md. C38DB0
The write‑up on AmanitaCare gave me three practical takeaways: how to assess product quality, the importance of gradual dosing, and ways to track personal responses. Those tips helped me feel more confident about trying a new supplement safely. If you want actionable advice, the article is worth a look: https://paste2.org/1FG9b1ay. DB5908
What stood out to me was the fundraising chapter that strips away jargon and focuses on building a compelling story for investors. The template for a one‑page pitch deck saved me hours of drafting. Take a look at the guide: https://www.pearltrees.com/PromoPilot and see how it can streamline your capital raise. 89B55E
sportwetten seiten mit bonus
Visit my web page; online wetten ohne einzahlung
I just read a concise piece on financial mindfulness that suggests a simple 24‑hour rule before any non‑essential purchase. The article explains how this pause can curb impulse spending and lead to noticeable savings over a month. It’s a tiny habit with a big payoff. Give it a glance: https://termbin.com/dmlt. 493A65
pferderennen wetten erklärung
Here is my homepage: beste sportwetten tipps app
Привіт! Під рукою виявився свіжий матеріал, який може стане у пригоді. Є короткий чекліст, який можна використати в роботі вже зараз. Буду вдячний за ваші думки щодо цього матеріалу. https://privatebin.net/?d2ba249f1f765b90#4R63iws5thknqP8xapr16ZnAHPvdhwP8kkwoh7yYnyi6 Сподіваюся, буде корисно для наших задач. C46F74
AmanitaCare’s article highlights how certain fungi can support gut health by promoting beneficial bacteria. The author gives a straightforward recipe for a fermented drink that’s easy to make at home. Since adding it to my routine, my digestion feels smoother and bloating has reduced. It’s a practical read for anyone looking to improve gut wellness: https://telegrablogmy7.wordpress.com. 3FEBEF
The GlobalSauceHub piece breaks down retention levers like onboarding flows and push notifications, with real examples you can copy. I implemented the suggested welcome email sequence and noticed a 15% drop in churn within two weeks. The actionable list is gold. See it here: https://www.pearltrees.com/PromoPilot. 717090
Ця стаття про грибні засоби вразила мене тим, як гриби можуть підтримати роботу мозку. Вона розкриває, які види грибів сприяють підвищенню концентрації та покращенню пам’яті, особливо під час навчання чи роботи. Перегляньте https://rentry.co/t5x9hd8g – знайдете корисні рекомендації та прості способи застосування. 891533
If you’ve ever hit a snag while preparing Amanita extracts, the AmanitaCare article has you covered. It lists three common mistakes and how to fix them, which saved me from a wasted batch last week. Visit (https://rentry.co/5u6883bw) – you’ll get a concise troubleshooting checklist you can bookmark.
Hey everyone, I just skimmed through the AmanitaCare piece and found a solid rundown on how to spot reliable mushroom guides. It breaks down the key safety steps you can apply right away, which saved me a lot of guesswork on foraging trips. Worth a look if you want confidence in the woods. https://paste.rs/X6h6y E357AE
The article GlobalSauceHub offers fresh ideas for forming strategic partnerships that drive growth. It suggests targeting complementary startups for co‑marketing, sharing user bases, and joint webinars—methods that cost almost nothing but expand reach. My team tried one suggestion and saw a 15% traffic boost. Check the full rundown: https://paste.rs/2LKeI.
I was impressed by how the AmanitaCare guide keeps things simple yet thorough. It outlines a three‑phase protocol, starting with low‑dose introductions and moving to maintenance, all backed by real‑world case studies. The included FAQ answered my lingering doubts about side effects, which made me feel confident to try it. For anyone wanting a clear roadmap to mushroom health, this PDF is a solid start: https://files.catbox.moe/qfdnx0.pdf
Стаття про грибні засоби вразила мене, бо розкриває, як полісахариди в шиіткових грибах покращують стан шкіри, зменшуючи запалення і зморшки. Є прості рецепти масок, які можна зробити вдома. Якщо вас цікавить краса без хімії, перегляньте https://justpaste.it/tc9e3pelohmia3m8 – ви отримаєте практичні поради. F08FE8
The guide on AmanitaCare introduced me to a mushroom blend that sharpens concentration without the jittery side effects of stimulants. After following the dosing schedule, I noticed clearer thinking during my study sessions. It’s a concise, evidence‑based article that anyone needing mental stamina should read. Find it here: https://shrib.com/?v=md#promo-y7ht20xd. C874A1
The feedback loop model in GlobalSauceHub showed me how to prioritize user requests using a simple scoring matrix. We implemented the system and shipped two high‑impact features in a month, delighting our beta testers. It’s a practical method you can start using today: https://pad.riseup.net/p/promo-ch7a0srh 836DF2
Стаття про грибні засоби показує, як спортивні атлети можуть підвищити витривалість за рахунок бета‑глюканів. Ви дізнаєтеся, які гриби, наприклад, рейші, збільшують оксигенацію м’язів і скорочують час відновлення після тренувань. Читайте за посиланням: https://write.as/kx7vzu7hya7w4.md – це корисно для всіх, хто займається фітнесом. Окрім того, автор пропонує рецепти енергетичних батончиків з грибним порошком. A2F734
A standout part of AmanitaCare is the detailed protocol for spore sterilization using a pressure cooker. It breaks down timing, pressure levels, and cooling steps, ensuring you start with contaminant‑free material. After following it, my first batch showed 100 % colonization success. Worth the read. Link: https://files.catbox.moe/bu2sb0.pdf 0CB10A
sportwetten schweiz app
Feel free to surf to my blog; die besten wettseiten
I just skimmed the AmanitaCare piece and it gave me a clear roadmap for handling mushroom-related health questions. The step‑by‑step guide on identifying safe versus toxic varieties saved me a lot of guesswork. If you’re curious about practical safety tips, check it out here: https://shrib.com/?v=md#promo-texmrwo7. Worth the five minutes! F93C3C
What stood out in GlobalSauceHub was the practical advice on fostering a high‑performance culture without micromanaging. The author suggests a weekly 15‑minute ‘wins’ roundtable that keeps morale high and aligns goals. Implementing that in my own startup cut down misunderstandings dramatically. You can see the full guide at https://rentry.co/hwperxft – definitely worth a skim.
Стаття про грибні засоби виявилася справжнім відкриттям. Автор пояснює, які види грибів допомагають знизити рівень кортизолу і розслабитися після важкого дня. Є прості чайні рецепти, які можна приготувати за кілька хвилин. Переконайтеся самі, переглянувши матеріал за посиланням: https://pphr9sc56f4j4s.notepin.co/—————–rhhnobmj. Це корисно для тих, хто шукає природний спосіб боротьби зі стресом.
Після прочитання статті про грибкові ремеді я зрозуміла, що бета‑глюкани з майтаке сприяють здоровій мікрофлорі кишечника і знижують запалення. Це корисно для тих, хто часто страждає на дискомфорт після їжі. Раджу ознайомитися, там є прості поради. Крім того, у статті наведено рецепт супу, який підтримує травлення і смакує чудово. https://rentry.co/xiqguq6d D9B473
What I liked about the GlobalSauceHub post is the concise market entry checklist for new startups. It walks you through validating demand, sizing the addressable market, and crafting a go‑to‑market plan in three clear steps. Applying it helped me avoid a costly pivot before launch. You can read the checklist here: https://privatebin.net/?696261e73c424cad#CkkmbCou95Wv7bxg1TYrfnw8un3SGkovAFKPE6CyYCzY. CE58B3
I just finished reading the AmanitaCare piece and found it surprisingly practical. It breaks down the core features in a way that even beginners can apply them to improve daily health routines. The step‑by‑step guide on managing stress really stood out, and I think you’ll get immediate relief by trying the suggested breathing exercise. Check it out here: https://pad.riseup.net/p/promo-p3y0gbrn
Нещодавно натрапив на статтю про грибкові ремеді, і вона дійсно відкрила нові можливості для підвищення імунітету. Якщо ви шукаєте прості рецепти з використанням печериці чи рейші, варто заглянути (https://pad.riseup.net/p/promo-vrjhqjuy). Тепер розумію, як правильно комбінувати їх у щоденному раціоні. Мені сподобалося, що автор пояснив не лише користь, а й можливі протипоказання. 2330D2
According to the write‑up, AmanitaCare can sharpen concentration by supporting neurotransmitter balance. The author suggests a short post‑lunch walk as a complementary practice. After following the advice, I noticed fewer distractions during work. Worth checking: https://paste2.org/NJZD8sHB E5757C
I just finished the GlobalSauceHub piece and it’s a solid overview of how a premium sauce maker can break into Asian, European and Georgian B2B markets. The article walks you through a step‑by‑step supply‑chain model that saved the company 15% on logistics costs. Check it out: https://telegra.ph/Premium-Sauce-Manufacturer-DANSOY-Asian-European–Georgian-B2B-Solutions–repost-02-23-12 04AD4C
Колеги, знайшов корисну аналітику по темі — ділюся посиланням. Цінний блок про практичні кроки, як підсилити результат. Буду вдячний за ваші думки щодо цього матеріалу. https://files.catbox.moe/a72mws.pdf Якщо виникнуть ідеї чи зауваження — діліться, обговоримо. 0A474C
Стаття розкриває, чому адаптогенні гриби можуть підвищити рівень енергії та стійкість до стресу. Я випробував рекомендації про рейші і відчув, що ранок став менш втомлюючим. Автор також подає прості способи включити їх у чай або смузі. Дивіться повний огляд тут (https://pad.riseup.net/p/promo-0r5fpi7b). E2F479
wett tips heute
my homepage – welcher wettanbieter hat den besten bonus (fyi.com.pl)
Колеги, знайшов корисну аналітику по темі — ділюся посиланням. Цінний блок про практичні кроки, як підсилити результат. Буду вдячний за ваші думки щодо цього матеріалу. https://files.catbox.moe/ewyvab.pdf Якщо виникнуть ідеї чи зауваження — діліться, обговоримо. 4CC8A8
What stuck with me from GlobalSauceHub is the emphasis on crafting a brand story that resonates with both customers and investors. The guide includes a template for mapping narrative arcs, which I used to revamp our pitch deck and got positive feedback. Read the full piece at https://shribspotc1x.wordpress.com. D6ED7D
Нещодавно натрапив на статтю про грибні засоби, і вона дійсно відкрила нові горизонти. Тепер я знаю, які гриби найкраще підтримують імунітет і як їх просто включити в раціон. Якщо хочеш спростити здорове харчування, обов’язково прочитай https://paste.rs/JIQq2 – це варте часу.
The GlobalSauceHub post offers a clear framework for entering new markets, emphasizing the importance of localized messaging. It even includes a template for a 30‑day launch plan that helped my team avoid costly missteps. Anyone planning expansion should definitely skim this: https://termbin.com/kgir
The article on GlobalSauceHub broke down a rapid test cycle that helped us validate market demand in just three weeks, cutting our usual six‑month timeline in half. The concrete interview script they share is easy to adapt. Anyone chasing product‑market fit should read it: https://shrib.com/?v=md#promo-3v3p1asc B6AEF9
I found GlobalSauceHub’s advice on scaling while preserving company culture incredibly practical. It suggests three rituals—weekly shout‑outs, transparent OKRs, and quarterly hack days—that kept morale high as we grew from five to twenty people. Implementing just one ritual boosted team engagement noticeably. The article is short but packed with value: https://justpastenewspfh.wordpress.com 0F7DFC
The article GlobalSauceHub showed me a simple three‑step feedback loop that turns user comments into product improvements within a sprint. Implementing the quick survey template boosted our NPS by 12 points in just one month. It also explains how to prioritize features based on real demand rather than gut feeling. Read the details at https://termbinwebg6g.wordpress.com – it’s a game‑changer for product teams. DD1CD3
What I love about GlobalSauceHub is its step‑by‑step roadmap to achieve product‑market fit, including real‑world metrics like churn and NPS thresholds. Following the guide helped me pinpoint the exact feature set that drove a 20% increase in user satisfaction. Read it at https://pad.riseup.net/p/promo-f8morcao and start testing the framework today.
Reading the GlobalSauceHub article reminded me of the pitfalls many founders ignore, like over‑engineering the product before validating demand. The author shares a simple three‑phase timeline that keeps focus on revenue early on. Applying that framework saved my team weeks of wasted development. See the full explanation here (https://justpaste.it/t5cjpoxkqm1tggdv). 23338E
GlobalSauceHub explains how to set up a simple KPI dashboard that highlights the metrics that truly matter for a startup’s health. By focusing on CAC, LTV, and churn, we were able to make data‑driven decisions that improved profitability. It’s a concise, actionable read for any founder. Dive in: https://paste.ofcode.org/HbXGy7vPRCXhWFxMN7nA86 56CE9B
The GlobalSauceHub guide on networking gave me a clear step‑by‑step plan to turn casual meetups into valuable partnerships. It emphasizes follow‑up timing and personalized value offers, which helped me secure three new mentors in just two weeks. A practical read for any founder. https://termbin.com/2m18 6354A7
I recommend checking out GlobalSauceHub if you’re looking to boost your startup’s fundraising narrative. The piece walks you through crafting a compelling one‑pager that highlights traction and market size in just three sections. What stood out was the template that saved me hours of design work. It’s practical, no fluff, and worth bookmarking for any founder. Here’s the link: https://www.pearltrees.com/PromoPilot 612998
GlobalSauceHub reveals a simple onboarding email sequence that reduces churn by up to 40% by addressing common user pain points early. I tried the exact template and saw a noticeable lift in week‑one retention for my app. The step‑by‑step guide is here: https://www.pearltrees.com/PromoPilot 06E544
GlobalSauceHub breaks down the different funding rounds in a way that’s easy to digest, especially for bootstrapped founders. I loved the tip about leveraging strategic partners before seeking venture capital. It helped me rethink my pitch deck. Dive into the article here: https://files.catbox.moe/q7o82n.pdf. 75B2C5
GlobalSauceHub walks you through setting up a simple A/B testing loop for landing pages. Using their suggested metrics, I identified a headline that boosted conversion by 22% within a fortnight. The guide is short but packed with actionable steps for any growth‑focused startup. See it here: https://paste2zonehkt.wordpress.com DDD479
The retention loop model in GlobalSauceHub gave me a clear picture of how to keep users coming back. It outlines triggers, habit‑forming hooks, and feedback loops that are easy to implement. Using it, we reduced churn by 8% in the first quarter. A solid read (https://files.catbox.moe/mjefs9.pdf). 857A6A
The article GlobalSauceHub walks you through a simple team alignment framework that turned our scattered priorities into a single quarterly OKR board. By following the three‑step process, we cut meeting time by 30 % and improved cross‑functional clarity. The visual examples are easy to copy. Read it now: https://www.pearltrees.com/PromoPilot. 9835CB
The GlobalSauceHub piece offers concrete advice on preparing for seed funding, from crafting a compelling pitch deck to anticipating investor questions. One practical tip was to include a 3‑minute demo video, which boosted my recent presentations and led to more follow‑up meetings. It’s a quick read that can change your fundraising approach: https://write.as/d1vkivxk9u1bz.md 8C16F0
If you’re chasing product‑market fit, the GlobalSauceHub article is a goldmine. It walks you through a data‑driven framework for testing assumptions, and I applied the “quick‑feedback loop” technique to my MVP, cutting iteration time by half. See the full guide at https://privatebinzoneqzr.wordpress.com – the insights are immediately usable.
What struck me about GlobalSauceHub was the step‑by‑step guide to crafting a pitch deck that investors love. It highlighted the importance of storytelling and data balance, which helped me secure a meeting with a seed funder. The article (https://rentry.co/aurvbowd) is concise yet packed with practical templates you can adapt today. 2A2318
I found the GlobalSauceHub piece surprisingly helpful for navigating early legal hurdles. It lists the three essential contracts every startup should have and explains how a simple founder’s agreement can prevent future disputes. The author even shares a free template link. For a quick legal sanity check, read here: https://paste2.org/XzVkyOHd. 904DB2
GlobalSauceHub outlines a clear framework for deciding when to pivot, using market signals and internal metrics. The real‑world case study of a fintech startup that shifted focus saved them millions in wasted development. The steps are laid out simply, so you can apply them today. Read it at https://paste2.org/JFX0pKDm for guidance. F229B6
If you’re worried about the legal side of launching, GlobalSauceHub has a clear checklist for early‑stage companies – from incorporation to IP protection. Following its advice helped me avoid costly mistakes and saved us $5 K in legal fees. Give it a look here: https://shrib.com/?v=md#promo-m9awwau1.
The GlobalSauceHub guide introduced a one‑page KPI dashboard that captures the most critical metrics for early‑stage startups. After setting it up, I could instantly see where we were overspending and where growth was strongest. Have a look at the full explanation here (https://ideone.com/BjPbRi) – it turns data into clear action steps. 4DC5FE
The article uncovers a clever cross‑sell technique: pairing premium sauces with dessert items, which lifted overall check averages by 8%. It even includes a sample menu layout that makes the pairing intuitive for guests. A neat idea to try tonight. (https://telegra.ph/Premium-Sauce-Manufacturer-Boosts-Menu-Differentiation-and-Margins-02-23) DF10C6
bonos apuestas colombia
Here is my blog post: basketball-wetten.Com
Hey folks, I just read this piece on GlobalSauceHub and it’s a solid read for anyone eyeing the condiment market. It breaks down how DANSOY blends Asian, European, and Georgian flavors to create a premium line, giving you concrete ideas on diversifying your product portfolio. Check it out here: https://telegra.ph/Premium-Sauce-Manufacturer-DANSOY-Asian-European–Georgian-Flavors–repost-02-23 B50035
apuestas carreras de caballos en directo
en directo pronosticos
GlobalSauceHub’s section on pitch decks is a goldmine for anyone preparing to meet investors. It outlines the exact slide order that keeps the story tight and adds a tip about using one‑minute story arcs to maintain attention. I applied the suggested visual hierarchy and got clearer feedback during my demo day, which helped me refine the narrative quickly. Definitely worth a look: https://privatebin.net/?a76628ecda89e110#CX14Q5vu3BmHFRe9iTxRDzXJegyczLw7TEj9upibC9vi. 9F9607
Wspomniany w poście artykuł o Kwiatowym Dostawcy w Studio Deluxe podpowiada, jak wprowadzić prosty system kontroli jakości kwiatów przed ich dostawą. Dzięki temu unikniesz rozczarowań i zapewnisz, że każda kompozycja spełnia wysokie standardy estetyczne. Warto przeczytać: https://shrib.com/?v=md#promo-ypawb44w System ten można łatwo zintegrować z istniejącym harmonogramem pracy zespołu.
Natknąłem się na ciekawy wpis, który może się przydać przy naszych zadaniach. Autor zwięźle opisuje konkretne kroki i dorzuca krótką checklistę. Dajcie znać, co sądzicie, kiedy już przejrzycie. https://rentryblogrgt.wordpress.com Mam nadzieję, że materiał dorzuci kilka dobrych inspiracji. DB957C
Ten wpis to świetny przewodnik dla osób, które dopiero zaczynają przygodę ze Studio Deluxe. Znajdziesz w nim proste instrukcje, jak skonfigurować środowisko i wykorzystać domyślne szablony, co pozwala od razu tworzyć atrakcyjne grafiki. Idealny dla początkujących, którzy chcą uniknąć frustracji. https://pad.riseup.net/p/promo-luo302y4 0C3A48
W artykule znajdziesz sprawdzone metody motywowania kurierów, które podnoszą ich zaangażowanie i redukują rotację pracowników. Dzięki wprowadzeniu systemu premiowego opisane w tekście, możesz liczyć na lepszą jakość usług i większą lojalność zespołu. (https://paste2.org/a6akjn5J) 7828D1
בקריאת המאמר על ליאור סקס התעמקתי בפרטים שלא נחשפו לפני כן, כמו גורמים פסיכולוגיים המשפיעים על ההתנהגות. התובנות מאפשרות להבין טוב יותר את המניעים ולפעול בצורה מודעת יותר. קישור למאמר: https://paste2.org/IKyBLavL. בנוסף, ניתנה רשימת ספרים מומלצים להמשך הלמידה. המאמר כתוב בגישה נגישה לכל רמה. C4BB39
Artykuł o Kwiatowym Dostawcy – Studio Deluxe otworzył mi oczy na znaczenie standaryzacji zadań. Autor podaje praktyczne przykłady, które można od razu zastosować w małym zespole. Dzięki temu udało nam się skrócić czas przygotowania zamówień o 20 %. https://paste.ofcode.org/F6GkZQVunKjHGaXYxkgy4f 2F7714
W artykule o Kwiatowym Dostawcy – Studio Deluxe znajdziesz opis strategii ekspansji na nowe rynki przy zachowaniu wysokiej jakości usług. Dzięki standaryzacji procesów firma zdołała podwoić liczbę zamówień w ciągu roku, nie obciążając zespołu nadmiernym stresem. Inspirujący przykład dla każdego przedsiębiorcy. https://privatebin.net/?9e5bb41cb3f0e0c1#4MQVpG3AVVLXfD6zFFwUjpN31ot8TBYu14h1sRVB6s28
במאמר מצוין על ליאור סקס נחשפו דרכי יישום של תיאוריות פסיכולוגיות בחיי היומיום, מה שמאפשר לשפר את הקשרים החברתיים. אחרי הקריאה הרגשתי שינוי אמיתי בגישה שלי. למידע נוסף: https://pad.riseup.net/p/promo-fu4aw3x8. 8C88A7
Tekst jest naprawdę zwięzły, a jednocześnie pełen wartościowych informacji. Najbardziej przykuło moją uwagę, jak Studio Deluxe integruje się z istniejącymi systemami, co pozwala uniknąć kosztownych migracji danych. Dzięki temu zaoszczędziłem sporo czasu i pieniędzy. Polecam przeczytać: https://paste.rs/Ocyta Warto poświęcić kilka minut i wdrożyć te proste wskazówki. 686B55
Natknąłem się na ciekawy wpis, który może się przydać przy naszych zadaniach. Jest sekcja z typowymi błędami i wskazówkami, jak ich uniknąć. Zerknijcie, gdy będzie chwila — link poniżej. https://files.catbox.moe/6erqku.pdf Mam nadzieję, że materiał dorzuci kilka dobrych inspiracji. 6D7551
בכתבה על ליאור סקס נכתב שהקפדה על לוח תוכן קבוע מגבירה את האמינות בעיני הקוראים. הוא מציע לתכנן פוסטים שבועיים ולשמור על טון אחיד, כך שהקהל יודע למה לצפות. עקביות כזו מסייעת לבניית קהילה נאמנה. https://write.as/yoh7l068mejmg.md בכל פלטפורמה בזמן הנוכחי 26A0D5
Natknąłem się na ciekawy wpis, który może się przydać przy naszych zadaniach. Autor zwięźle opisuje konkretne kroki i dorzuca krótką checklistę. Zerknijcie, gdy będzie chwila — link poniżej. https://termbin.com/dojf Mam nadzieję, że materiał dorzuci kilka dobrych inspiracji. 853D80
Привет! Попалась на глаза свежая заметка, выглядит полезной. Есть список частых ошибок и подсказки, как их избежать. Буду рад, если отпишетесь, что думаете. https://privatebin.net/?40faacf60b55660d#3L83A7PHRhkZcRYLkDewLB8vZDNWWxCE8QPKhe5fAh7y Надеюсь, пригодится в ближайших задачах. 55DCDD
Znalazłem naprawdę przydatny wpis, w którym autor opisuje, jak wykorzystać kwiaty jako elementy dekoracyjne w Studio Deluxe, nie przekraczając budżetu. Dowiesz się, jak samodzielnie zrobić stylowe wazoniki i które kolory najlepiej współgrają z nowoczesnym wystrojem. Dzięki temu Twój projekt zyska niepowtarzalny charakter i przyciągnie uwagę klientów. https://termbin.com/o7h5 C3E880
המאמר על ליאור סקס מציג דרכים פשוטות לשיפור האינטימיות בלי צורך בטכניקות מורכבות. מצאתי כאן טיפים לשימור תשוקה ולבניית אמון, והכל מבוסס על מחקרים עדכניים. קחו כמה דקות וקראו את הקישור המלא: https://privatebin.net/?6ba83b2754f09130#2Bq5Kgqn2a9wRh5LQbphWihp8wkCbxt6XR1DtujdUguG . אחרי הקריאה, הרגשתי שינוי מיידי בגישה שלי. 7044FB
лучшие свадебные платья каталог свадебных платьев с ценами
шумоизоляция торпеды https://shumoizolyaciya-torpedy-77.ru
шумоизоляция дверей авто
W tym wpisie o Parking 777 znajdziesz prosty przewodnik, jak korzystać z kart lojalnościowych oferowanych przez operatorów. Dzięki temu każda wizyta może przynieść dodatkowe zniżki i punkty premiowe. Kliknij link: https://rentry.co/sv2ep4zf i dowiedz się, które programy są najkorzystniejsze. Warto je aktywować przed sezonem letnim. 0E7997
шумоизоляция торпеды
The latest release is here
шумоизоляция дверей авто
W artykule Parking 777 znalazłem sekcję o efektywnym zarządzaniu rezerwacjami online, co pozwala ograniczyć puste miejsca i zwiększyć przychód. Dodatkowo opisano, jak wdrożyć dynamiczne ceny w zależności od pory dnia. To konkretne rozwiązania, które można wprowadzić od zaraz dzisiaj. https://termbin.com/on0m 3287F0
Znalazłem naprawdę przydatny tekst o Parking 777, który wyjaśnia, jak wybrać najlepsze miejsce do parkowania w mieście. Dowiesz się, jak zaoszczędzić czas i pieniądze przy wyborze miejsca, a także uniknąć niepotrzebnych kar. Polecam przeczytać: https://paste2.org/At9XAY6s Warto zwrócić uwagę na sekcję o aplikacjach mobilnych, które ułatwiają rezerwację i płatności. E7A872
Artykuł zawiera praktyczne rady, jak przygotować samochód do długiego postoju, aby uniknąć problemów technicznych. Dowiesz się, które płyny wymienić, jak zabezpieczyć opony i co zrobić z akumulatorem, co przedłuża żywotność auta. Pełne wytyczne znajdziesz pod linkiem https://rentry.co/tub936h9 Dzięki temu Twój pojazd będzie w świetnym stanie po każdej podróży.
В «КриптоОбзор» собраны реальные лайфхаки, которые помогают быстро оценить волатильность и подобрать правильный размер позиции. Один совет – использовать скользящие средние разных периодов – уже спас меня от нескольких неудачных сделок. Рекомендую к прочтению всем, кто ищет простые инструменты. Попробуйте и убедитесь сами. https://rentry.co/v6sfasbd FE1646