TKG Series
- [TKG Series – Part 1] VMware Tanzu Kubernetes Grid introduction and installation
- [TKG Series – Part 2] Install Kubernetes Cluster(s) using Tanzu Kubernetes Grid
- [TKG Series – Part 3] Creating custom plan in Tanzu Kubernetes Grid
This is going to be a long post as I will try to keep it as detailed as possible.
Quick Introduction
VMware Tanzu Kubernetes Grid (TKG for short) is the rebranded PKS Essentials from VMware PLUS much more feature than its previous iteration. TKG offers automated k8s installation using ClusterAPI which enables it to have consistent experience to different cloud (AWS and vSphere).
I’m excited on the release of this as i’ve experienced first hand the hit-or-miss way of setting up a kubernetes cluster. Before, I use to do the installation using ansible-powered kube-spray that uses kubeadm. It works but it gets hard to maintain if you need to change any parameters or had to work with different OS. Also, you need to prepare the container hosts prior to execution hence an IaaS orchestration is needed – I used to use terraform for this.
Now, the ClusterAPI way of installation provides both infrastructure and bootstrapping the kubernetes installation in one interface. It manages the whole lifecycle of the cluster which simplifies the whole process significantly. ClusterAPI is part of k8s SIGS which is being developed by the community across different end-points: Here is the vSphere page: https://github.com/kubernetes-sigs/cluster-api-provider-vsphere

Back to TKG: before I start, I’ll enumerate the pre-requisite needed to keep things moving:
Pre-requisites
- Control VM (or desktop running linux/mac)
- This is where we will be initiating the tkg cli and the whole installation. As i’m using windows, I prefer to have this on a single VM server running Ubuntu 18.04 (with atleast 4GB memory).
- The following needs to be installed configured:
- govc
- kubectl
- docker
- https://docs.docker.com/install/linux/docker-ce/ubuntu/
- Why the need for docker on a control-vm? Because, as part of TKG installation, it creates a local k8s cluster on the VM and use this to boot-strap the tkg installation on the target. The local k8s/container gets deleted after installation
- vSphere 6.7 U3 environment
- Network with DHCP Server
- Nodes provisioned relies on DHCP IP
- Internet Access
- Needs internet to pull images
- Tanzu Kubernetes Grid (TKG) official download page
Installation
- Upload all necessary files to the control VM (or where you’ll be performing the installation)
- photon with kubernetes (photon-3-v1.17.3+vmware.2.ova)
- This will be used for cloning master and worker nodes
- photon with capv+haproxy (photon-3-capv-haproxy-v0.6.3+vmware.1.ova)
- This will be used to setup haproxy for the master nodes and running the clusterAPI.
- HAProxy/LB is installed even if you have one master node as to aid with scale operation of master node
- photon with kubernetes (photon-3-v1.17.3+vmware.2.ova)
- Create json spec for the OVA payload. Specify a valid network for the OVA
- Make sure govc is pre-setup to connect to the target vCenter
- https://letsdocloud.com/?p=666
govc import.spec photon-3-v1.17.3+vmware.2.ova | jq '.Name="photon-3-v1.17.3+vmware.2"' | jq '.NetworkMapping[0].Network="DR-Overlay"' > photon-3-v1.17.3+vmware.1.json
- Import the ova to vCenter and specify the JSON object that was created on the previous step
govc import.ova -options=photon-3-v1.17.3+vmware.2.json photon-3-v1.17.3+vmware.2.ova

- Do the same for the ha-proxy ova
- After uploading BOTH ova, mark them as template
govc vm.markastemplate photon-3-v1.17.3+vmware.2

govc vm.markastemplate photon-3-capv-haproxy-v0.6.3+vmware.1
- Next, we download tkg – i’m using pre-GA build. Extract it and move to local $PATH. In my case, its under /usr/loca/bin
gz -d tkg-linux-amd64-v1.0.0+vmware.1.gz

chmod +x tkg-linux-amd64-v1.0.0+vmware.1

mv tkg-linux-amd64-v1.0.0+vmware.1 /usr/local/bin/tkg
- Once we are done, we ready to initialize the tkg management cluster
- tkg cluster will be used to spawn/ manage the different k8s cluster. Think of it as the provider cluster for our future k8s cluster(s)
- If you are running a control-VM or have installed all the components from a remote server, you need to re-establish SSH connection with the following tunneling options. This is because tkg init will launch a WebUI where you’ll be asked to install options
- For the below, I tunneled remote 8080 to port 9000 of my laptop (because after it’s done – it’s awesomeness will be over 9000! ;))

- In the SSH session, launch tkg init with ui option
tkg init --ui -v 6
- From your browser, browse http://127.0.0.1:9000 (or whichever port you chose in the SSH/putty tunnel before connecting)

- Next, we go through the installation wizard. The first page asks you for the vCenter server and public ssh key. The SSH key will be used to login to the deployed VMs.
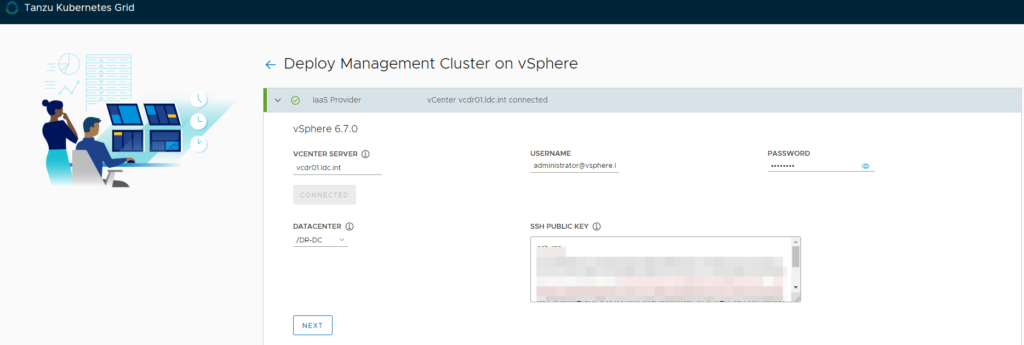
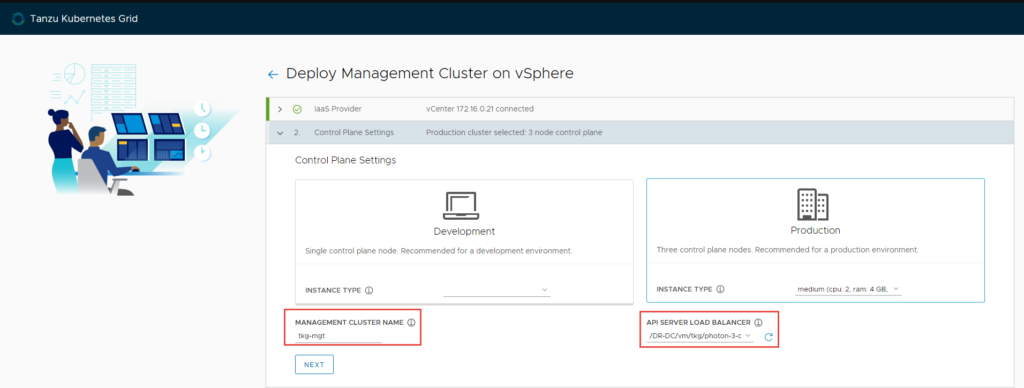
- On the next page, you need to select the type of installation
- For production install, you need to specify the ha-proxy template that will act as the load balancer for the management plane.
- This is also the place to name the tkg management plane
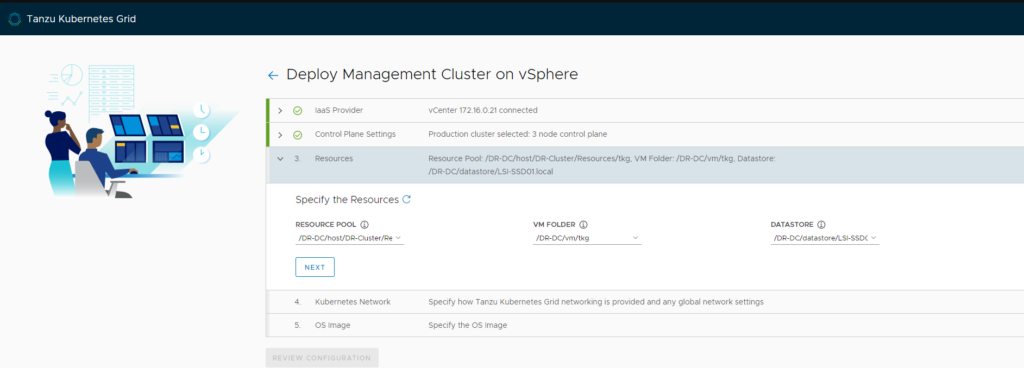
- Then the target resource pool/ VM folder/ datastore
- I’ve decided to put mine in its own resource pool
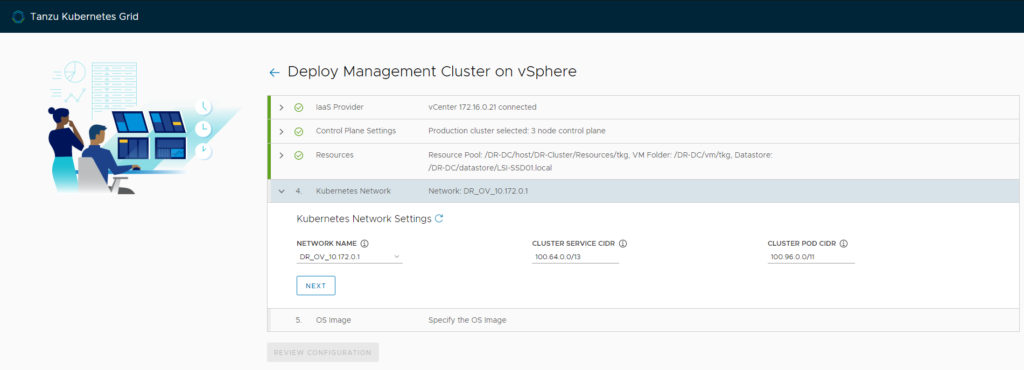
- Next, the target network portgroup and CIDR for cluster and pods (customize in case there’s conflict in your nextwork)
- Portgroup can be standard PortGroup, dvPortGroup, or any NSX-T segment
- Make sure it’s running DHCP
- Last, specify the photon+kubernetes template
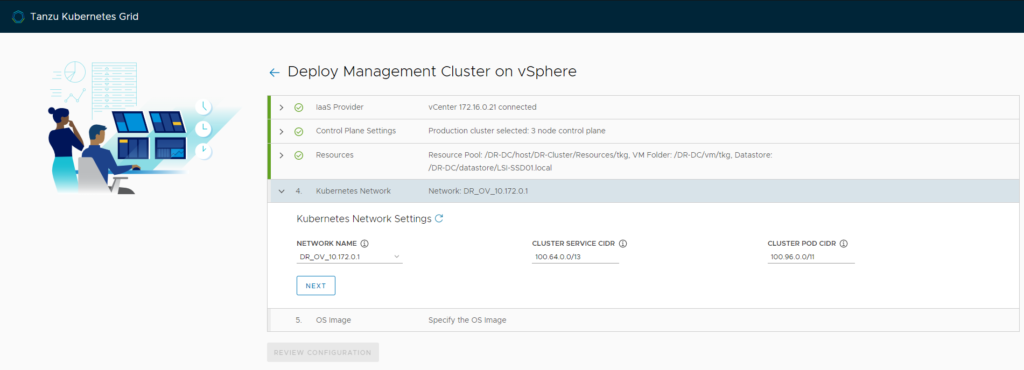
- Review config and deploy!
- While deploying, progress will be shown on the SSH session
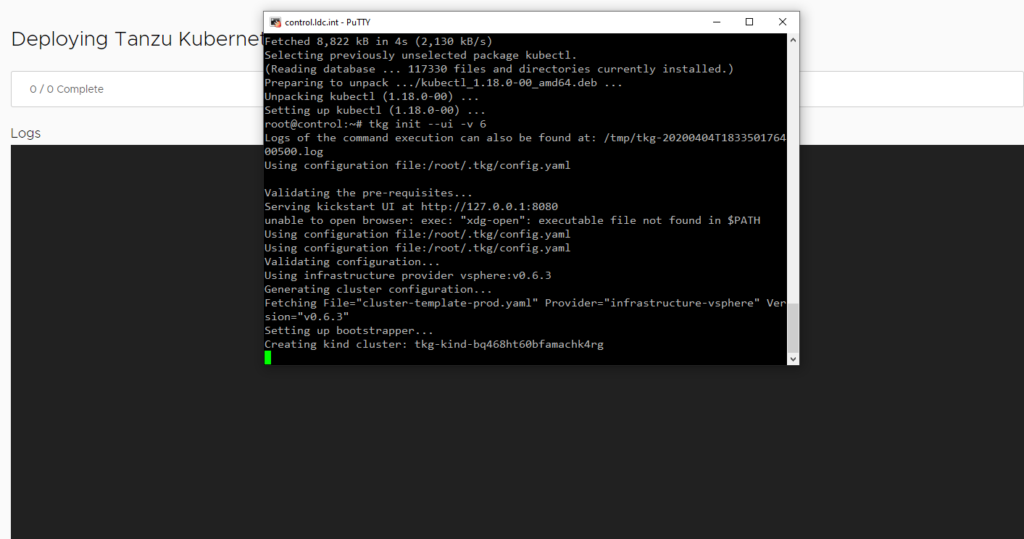
- You can watch the progress by initiating another SSH session and watching pods gets created using kubectl

Verify Installation
- Invoke the following
tkg get management-cluster

kubectl get nodes

- Verify SSH to the deployed VMs
- This verifies your Public SSH key specified in the installation works
- use capv user

Deleting tkg management cluster
The following commands deletes the target tkg management cluster. This also deletes the associated VMs
tkg delete management-cluster

After the operation, its best to delete the ~/.tkg folder in your control VM (or laptop) as well to ensure previous tkg configurations are also deleted.
In my next post, I’ll be describing how to create kubernetes clusters using tkg



This is a great write-up. Thank you for taking the time to publish this. I am looking to install TKG and related components on vSphere 7. Before I get started, do you see any reasons why this guide will not work for me? Are the differences between 6.7 and 7 significant enough to be a barrier? Note that I am a developer with many years of experience developing code, but only about a year of solid devops experience.
Pingback: A private cloud – all for myself » Goodbye Metallb – Hello AVI LB. How to use Avi LB on your on-prem kubernetes